
Astro Pneumatic Tool EUROHE103
Astro EUROHE103 EuroPro High Efficiency/High Transfer Spray Gun User Manual
Model: EUROHE103 | Brand: Astro Pneumatic Tool
1. Product Overview
The Astro EUROHE103 EuroPro High Efficiency/High Transfer Spray Gun is designed for professional bodywork applications, offering superior atomization and transfer efficiency. Its anodized body ensures corrosion protection and easy cleaning, while the stainless steel needle and fluid tip enhance durability. This spray gun features an innovative High Efficiency (HE) advanced technology for optimal coverage and reduced overspray.
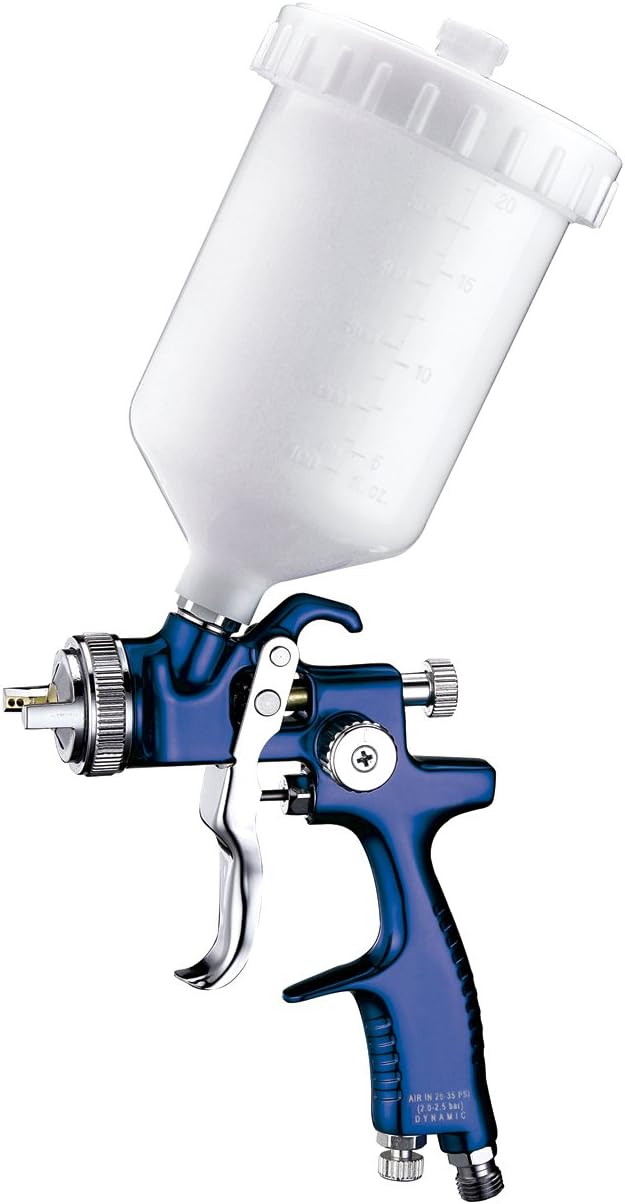
Image 1.1: The Astro EUROHE103 EuroPro High Efficiency/High Transfer Spray Gun, featuring a blue body, chrome accents, and a white plastic cup mounted on top. This is the primary view of the product.
Key Features:
- High Efficiency/High Transfer: Cuts down on spray time, requires less overlap than traditional HVLP's, and provides great transfer efficiency with superior atomization.
- Durable Construction: Anodized body for corrosion protection, slick finish for easier cleaning, and internal coated passages with stainless needle and fluid tip.
- Quick Thread Technology: Features 1 turn to lock/unlock the air cap and 3 turns to lock/unlock the fluid tip, with wide threads for easy cleaning.
- Smooth Operation: Soft trigger pull to reduce fatigue and precise lubricated adjustment knobs for better control.
- Versatile Compatibility: M16*P1.5 female thread fluid joint compatible with most traditional and disposable cup systems.
2. Setup and Assembly
Before initial use, ensure all components are present and properly assembled. The spray gun comes with a plastic cup and is designed for straightforward setup.
Assembly Steps:
- Attach Plastic Cup: Securely screw the provided 600ml plastic cup onto the fluid joint of the spray gun. The M16*P1.5 female thread ensures compatibility.
- Install Air Cap: Align the air cap with the gun body and turn it one full rotation to lock it into place.
- Install Fluid Tip: If not already installed, carefully insert the 1.3mm fluid tip and turn it three full rotations to lock it securely. The wide threads facilitate easy installation and removal.
- Connect Air Supply: Attach your air hose to the 1/4" NPT air inlet thread on the bottom of the gun handle. Ensure a secure, leak-free connection.

Image 2.1: A detailed view of the spray gun, possibly showing the nozzle, air cap, and fluid tip area, highlighting the quick-thread mechanism for assembly.
3. Operating Instructions
Proper operation of the Astro EUROHE103 spray gun ensures optimal finish quality and efficiency.
Preparation:
- Material Preparation: Ensure your paint or coating material is properly mixed and thinned according to the manufacturer's specifications.
- Fill Cup: Pour the prepared material into the 600ml plastic cup.
Spraying:
- Set Air Pressure: Connect the gun to an air compressor. The recommended operation pressure is 29 psi. Adjust your air regulator to achieve this pressure while the trigger is pulled. Average air consumption is 10.5-12.5 cfm.
- Adjust Fan Pattern: Use the adjustment knobs to control the fan pattern and fluid flow. The gun is designed for a wide pattern, with a maximum pattern of 11-13 inches (280-330mm) at a distance of 6-8 inches from the surface.
- Test Spray: Before applying to your workpiece, perform a test spray on a scrap piece of material to verify the pattern, atomization, and fluid output.
- Apply Material: Maintain a consistent distance (6-8 inches) and speed while spraying. The soft trigger pull reduces fatigue during extended use.

Image 3.1: Packaging detail highlighting key features such as High Efficiency, Quick Thread Technology, and Smooth Operation, providing visual cues for operational aspects.
4. Maintenance and Cleaning
Regular cleaning and maintenance are crucial for the longevity and optimal performance of your Astro EUROHE103 spray gun. The anodized body and internal coated passages are designed for easier cleaning.
Cleaning Steps:
- Empty Cup: After each use, empty any remaining material from the plastic cup.
- Flush Gun: Pour an appropriate cleaning solvent (compatible with your material) into the cup and spray it through the gun until clear.
- Disassemble for Deep Cleaning:
- Remove the plastic cup.
- Unscrew the air cap (1 turn).
- Unscrew the fluid tip (3 turns). The wide threads make this process easier.
- Carefully remove the needle.
- Clean Components: Clean all disassembled parts (cup, air cap, fluid tip, needle, gun body passages) thoroughly with cleaning brushes and solvent. The slick finish and internal coated passages aid in this process.
- Inspect and Lubricate: Inspect all parts for wear or damage. Lubricate the needle and adjustment knobs with a suitable lubricant to ensure smooth operation.
- Reassemble: Reassemble the gun in reverse order, ensuring all parts are securely fastened.
Important: Refer to product packaging for safety instructions, including proper handling, usage, maintenance, and disposal. Be cautious of pressurized liquids, chemical exposure, and mechanical risks. Ensure safe operation by handling the product with care, following compressor guidelines, and maintaining the forged body and anodized coating for longer tool life.
5. Troubleshooting
This section addresses common issues you might encounter with your spray gun.
| Problem | Possible Cause | Solution |
|---|---|---|
| Poor Atomization / Uneven Spray Pattern |
|
|
| Fluid Leaking from Nozzle |
|
|
| Trigger Sticking |
|
|
| Difficulty Removing Needle Cap/Fluid Tip |
|
|
6. Specifications
Detailed technical specifications for the Astro EUROHE103 EuroPro Spray Gun.
| Feature | Detail |
|---|---|
| Model Name | EUROHE103 |
| Nozzle Size | 1.3mm |
| Cup Capacity | 600ml |
| Operation Pressure | 29 psi |
| Average Air Consumption | 10.5 - 12.5 cfm |
| Item Weight | 0.7 lbs (325g) |
| Dimensions (W x H) | 7" x 5-3/4" (175mm x 145mm) |
| Air Inlet Thread | 1/4" NPT |
| Fluid Joint Thread | M16*P1.5 female thread |
| Max. Pattern at 6"-8" Distance | 11" - 13" (280-330mm) |
| Material | Anodized body, Stainless steel needle and fluid tip, Plastic cup |
| Color | Blue, Silver, White |
| UPC | 013317011423, 745227014101 |

Image 6.1: A visual representation of the spray gun's dimensions, indicating a height of 9.2 inches (23 cm) for reference.
7. Warranty and Support
The Astro EUROHE103 EuroPro High Efficiency/High Transfer Spray Gun comes with a manufacturer's warranty and support options.
Warranty Information:
This product is covered by a 1-year warranty on material and workmanship from the date of purchase.
Customer Support:
For further assistance, technical support, or to inquire about replacement parts, please visit the official Astro Pneumatic Tool Store or contact their customer service.
Official Brand Store: Astro Pneumatic Tool Store on Amazon
Ask a question about this manual
Ask about setup, troubleshooting, compatibility, parts, safety, or missing instructions. Manuals+ will review the question and use this page’s manual context to help answer it.