1. Introduction and Overview
The Digital Reference DRDK7 is a comprehensive 7-piece drum microphone kit designed for capturing the sound of a drum set in both live performance and studio recording environments. This kit provides a specialized microphone for each component of a drum kit, ensuring optimal sound reproduction. The included microphones are engineered for clarity, punch, and detail, offering a professional miking solution with minimal visibility and secure mounting options.

Image 1.1: The DRDK7 7-piece drum microphone kit neatly organized within its protective hardshell carrying case, showcasing all microphones and their respective clips.
2. Product Contents
The DRDK7 kit includes the following components:
- 1 x DR-K100 Kick Drum Microphone: Designed for low-frequency capture with a clip.
- 4 x DR-ST100 Snare/Tom Microphones: Optimized for snare and tom drums, includes clips for rim mounting.
- 2 x DR-C100 Condenser Overhead Microphones: For cymbal and overall kit sound, includes clips.
- 1 x Hardshell Carrying Case: With die-cut foam compartments for secure storage and transport.

Image 2.1: The retail packaging for the DRDK7 kit, illustrating the various microphones and their intended use on a drum set.
3. Setup Instructions
Proper microphone placement is crucial for achieving optimal sound quality. Follow these steps for setting up your DRDK7 kit:
3.1 DR-K100 Kick Drum Microphone Setup
Position the DR-K100 inside or just outside the kick drum's resonant head. Experiment with distance and angle to capture the desired attack and low-end thump. Use the included clip to secure the microphone.

Image 3.1: Close-up view of the DR-K100 kick drum microphone, showing its robust design and integrated clip for secure placement.
3.2 DR-ST100 Snare/Tom Microphone Setup
Attach the DR-ST100 microphones to the rims of your snare and tom drums using the provided clips. Aim the microphone capsule towards the center of the drum head, approximately 1-2 inches from the rim. Adjust the angle to balance the attack of the stick with the resonance of the drum.

Image 3.2: The DR-ST100 snare/tom microphone, featuring its compact design and rim-mount clip for easy attachment to drum hardware.
3.3 DR-C100 Condenser Overhead Microphone Setup
Mount the two DR-C100 condenser microphones on stands (not included) above the drum kit. These microphones are designed to capture the cymbals and the overall stereo image of the drum set. Common overhead miking techniques include spaced pair or X/Y configurations. Ensure they are positioned to avoid phase issues and capture a balanced sound.
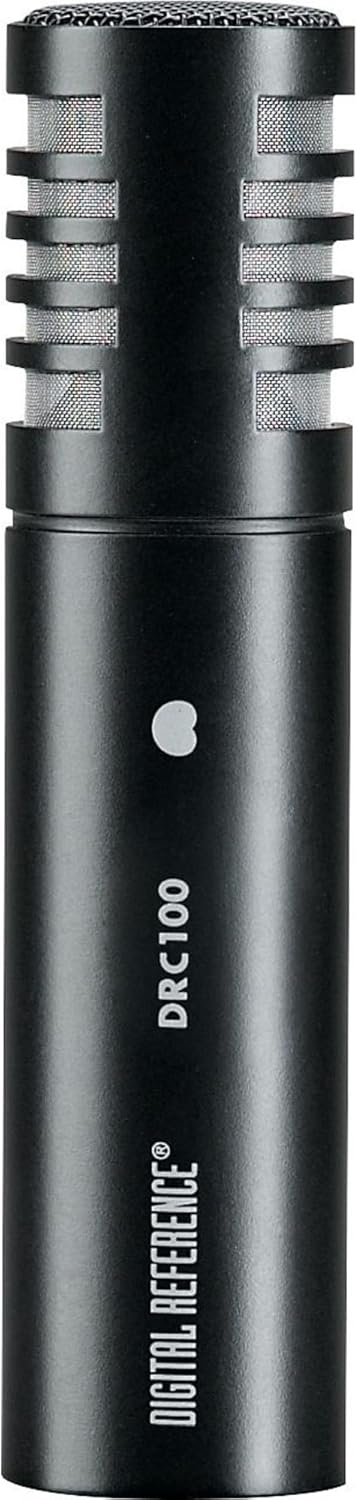
Image 3.3: A detailed view of the DR-C100 condenser microphone, highlighting its slender profile suitable for overhead placement.
3.4 Connecting to a Mixer/PA System
All microphones in the DRDK7 kit utilize standard XLR connectors. Connect each microphone to an available XLR input on your audio mixer or PA system. The DR-C100 condenser microphones require 48V phantom power, which must be enabled on your mixer's input channels for these microphones to function correctly. Ensure all cables are securely connected.
4. Operating Guidelines
Once the microphones are physically set up and connected, follow these guidelines for operation:
- Phantom Power: Activate 48V phantom power on your mixer for the channels connected to the DR-C100 condenser microphones. The DR-K100 and DR-ST100 dynamic microphones do not require phantom power.
- Gain Staging: Adjust the gain (trim) control on each mixer channel to achieve a healthy signal level without clipping. Start with the gain low and gradually increase it while the drummer plays.
- Equalization (EQ): Use your mixer's EQ controls to shape the tone of each drum. For kick drums, you might boost low frequencies and cut some mid-range. For snare and toms, focus on attack and body. Overheads typically benefit from high-frequency boosts for cymbal clarity.
- Polar Pattern: All microphones in this kit feature a unidirectional (cardioid) polar pattern. This means they are most sensitive to sound coming from the front and reject sound from the sides and rear, helping to minimize bleed from other instruments and reduce feedback.
- Monitoring: Listen to the drum sound through headphones or studio monitors to make fine adjustments to placement, gain, and EQ.
5. Maintenance
To ensure the longevity and optimal performance of your Digital Reference DRDK7 microphone kit, adhere to the following maintenance practices:
- Cleaning: Gently wipe the microphone bodies with a soft, dry cloth. For microphone grilles, use a soft brush to remove dust or debris. Avoid using liquid cleaners directly on the microphones, especially on the capsules.
- Storage: Always store the microphones in the provided hardshell carrying case when not in use. The die-cut foam compartments protect each microphone from physical damage and environmental factors like dust and moisture.
- Handling: Handle microphones with care. Avoid dropping them or subjecting them to excessive force, as this can damage internal components or the microphone capsule.
- Cable Management: Coil XLR cables properly after each use to prevent kinks and damage. Damaged cables can lead to intermittent sound or signal loss.
6. Troubleshooting
If you encounter issues with your DRDK7 microphone kit, consult the following troubleshooting guide:
- No Sound from a Microphone:
- Check all XLR cable connections at both the microphone and the mixer.
- Ensure the correct input channel is selected on the mixer.
- For DR-C100 condenser microphones, verify that 48V phantom power is enabled on the corresponding mixer channel.
- Increase the gain (trim) control on the mixer channel.
- Test with a different XLR cable or mixer channel to rule out faulty equipment.
- Low or Weak Sound:
- Increase the gain (trim) on the mixer channel.
- Ensure the microphone is positioned close enough to the sound source.
- Check for proper phantom power for condenser mics.
- Distorted Sound:
- Reduce the gain (trim) on the mixer channel to prevent clipping.
- Ensure the microphone is not overloaded by an excessively loud sound source; reposition if necessary.
- Check for damaged cables.
- Feedback (High-Pitched Squeal):
- Reposition microphones further away from speakers or monitors.
- Reduce the gain on the affected microphone channel.
- Use your mixer's EQ to cut frequencies that are feeding back.
- Ensure the unidirectional polar pattern is correctly oriented towards the sound source and away from monitors.
7. Specifications
Detailed technical specifications for the Digital Reference DRDK7 7-Piece Drum Microphone Kit:
| Feature | Specification |
|---|---|
| Model Name | DRDK7 |
| Brand | Digital Reference |
| Item Weight | 6.15 pounds |
| Product Dimensions (L x W x H) | 16.5 x 12.5 x 4.9 inches |
| Microphone Form Factor | Overhead (for DR-C100), Instrument (for DR-K100, DR-ST100) |
| Power Source | Corded Electric (Phantom Power for DR-C100) |
| Material | Foam (case interior) |
| Signal-to-Noise Ratio | 78 dB |
| Hardware Platform | Karaoke Machine (Compatible) |
| Number of Channels | 1 (per microphone) |
| Connectivity Technology | XLR |
| Connector Type | XLR |
| Special Feature | Clip (for mounting) |
| Compatible Devices | PA System |
| Polar Pattern | Unidirectional |
| UPC | 656238012928 |
8. Warranty and Support
For information regarding product warranty, technical support, or service, please refer to the documentation included with your purchase or visit the official Digital Reference website. Contact details for customer support are typically available on the manufacturer's website.