Introduction
This manual provides detailed instructions for the setup, operation, and maintenance of your Sangean RCR-10 AM/FM-RDS Atomic Clock Radio with iPod Dock. Please read this manual thoroughly before using the device to ensure proper functionality and to maximize your user experience.
Product Features
- 10 station presets (5 FM, 5 AM) for quick access to your favorite radio stations.
- Integrated iPod dock for playing, charging, and cradling your iPod device.
- Comprehensive iPod Dock adjuster to accommodate various iPod models.
- Radio Controlled clock for automatic time synchronization (DCF and FM RDS-CT).
- Time zone selector switch for accurate time display across different regions.
- Two independent alarm timers with multiple wake-up options.
- Easy-to-read LCD display with adjustable backlight for optimal visibility in any lighting condition.
Setup
Follow these steps to set up your Sangean RCR-10 clock radio.
1. Power Connection
Connect the provided AC power adapter to the DC IN jack on the back of the unit and then plug it into a standard wall outlet. The unit will power on automatically.
2. Battery Backup Installation
The RCR-10 requires backup batteries (not included) to retain time and alarm settings during a power outage. Locate the battery compartment on the bottom of the unit, insert the required batteries (e.g., 2 x AA batteries) according to the polarity indicators, and close the compartment. Note that battery backup only saves settings; the alarm will not sound during a power outage without AC power.
3. Atomic Clock Synchronization
Upon initial power-up, the RCR-10 will attempt to synchronize its time with the atomic clock signal. This process may take several minutes. Ensure the unit is placed in an area with good reception for the atomic clock signal.
4. Time Zone Selection
After atomic synchronization, you may need to set your local time zone. Refer to the on-screen menu or dedicated buttons (if available) to select the correct time zone for your region. This ensures the displayed time is accurate.
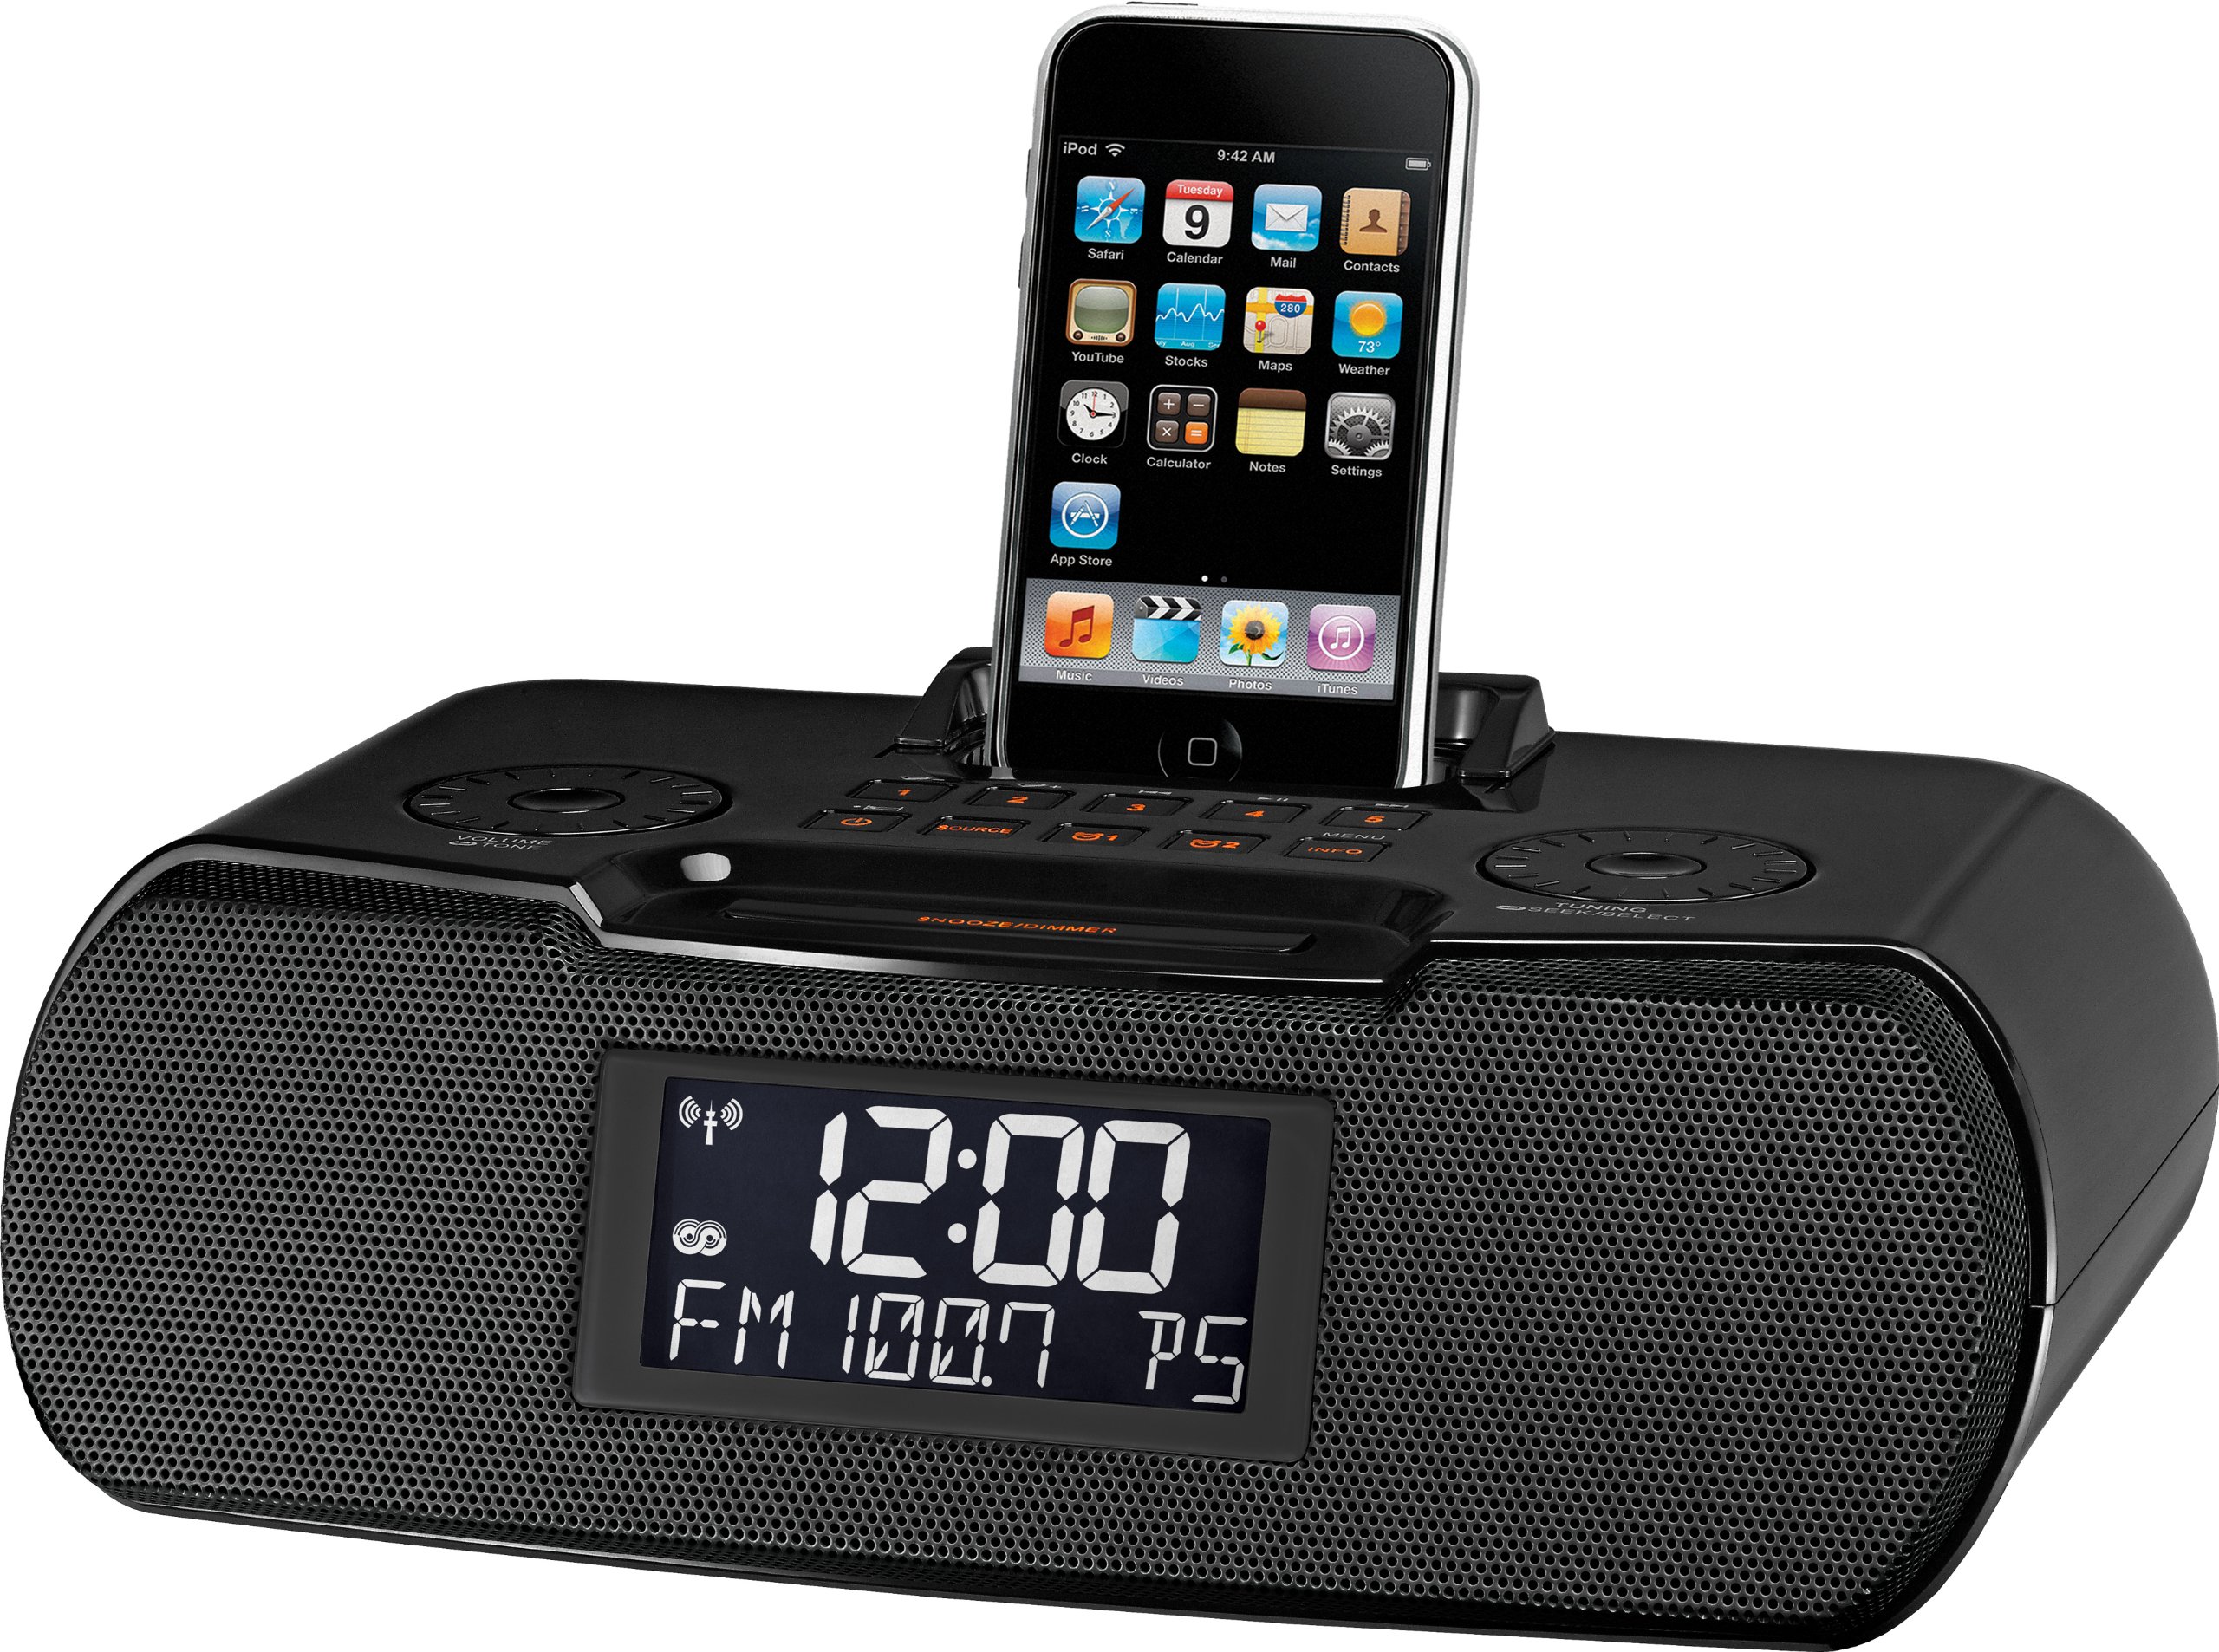
Image of the Sangean RCR-10 clock radio, showing its front panel with the display, controls, and iPod dock.
Operating Instructions
1. Basic Controls
The front panel of the RCR-10 features various buttons for control. Common controls include Power, Mode (to switch between FM, AM, iPod, AUX), Volume Up/Down, Tune Up/Down, Alarm Set, and Snooze/Dimmer. Familiarize yourself with these controls for easy operation.
2. Radio Operation (AM/FM)
- Selecting Band: Press the MODE button to switch between FM and AM bands.
- Tuning: Use the TUNE Up/Down buttons to manually tune to a desired frequency. For automatic scanning, press and hold the TUNE Up/Down button.
- Presets: To save a station, tune to the desired frequency, then press and hold a preset button (1-5 for each band) until the display confirms it's saved. To recall a preset, simply press the corresponding preset button.
- RDS (Radio Data System): When tuned to an FM station broadcasting RDS, information such as station name and program type may be displayed.
3. iPod Dock Operation
- Connecting iPod: Gently place your iPod into the retractable docking station. Adjust the dock's position if necessary to ensure a secure fit. The RCR-10 is compatible with most iPod models, excluding 3rd generation.
- Charging: Your iPod will begin charging automatically when docked and the RCR-10 is powered on.
- Playback: Press the MODE button to select the iPod source. Use the iPod's controls or the RCR-10's playback controls (if available) to manage music playback.
4. Alarm Settings
The RCR-10 features two independent alarms. Each alarm can be configured with specific wake-up times and sources.
- Setting Alarm Time: Press the ALARM 1 or ALARM 2 button. Use the TUNE Up/Down buttons to set the desired wake-up time, then confirm.
- Wake-up Source: Select your preferred wake-up source: iPod, Buzzer, or Radio. If choosing Radio, select a preset station.
- Alarm Frequency: Configure the alarm to sound daily, on weekdays only, or on weekends only.
- Snooze: When an alarm sounds, press the SNOOZE button to temporarily silence it for a set period.
- Disabling Alarm: Press the ALARM 1 or ALARM 2 button repeatedly until the alarm indicator disappears from the display.
5. Display Brightness
The LCD display's backlight is adjustable. Press the SNOOZE/DIMMER button (or a dedicated dimmer button) repeatedly to cycle through different brightness levels, including turning the backlight off completely for dark environments.
6. Auxiliary Input
The RCR-10 includes an auxiliary input jack (AUX IN) on the back. You can connect external audio devices, such as MP3 players or CD players, using a 3.5mm audio cable. Press the MODE button to select the AUX source for playback.
Maintenance
1. Cleaning
To clean the unit, use a soft, dry cloth. Do not use abrasive cleaners, waxes, or solvents, as these can damage the finish. Ensure the unit is unplugged before cleaning.
2. Battery Replacement
If the clock loses time or settings during a power outage, the backup batteries may need to be replaced. Follow the instructions in the Setup section for battery installation.
Troubleshooting
- No Power: Ensure the AC adapter is securely plugged into both the unit and a working wall outlet. Check the power outlet with another device.
- Poor Radio Reception: Extend the FM wire antenna fully and reposition it for better reception. For AM, try rotating the unit. Avoid placing the unit near other electronic devices that may cause interference.
- iPod Not Playing/Charging: Ensure the iPod is correctly seated in the dock. Verify that the iPod is compatible with the RCR-10 (not 3rd generation iPods). Check if the iPod source is selected.
- Alarm Not Sounding: Verify that the alarm is enabled and set to the correct time and frequency (daily, weekday, weekend). Ensure the volume is not set to minimum if using radio or iPod as the wake-up source. Remember that the alarm will not sound during a power outage if only relying on battery backup.
- Display Too Bright/Dim: Use the SNOOZE/DIMMER button to adjust the backlight brightness.
Specifications
| Feature | Specification |
|---|---|
| Product Dimensions | 10.5 x 3.3 x 7.1 inches |
| Item Weight | 2.5 pounds |
| Model Number | RCR-10 |
| Manufacturer | Sangean America, Inc. |
| Date First Available | July 29, 2010 |
Warranty and Support
Sangean products are designed for reliability and performance. For specific warranty information, please refer to the warranty card included with your product or visit the official Sangean website. For technical support or service inquiries, please contact Sangean customer service through their official channels.