Introduction
The Thermaltake Slim X3 (CLP0534) is a low-profile CPU cooler designed for efficient cooling in compact systems, such as Home Theater Personal Computers (HTPCs). It features a dual heatpipe design with aluminum fins and a 92mm fan, providing effective heat dissipation for Intel LGA775, LGA1156, and LGA1200 sockets. This manual provides essential information for the proper installation, operation, and maintenance of your CPU cooler.
Package Contents
- Thermaltake Slim X3 CPU Cooler (CLP0534)
- Mounting Hardware for Intel LGA775/1156/1200
- Thermal Paste (pre-applied or in a small tube)
- User Manual (this document)
Safety Information
Please read and understand all safety instructions before installation and use. Failure to follow these instructions may result in damage to the product, other components, or personal injury.
- Always disconnect power from your computer before installing or removing any components.
- Handle the CPU cooler and other components with care to avoid damage.
- Be aware of sharp edges on heatsink fins.
- Keep out of reach of children.
- Ensure proper grounding to prevent electrostatic discharge (ESD) damage.
Setup and Installation
This section guides you through the installation process of the Thermaltake Slim X3 CPU cooler on compatible Intel motherboards (LGA775, LGA1156, LGA1200).
- Prepare the Motherboard: Ensure your motherboard is removed from the PC case for easier installation. Clean the CPU surface thoroughly with isopropyl alcohol to remove any old thermal paste or residue.
- Apply Thermal Paste: If thermal paste is not pre-applied to the cooler's base, apply a small, pea-sized amount to the center of your CPU's Integrated Heat Spreader (IHS). Do not spread it manually; the pressure from the cooler will distribute it evenly.
- Position the Cooler: Carefully align the four mounting pins on the Slim X3 cooler with the four holes around the CPU socket on your motherboard.
- Secure the Cooler:
- For push-pin type installations, press down firmly on each pin in a diagonal pattern (e.g., top-left, bottom-right, top-right, bottom-left) until you hear a click. This indicates the pin is locked into place.
- Verify that all four pins are securely fastened and the cooler is stable on the CPU.
- Connect the Fan Cable: Locate the 4-pin CPU fan header on your motherboard. Connect the cooler's 4-pin fan cable to this header. Ensure the connector is oriented correctly.
- Final Check: Double-check all connections and ensure no cables are obstructing the fan blades or other components.

Figure 1: Thermaltake Slim X3 CPU Cooler. This image shows the top view of the cooler with its fan and heatsink fins, ready for installation.
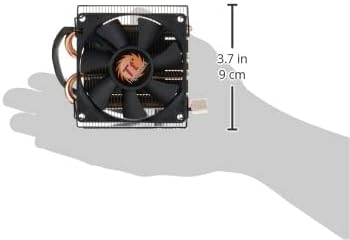
Figure 2: Dimensions of the Slim X3 CPU Cooler. This image illustrates the compact size of the cooler, highlighting its low profile suitable for small form factor cases.
Operating Instructions
The Thermaltake Slim X3 CPU cooler operates automatically once connected to the motherboard's 4-pin CPU fan header.
- PWM Functionality: The fan supports Pulse Width Modulation (PWM), allowing the motherboard to automatically adjust the fan speed based on the CPU temperature. This ensures optimal cooling performance while minimizing noise during lighter loads.
- Temperature Monitoring: You can monitor your CPU temperature and fan speed through your motherboard's BIOS/UEFI settings or compatible software provided by your motherboard manufacturer.
- Normal Operation: The fan will spin between 1200 and 2400 RPM, adjusting as needed to maintain safe CPU temperatures.
Maintenance
Regular maintenance helps ensure the longevity and optimal performance of your CPU cooler.
- Dust Removal: Periodically (e.g., every 3-6 months), power down your computer and disconnect it from the power source. Use compressed air to gently blow dust out of the heatsink fins and fan blades. Hold the fan blades to prevent them from spinning rapidly during cleaning, which can damage the bearings.
- Inspection: Check the fan blades for any obstructions or damage. Ensure the fan cable is securely connected.
- Thermal Paste: The thermal paste typically lasts for several years. If you notice consistently high CPU temperatures, consider reapplying fresh thermal paste after carefully cleaning the CPU and cooler base.
Troubleshooting
If you encounter issues with your Thermaltake Slim X3 CPU cooler, refer to the following common problems and solutions:
- Fan Not Spinning:
- Ensure the 4-pin fan cable is securely connected to the motherboard's CPU_FAN header.
- Check BIOS/UEFI settings to ensure the CPU fan is enabled and not set to a very low RPM profile that might appear as "off" at low temperatures.
- Test the fan on another fan header if available, or try a different fan if possible, to isolate the issue.
- High CPU Temperatures:
- Verify that the cooler is securely mounted to the CPU and making good contact. Re-seat if necessary.
- Ensure sufficient thermal paste was applied and properly spread. Reapply if unsure.
- Clean any dust accumulation from the heatsink fins and fan blades.
- Check for proper airflow within your PC case.
- Excessive Noise:
- Inspect the fan for any obstructions (e.g., loose cables) hitting the blades.
- Clean dust from the fan blades.
- If the noise is a grinding or rattling sound, the fan bearings may be failing. Consider replacing the fan.
- Check BIOS/UEFI settings for fan speed control; a very aggressive fan curve can lead to higher noise.
Specifications
| Feature | Specification |
|---|---|
| Model | CLP0534 |
| Fan Size | 80 x 80 x 15 mm |
| CPU Socket Compatibility | Intel LGA 1200 / 1156 / 1155 / 1151 / 775 |
| Fan Speed (RPM) | 1200 - 2400 RPM (PWM controlled) |
| Air Flow Capacity | 10.814 - 22.35 CFM |
| Noise Level | 20 - 26.9 dBA |
| Power Connector | 4-Pin |
| Heatsink Material | Aluminum Fins & Base, Dual Copper Heatpipes |
| Heatsink Dimensions (L x W x H) | 92 x 99 x 36 mm |
| Max CPU Cooler Height | 36 mm |
| Weight | 180 g (6.4 ounces) |
| Rated Voltage | 12 Volts |
| Max TDP Support | Up to 75W |
Warranty Information
The Thermaltake Slim X3 CPU Cooler (CLP0534) comes with a 3-year limited warranty from the date of purchase. This warranty covers defects in materials and workmanship under normal use.
The warranty does not cover damage resulting from:
- Improper installation or use not in accordance with this manual.
- Accident, abuse, misuse, or natural disaster.
- Unauthorized modification or repair.
- Normal wear and tear.
For warranty claims, please retain your proof of purchase and contact Thermaltake customer support.
Customer Support
If you require further assistance or have questions not covered in this manual, please visit the official Thermaltake website for support resources, FAQs, and contact information.
Thermaltake Official Website: www.thermaltake.com


