1. Introduction
This manual provides detailed instructions for the installation, operation, and maintenance of your Honeywell Home RTH6450D 5-1-1-Day Programmable Thermostat. This thermostat is designed to provide precise temperature control and energy savings through its programmable scheduling features. Please read this manual thoroughly before installation and use to ensure proper functionality and safety.

Figure 1.1: Front view of the Honeywell Home RTH6450D Programmable Thermostat, showing the digital display and control buttons.
2. Safety Information
Always observe the following safety precautions during installation and operation:
- Turn off power to the heating/cooling system at the circuit breaker or fuse box before installing or servicing the thermostat.
- Ensure all wiring connections are secure and comply with local electrical codes.
- Do not short circuit the battery terminals.
- Dispose of used batteries according to local regulations.
- This thermostat operates on 30 Volts AC/DC. Do not connect to higher voltage systems.
3. Setup and Installation
3.1 Pre-Installation Checklist
- Verify system compatibility: This thermostat is compatible with most single-stage heating and cooling systems, including heat pumps without auxiliary/backup heat.
- Gather tools: Small Phillips screwdriver, wire strippers (if needed), drill (if new mounting holes are required).
- Ensure power is off to the HVAC system.
3.2 Removing Your Old Thermostat
- Turn off power to your heating/cooling system at the circuit breaker or fuse box.
- Remove the cover of your old thermostat.
- Take a photograph of the wiring connections for reference. Label each wire with the terminal designation (e.g., R, G, Y, W) using the provided labels or tape.
- Disconnect the wires and remove the old thermostat's wall plate.
3.3 Mounting the New Thermostat
- Separate the new thermostat from its wall plate.
- Position the new wall plate against the wall, using existing mounting holes if possible. Mark new holes if necessary.
- Drill pilot holes (if needed) and secure the wall plate to the wall using the provided screws and anchors.
3.4 Wiring Connections
Connect the labeled wires from your system to the corresponding terminals on the new thermostat's wall plate. Refer to your photograph from step 3.2.3 for accurate connections. Ensure wires are securely fastened.

Figure 3.1: Side view of the Honeywell Home RTH6450D Thermostat, illustrating the physical buttons for control and adjustment.
3.5 Battery Installation
Insert 1 'A' battery (NiMH recommended) into the battery compartment of the thermostat. Ensure correct polarity. The thermostat will power on and prompt for initial setup.
3.6 Initial Configuration
After battery installation, the thermostat will guide you through initial setup, including setting the current time and day. Follow the on-screen prompts and use the Up/Down buttons to adjust values and the 'Set Clock/Day/Schedule' button to confirm.
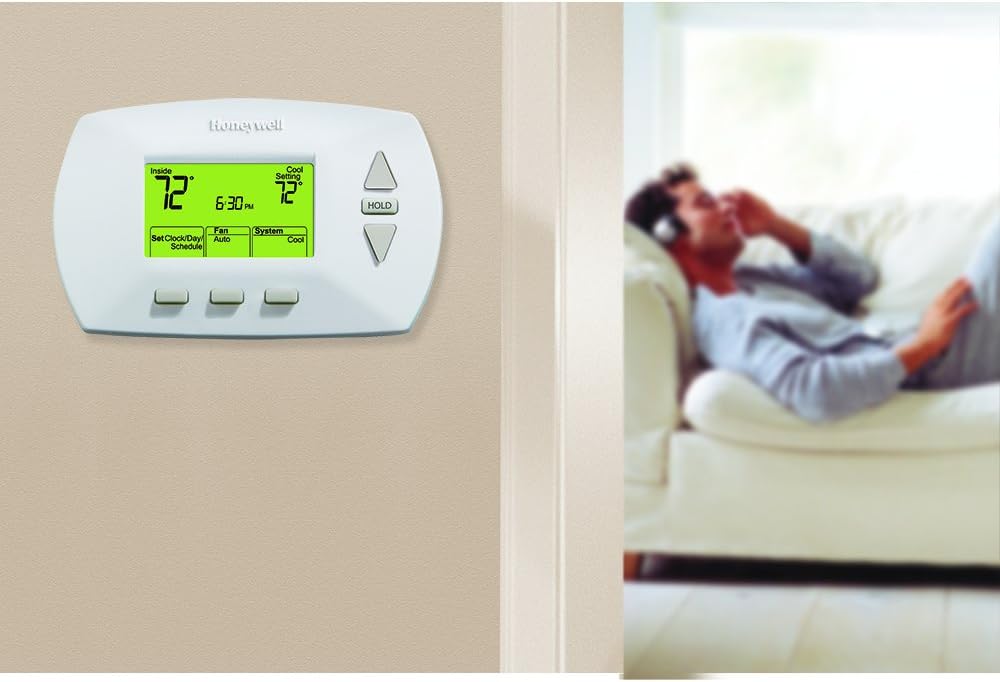
Figure 3.2: The Honeywell Home RTH6450D Thermostat mounted on a wall, demonstrating its appearance in a typical home environment.
4. Operating Instructions
4.1 Understanding the Display
The large backlit digital display shows the current room temperature, set temperature, time, day, and system status (Heat, Cool, Off, Fan Auto, Fan On).
4.2 Setting the Clock and Day
- Press the 'Set Clock/Day/Schedule' button.
- Use the Up/Down buttons to adjust the time. Press 'Set Clock/Day/Schedule' to confirm.
- Use the Up/Down buttons to set the current day. Press 'Set Clock/Day/Schedule' to confirm and exit.
4.3 Programming the 5-1-1 Day Schedule
The 5-1-1 day programming allows for one schedule for weekdays (Monday-Friday) and separate schedules for Saturday and Sunday. Each day has four programmable periods: Wake, Leave, Return, and Sleep.
- Press the 'Set Clock/Day/Schedule' button repeatedly until 'Set Schedule' appears.
- Use the Up/Down buttons to adjust the start time for the 'Wake' period for weekdays. Press 'Set Clock/Day/Schedule' to confirm.
- Use the Up/Down buttons to adjust the temperature for the 'Wake' period. Press 'Set Clock/Day/Schedule' to confirm.
- Repeat steps 2 and 3 for the 'Leave', 'Return', and 'Sleep' periods for weekdays.
- After programming weekdays, the thermostat will automatically move to Saturday's 'Wake' period. Repeat the process for Saturday and then Sunday.
- Press 'Run Schedule' to save and exit programming mode.
4.4 Manual Override (Hold Function)
To temporarily override the programmed schedule, use the Up/Down buttons to adjust the temperature. The new temperature will be maintained until the next programmed period begins. To permanently hold a temperature, press the 'HOLD' button. The thermostat will maintain this temperature indefinitely until 'Run Schedule' is pressed again.
4.5 Fan Settings
- Auto: The fan runs only when the heating or cooling system is operating. This is the most common setting.
- On: The fan runs continuously, regardless of whether the heating or cooling system is active.
4.6 System Mode
- Heat: The thermostat controls the heating system.
- Cool: The thermostat controls the cooling system.
- Off: Both heating and cooling systems are turned off.
5. Maintenance
5.1 Battery Replacement
When the low battery indicator appears on the display, replace the batteries promptly. Open the battery compartment, remove the old batteries, and insert new 'A' batteries, ensuring correct polarity. The thermostat retains its programming for a short period during battery replacement.
5.2 Cleaning
Clean the thermostat's exterior with a soft, damp cloth. Do not use abrasive cleaners or solvents. Avoid spraying liquids directly onto the thermostat.
6. Troubleshooting
If you experience issues with your thermostat, refer to the following common problems and solutions:
| Problem | Possible Cause / Solution |
|---|---|
| Display is blank | Check batteries; replace if low. Ensure power to HVAC system is on. |
| Heating/Cooling system not responding | Check system mode (Heat/Cool/Off). Verify wiring connections. Ensure power to HVAC system is on. |
| Incorrect temperature reading | Ensure thermostat is not exposed to direct sunlight, drafts, or heat sources. |
| Programming errors | Review Section 4.3 for detailed programming steps. Ensure correct times and temperatures are set for each period. |
For persistent issues, it is recommended to consult a qualified HVAC technician or contact Honeywell customer support.
7. Specifications
| Feature | Detail |
|---|---|
| Brand | Honeywell |
| Model Name | 5-1-1 Day |
| Product Dimensions | 1.25"D x 5.75"W x 3.25"H |
| Controller Type | Hand Control |
| Special Feature | Programmable |
| Color | White |
| Specific Uses For Product | Heat Pump |
| Temperature Control Type | Heating |
| Included Components | Thermostat |
| Power Source | AC/DC |
| Voltage | 30 Volts |
| Display Type | Digital |
| Screen Size | 6 Inches |
| Control Type | Button Control |
| Control Method | Touch |
| Mounting Type | Wall Mount |
| Backlight | Yes |
| Batteries Required | Yes (1 'A' battery) |
| Battery Cell Type | NiMH |
| Item Model Number | RTH6450D |
| UPC | 085267496520 |

Figure 7.1: Overview of key features and specifications for the Honeywell Home RTH6450D Thermostat.
8. Warranty and Support
This Honeywell Home RTH6450D Programmable Thermostat comes with a manufacturer's warranty. Please refer to the warranty documentation included with your product for specific terms and conditions. For technical assistance, troubleshooting beyond this manual, or warranty claims, please contact Honeywell customer support directly.
You can visit the official Honeywell store for more information and support resources: Honeywell Store


