Introduction
Welcome to your new Laney CUB-Head amplifier. This manual provides essential information for the safe and optimal use of your amplifier. The CUB-Head is a compact, all-tube amplifier head designed to deliver classic British valve tone. It features a versatile control set and flexible power options suitable for various playing environments.

Image: Laney CUB-Head amplifier head.
Important Safety Instructions
- Read these instructions. Keep these instructions. Heed all warnings. Follow all instructions.
- Do not use this apparatus near water.
- Clean only with a dry cloth.
- Do not block any ventilation openings. Install in accordance with the manufacturer's instructions.
- Do not install near any heat sources such as radiators, heat registers, stoves, or other apparatus (including amplifiers) that produce heat.
- Do not defeat the safety purpose of the polarized or grounding-type plug.
- Protect the power cord from being walked on or pinched.
- Only use attachments/accessories specified by the manufacturer.
- Unplug this apparatus during lightning storms or when unused for long periods of time.
- Refer all servicing to qualified service personnel.
Key Features
- 15 Watts RMS or <1 Watt RMS selectable power output.
- Preamp section features 3 x ECC83 tubes.
- Power amp section features 2 x EL84 tubes.
- Comprehensive tone controls: Gain, Treble, Middle, Bass, Volume, Tone, and Reverb.
- Integrated Effects Loop for external effects pedals.
- Footswitch socket for Reverb control.
- Multiple speaker output options (8 Ohm & 16 Ohm).
Setup and Connections
Unpacking
Carefully unpack your CUB-Head amplifier. Retain all packaging materials for future transport.
Power Connection
Ensure the amplifier's power switch is in the OFF position. Connect the supplied power cord to the IEC inlet on the rear panel and then to a suitable mains power outlet.
Speaker Connection
The CUB-Head requires an external speaker cabinet. Connect a speaker cable from one of the speaker output sockets (8 Ohm or 16 Ohm) on the rear panel to your speaker cabinet's input. Ensure the impedance matches.
WARNING:
Never operate the amplifier without a speaker cabinet connected. This can cause severe damage to the amplifier.
Instrument Connection
Connect your guitar to either the 15W or <1W input jack on the front panel using a high-quality instrument cable.
Effects Loop Connection
For connecting external effects pedals, use the FX Send/Line Out and FX Return sockets on the rear panel. Connect the FX Send to the input of your effects unit and the output of your effects unit to the FX Return.
Footswitch Connection
Connect an optional footswitch to the Footswitch socket on the rear panel to remotely switch the Reverb effect.
Operation
Front Panel Controls
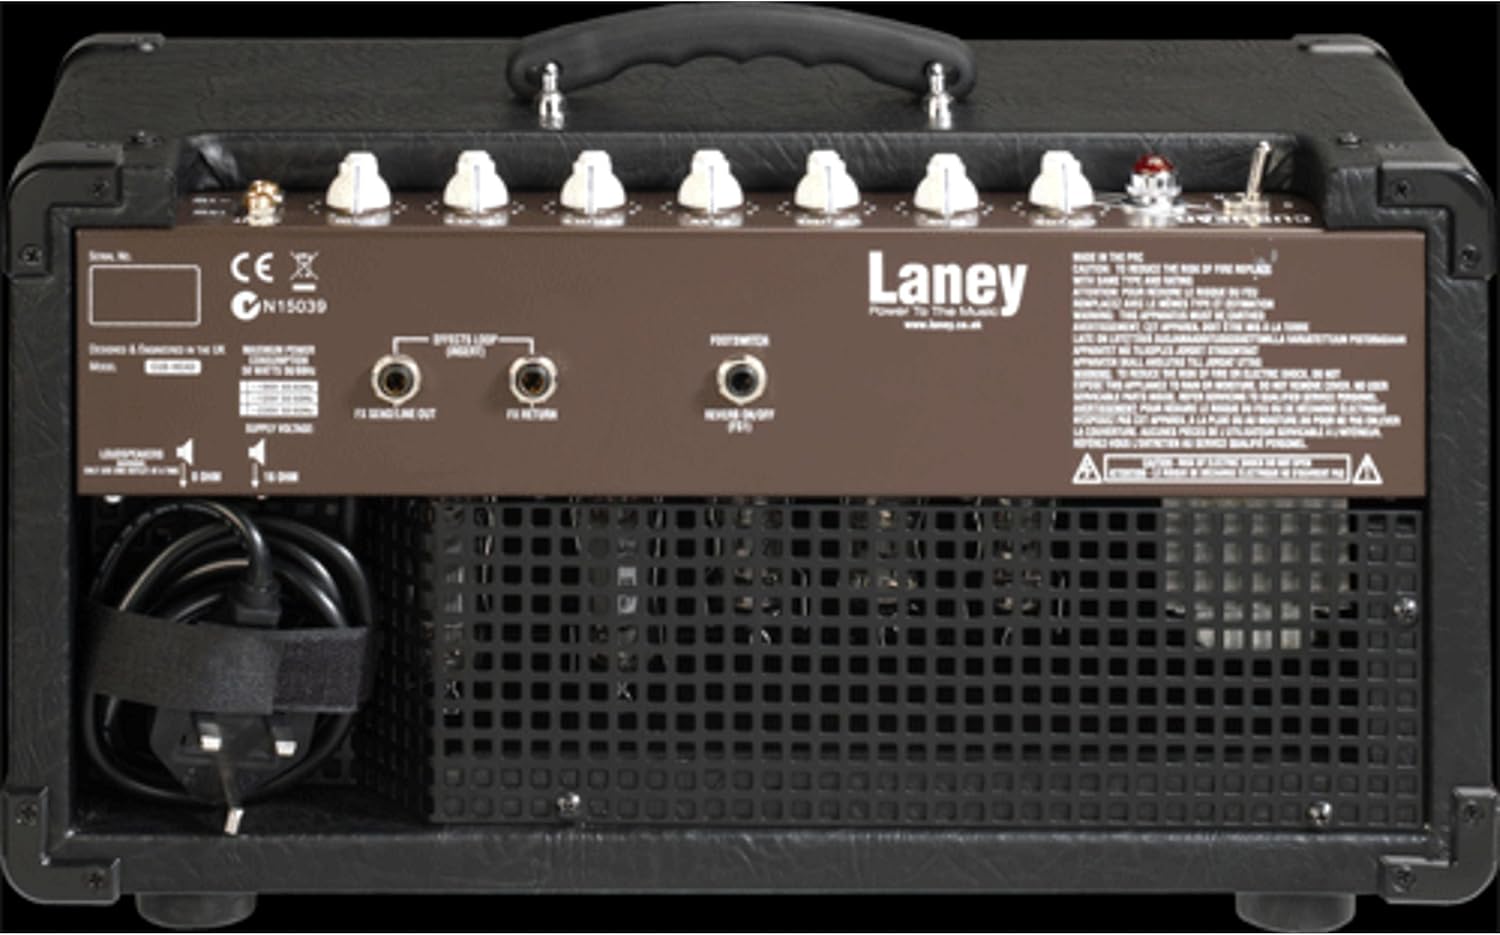
Image: Front control panel of the Laney CUB-Head amplifier.
- POWER Switch: Toggles the amplifier ON/OFF. Allow a brief warm-up period after switching ON.
- INPUT 15W: Standard input for full 15-watt output.
- INPUT <1W: Low power input, reducing output to approximately 0.75 watts. Ideal for achieving power amp compression at lower volumes.
- GAIN: Controls the amount of preamp overdrive and distortion. Higher settings increase saturation.
- TREBLE: Adjusts the high-frequency response.
- MIDDLE: Adjusts the mid-frequency response.
- BASS: Adjusts the low-frequency response.
- VOLUME: Controls the overall output level of the amplifier.
- TONE: A global tone control that shapes the overall frequency balance.
- REVERB: Adjusts the amount of built-in digital reverb effect.
Rear Panel Connections

Image: Rear panel connections of the Laney CUB-Head amplifier.
- POWER INLET: Connects to mains power via the supplied IEC cable.
- SPEAKER OUT (8 Ohm & 16 Ohm): Connect to external speaker cabinets. Ensure correct impedance matching.
- FX SEND/LINE OUT: Output for the effects loop, can also be used as a line out.
- FX RETURN: Input for the effects loop.
- FOOTSWITCH: Connects an optional footswitch for remote Reverb control.
Maintenance
Cleaning
Clean the amplifier's exterior with a soft, dry cloth. Avoid abrasive cleaners or solvents.
Tube Replacement
Vacuum tubes have a finite lifespan and will eventually need replacement. This should only be performed by qualified service personnel. Contact an authorized Laney service center for tube replacement.
Storage
When not in use, store the amplifier in a dry, cool environment, away from direct sunlight and extreme temperatures.
Troubleshooting
| Problem | Possible Cause | Solution |
|---|---|---|
| No power | Power cord disconnected; Power outlet faulty; Fuse blown. | Check power cord connection; Try a different outlet; Consult qualified service personnel for fuse replacement. |
| No sound | Speaker not connected; Instrument cable faulty; Volume/Gain set to zero; Faulty tubes. | Ensure speaker is connected and impedance matched; Test with a different instrument cable; Check Volume/Gain settings; Consult qualified service personnel. |
| Weak or distorted sound | Faulty tubes; Incorrect impedance match; Speaker damage. | Consult qualified service personnel for tube inspection; Verify speaker impedance; Check speaker for damage. |
| Excessive hum or noise | Ground loop; Faulty instrument cable; Proximity to other electronic devices. | Ensure proper grounding; Try a different instrument cable; Move amplifier away from other electronics. |
Specifications
| Feature | Detail |
|---|---|
| Model | CUB-HEAD |
| Output Wattage | 15 Watts RMS (selectable to <1 Watt) |
| Preamp Tubes | 3 x ECC83 |
| Power Amp Tubes | 2 x EL84 |
| Controls | Gain, Treble, Middle, Bass, Volume, Tone, Reverb |
| Inputs | 15W Input, <1W Input (6.35mm Jack) |
| Outputs | 8 Ohm Speaker Out, 16 Ohm Speaker Out |
| Effects Loop | Send/Line Out, Return |
| Footswitch | Yes (for Reverb) |
| Power Source | Corded Electric |
| Item Weight | 8.48 pounds (3.85 kg) |
| Product Dimensions (D x W x H) | 9.25 x 17.13 x 9.76 inches (23.5 x 43.5 x 24.8 cm) |

Image: Dimensions of the Laney CUB-Head amplifier.
Warranty Information
Laney products are designed for reliability and performance. For specific warranty terms and conditions, please refer to the warranty card included with your product or visit the official Laney website. Keep your proof of purchase for warranty claims.
Support and Service
Should you encounter any issues or require technical assistance, please contact your authorized Laney dealer or visit the official Laney website for support resources and service center locations.
Official Laney Website: www.laney.co.uk