Introduction
This manual provides comprehensive instructions for the setup, operation, and maintenance of your Intercomp E-Z Weigh Scale SW500 system with Billet Pads. Designed for precision vehicle weight measurement, this system assists in optimizing chassis setups. Please read this manual thoroughly before using the equipment to ensure proper function and longevity.
Package Contents
Verify that all components are present and undamaged upon unpacking:
- Four (4) 15" x 15" x 2.5" Billet Scale Pads
- One (1) Cabled Indicator with Case
- Connecting Cables for pads
- One (1) Standard 9-Volt Battery
- Instruction Manual (this document)
Setup
Follow these steps to set up your E-Z Weigh Scale system:
- Placement: Position the four billet scale pads on a flat, level, and stable surface where the vehicle will be weighed. Ensure adequate space around each pad.
- Connect Pads: Connect each scale pad to the cabled indicator using the provided cables. Match the cable connectors to the corresponding ports on the indicator (e.g., LF for Left Front, LR for Left Rear, RF for Right Front, RR for Right Rear). Ensure connections are secure.
- Install Battery: Open the battery compartment on the indicator unit and insert the 9-Volt battery, observing correct polarity. Close the compartment securely.
- Power On: Press the power button on the indicator unit to turn on the system. The display should illuminate.
- Initial Zeroing: Before placing the vehicle on the pads, ensure the display reads zero for all pads. If not, use the "ZERO" or "CLEAR" function on the indicator as per the operating instructions to zero the scales.
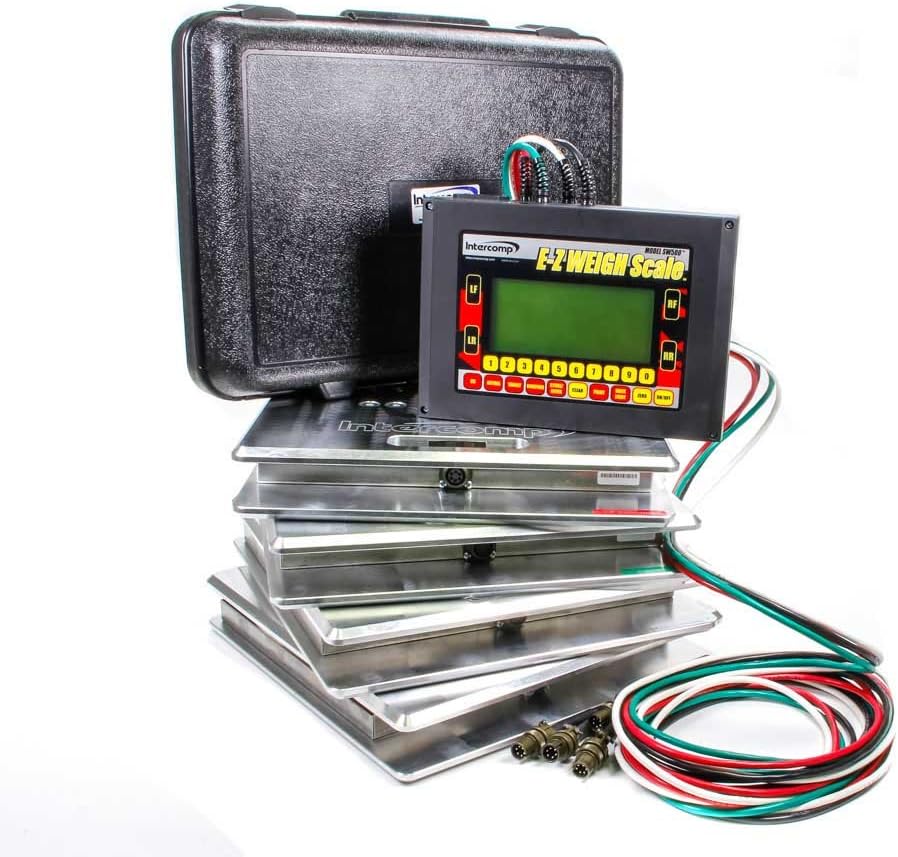
Figure 1: Intercomp E-Z Weigh Scale SW500 system components. This image displays the complete Intercomp E-Z Weigh Scale SW500 system, including the central cabled indicator unit with a green backlit display, four silver billet scale pads, various connecting cables (red, white, green, black), and a black protective carrying case. The indicator unit features buttons for left front (LF), left rear (LR), right front (RF), and right rear (RR) weight readings, along with numerical input and function keys.
Operating Instructions
The SW500 indicator provides various functions for precise weight measurement and analysis.
Basic Weighing Procedure
- Ensure the system is powered on and zeroed as described in the Setup section.
- Carefully drive or push the vehicle onto the scale pads, ensuring each wheel is centered on a pad.
- Allow the vehicle to settle. The indicator display will show the weight for each individual pad (LF, LR, RF, RR) and often the total weight and percentages.
- Record the readings as needed.
Display Modes
The indicator allows users to select various display modes to view weight and percentage combinations. Refer to the indicator's specific buttons (e.g., "MODE" or dedicated percentage buttons) to cycle through available views such as individual wheel weights, cross weights, front/rear percentages, and total weight. The display characters are 0.5" tall and backlit for clear visibility.
Storing and Recalling Setups
The SW500 can store up to 100 chassis setups. Use the numerical keypad and "STORE" or "SAVE" buttons to save current readings. To recall a previously stored setup, use the "RECALL" or "LOAD" function and input the corresponding setup number. This feature allows for baseline setup recall and comparison.
Center of Gravity (CG) Calculation
The system can calculate the vehicle's center of gravity. Consult the indicator's specific menu or button for initiating this calculation. Accurate CG calculation requires precise input of wheelbase and track width, which may need to be entered into the system.
Target Tune Feature
The Target Tune feature assists in achieving desired weight distribution. This function typically allows you to input target percentages, and the system may guide you in making adjustments to reach those targets. Refer to the indicator's specific instructions for using this advanced feature.
Data Output (USB & RS232)
The SW500 indicator includes USB and RS232 output ports for connecting to a computer or other data logging devices. This allows for external recording and analysis of weight data. Consult the Intercomp software or driver documentation for specific connection and data transfer procedures.
Maintenance
Proper maintenance ensures the accuracy and longevity of your weighing system.
- Cleaning: Clean the scale pads and indicator unit with a soft, damp cloth. Avoid abrasive cleaners or solvents that could damage the finish or electronic components. Ensure no moisture enters the electronic connections.
- Battery Replacement: When the battery indicator shows low power, replace the 9-Volt battery promptly to avoid interruption during use. Always use a fresh, high-quality 9-Volt battery.
- Storage: Store the system in its protective case in a dry, temperature-controlled environment when not in use. Avoid exposing the pads or indicator to extreme temperatures, direct sunlight, or excessive moisture.
- Cable Inspection: Periodically inspect all connecting cables for signs of wear, cuts, or damage. Replace any damaged cables immediately to maintain reliable operation.
Troubleshooting
If you encounter issues with your E-Z Weigh Scale, refer to the following common problems and solutions:
- No Power:
- Check if the 9-Volt battery is correctly installed and fully charged. Replace if necessary.
- Ensure the power button is pressed firmly.
- Inaccurate Readings:
- Ensure the scale pads are on a flat, level, and stable surface.
- Verify that the pads were zeroed before placing the vehicle on them.
- Check all cable connections for security and damage.
- Ensure no debris is under the pads or interfering with their movement.
- Display Errors:
- If an error code appears, consult the Intercomp support website or contact customer service for specific code interpretations.
- Try powering the unit off and on again (reboot).
- Connectivity Issues (USB/RS232):
- Ensure the correct drivers are installed on your computer.
- Verify the cable connection between the indicator and the computer.
- Check the communication settings (baud rate, etc.) in your software.
If problems persist after attempting these solutions, contact Intercomp customer support.
Specifications
| Feature | Detail |
|---|---|
| Pad Capacity | 1,500 lb (700 kg) per pad |
| System Capacity | 6,000 lb (2,800 kg) total |
| Accuracy | Certified to 0.1% |
| Pad Dimensions | 15" x 15" x 2.5" (381 x 381 x 64mm) |
| Display Characters | Giant 0.5", Backlit |
| Power Source | Standard 9-Volt Battery |
| Data Output | USB & RS232 |
| Setup Storage | Stores 100 Chassis Setups |
| Item Weight | 110.4 pounds (total system) |
| Product Dimensions | 16.3 x 16.4 x 20.6 inches (packaging/overall) |
Warranty and Support
The Intercomp E-Z Weigh Scale SW500 system is backed by a 2-Year Warranty from the date of purchase, covering defects in materials and workmanship. For warranty claims, technical assistance, or further inquiries, please contact Intercomp customer support through their official website or the contact information provided with your purchase documentation.
For the most up-to-date support information, please visit the official Intercomp website.