
LYD MD600
LYD MD600 Mini DV/DVR Camcoder User Manual
Model: MD600
1. Introduction
This manual provides detailed instructions for the proper use and maintenance of your LYD MD600 Mini DV/DVR Camcoder. Please read this manual thoroughly before operating the device to ensure optimal performance and longevity. The MD600 is a compact digital video recorder designed for capturing high-resolution video and still images.
2. Product Overview
2.1 Components and Controls
Familiarize yourself with the main components and controls of your MD600 camcoder.
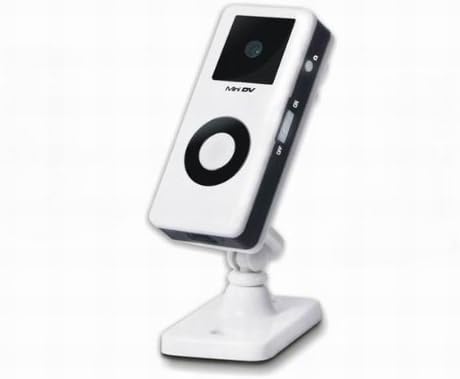
Image 1: Front view of the LYD MD600 Mini DV/DVR Camcoder mounted on its adjustable stand. The camera features a lens, a display area, and a large circular button for operation.

Image 2: Side view of the LYD MD600 Mini DV/DVR Camcoder, illustrating the ON/OFF switch and a detachable clip mechanism for versatile mounting options. The device is shown attached to its stand.
2.2 Package Contents
Ensure all items are present in the package:

Image 3: The complete package contents for the LYD MD600 Mini DV/DVR Camcoder, including the camera unit, USB charging cable, wall adapter, and a mini CD with drivers/software.
- LYD MD600 Mini DV/DVR Camcoder Unit
- Adjustable Mounting Bracket/Stand
- USB Charging/Data Cable
- Wall Power Adapter
- Driver/Software Mini CD
2.3 Key Features
- 1.3 Megapixel sensor for high-resolution capture
- Supports up to 32GB TF (Micro SD) card for storage
- New design bracket with all-direction turning for flexible positioning
- Capable of both photo taking and video recording
- Compact dimensions: approximately 0.8 x 2.2 x 1.1 inches
- Lightweight design: approximately 1.8 ounces
3. Setup
3.1 Inserting a Micro SD Card
- Ensure the camcoder is powered off.
- Locate the Micro SD card slot on the device.
- Gently insert the Micro SD card into the slot with the gold contacts facing down until it clicks into place.
- To remove, gently push the card in again until it springs out.
Note: A Micro SD card (up to 32GB) is required for recording video and taking photos. The card is not included in the standard package.
3.2 Initial Charging
Before first use, fully charge the camcoder's internal battery. Refer to Section 5 for detailed charging instructions.
4. Operating Instructions
4.1 Powering On/Off
- To Power On: Slide the ON/OFF switch (refer to Image 2) to the 'ON' position. The indicator light will illuminate.
- To Power Off: Slide the ON/OFF switch to the 'OFF' position. The indicator light will turn off.
4.2 Recording Video
- Ensure the camcoder is powered on and a Micro SD card is inserted.
- Press the main circular button (refer to Image 1) once to start video recording. The indicator light will flash to indicate recording is in progress.
- Press the main circular button again to stop recording. The indicator light will return to a steady state.
4.3 Taking Photos
- Ensure the camcoder is powered on and a Micro SD card is inserted.
- To switch to photo mode, press and hold the main circular button for approximately 2 seconds until the indicator light changes pattern (e.g., a quick flash).
- Once in photo mode, press the main circular button once to take a picture. The indicator light will flash briefly to confirm the photo has been taken.
4.4 Connecting to a Computer
- Ensure the camcoder is powered off.
- Connect the camcoder to your computer using the provided USB cable.
- The camcoder will be recognized as a removable disk. You can now access the recorded video files and photos on the Micro SD card.
- Safely eject the removable disk from your computer before disconnecting the USB cable.
5. Charging
To charge the LYD MD600 camcoder:
- Connect the small end of the USB cable to the camcoder's USB port.
- Connect the large end of the USB cable to the provided wall power adapter.
- Plug the wall power adapter into a standard electrical outlet.
- The indicator light on the camcoder will illuminate during charging and typically change or turn off when fully charged.
- Alternatively, you can connect the USB cable to a powered USB port on your computer for charging.
6. Maintenance
- Keep the device dry. Moisture can damage electronic components.
- Avoid extreme temperatures. Do not expose to direct sunlight or very cold environments.
- Clean the lens gently with a soft, lint-free cloth. Do not use harsh chemicals.
- Store the device in a clean, dust-free environment when not in use.
- Avoid dropping or subjecting the device to strong impacts.
7. Troubleshooting
- Device does not power on: Ensure the battery is charged. Connect to a power source and try again. Check the ON/OFF switch position.
- Cannot record video/take photos: Verify that a Micro SD card is properly inserted and has sufficient free space. The card may need to be formatted (refer to your computer's instructions for formatting a Micro SD card).
- Computer does not recognize the device: Ensure the camcoder is powered off before connecting to the computer. Try a different USB port or cable. Install necessary drivers from the provided mini CD if prompted by your operating system.
- Poor video/photo quality: Ensure the lens is clean and free from smudges. Ensure adequate lighting in the recording environment.
8. Specifications
| Model Number | MD600 |
| Brand | LYD |
| Product Dimensions | 2.16 x 1.1 x 0.78 inches |
| Item Weight | 5.6 ounces |
| Flash Memory Type | Micro SD (supports up to 32GB) |
| Special Feature | Low Light capability |
| Lens Type | Zoom |
| Supported File Format | JPEG (for photos) |
| Batteries Included | Yes |
| UPC | 858919002192 |
9. Warranty and Support
For warranty information and technical support, please refer to the documentation provided with your purchase or contact your retailer. Keep your proof of purchase for any warranty claims.
Ask a question about this manual
Ask about setup, troubleshooting, compatibility, parts, safety, or missing instructions. Manuals+ will review the question and use this page’s manual context to help answer it.