Introduction
The Tusk Motorcycle Wheel Balancing and Truing Stand is a versatile tool designed for precise servicing of motorcycle wheels in both professional workshops and home garages. This stand facilitates accurate static balancing, lacing, and truing of wheels, ensuring optimal performance and a smoother ride. Its robust construction and thoughtful design make it an essential tool for motorcycle maintenance.
Safety Information
Always prioritize safety when using this tool. Read and understand all instructions before operation. Keep hands and clothing clear of moving parts. Ensure the stand is placed on a stable, level surface. Wear appropriate personal protective equipment, including safety glasses. Do not exceed the recommended wheel size or weight capacity. Keep children and pets away from the work area.
Components List
- Base: Sturdy foundation with adjustable rubber feet and an integrated leveling bubble.
- Vertical Support Arms: Two upright arms that hold the rollers.
- Rollers: Low-friction rollers mounted on the support arms to allow the shaft to spin freely.
- Precision Centering Shaft: The main axle for mounting the wheel.
- Centering Cones: Adjustable cones (15mm to 32mm) to securely hold the wheel hub on the shaft.
- Rim Pointer: An adjustable indicator arm used for checking radial and lateral runout during truing.
Setup
- Unpack Components: Carefully remove all parts from the packaging. Inspect for any damage or missing items.
- Assemble the Stand: Attach the vertical support arms to the base using the provided hardware. Ensure all bolts are tightened securely.
- Level the Stand: Place the assembled stand on a firm, flat surface. Use the adjustable rubber feet on the base to level the stand. Refer to the integrated leveling bubble on the base to achieve a perfectly level setup. Adjust the feet until the bubble is centered.

Image: Close-up of the integrated leveling bubble on the stand's base.

Image: The Tusk Wheel Balancing and Truing Stand fully assembled.
Operating Instructions
Wheel Balancing
- Prepare the Wheel: Remove any existing balance weights from the wheel. Ensure the wheel hub and bearings are clean and in good condition.
- Mount Wheel on Centering Shaft: Slide one centering cone onto the precision centering shaft. Insert the shaft through the center of the wheel hub. Slide the second centering cone onto the shaft from the other side. Adjust both cones to firmly secure the wheel, ensuring there is no side-to-side play. Tighten the hex bolts on the cones to lock them in place.

Image: Precision centering shaft with cones securing a wheel hub.
- Place on Stand: Carefully lift the shaft with the mounted wheel and place it onto the low-friction rollers of the stand. Ensure the shaft rests securely on both rollers.
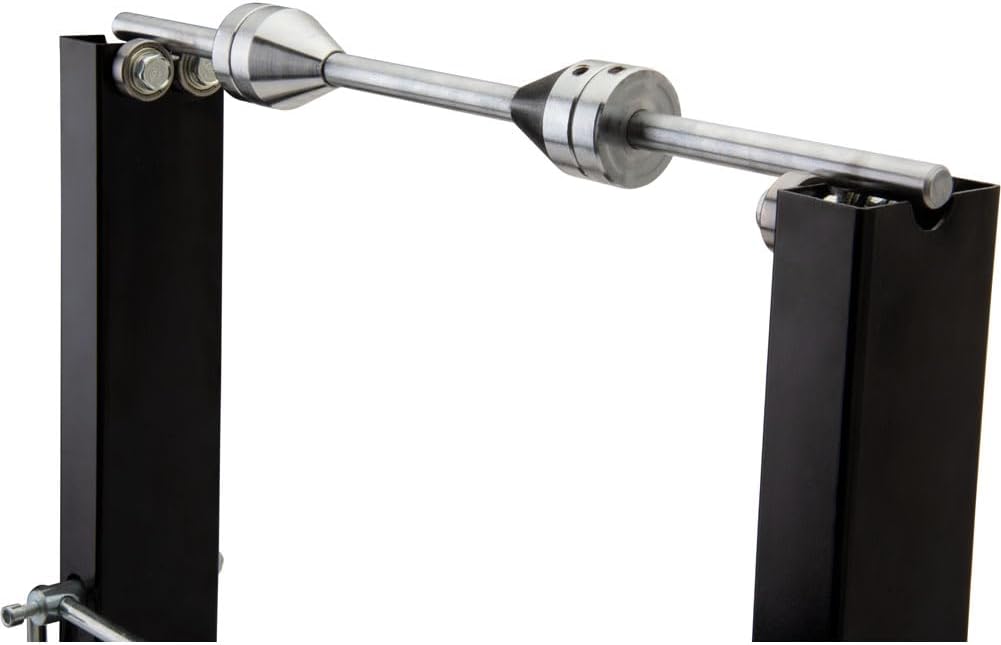
Image: The wheel's shaft properly seated on the stand's rollers.

Image: A motorcycle wheel mounted on the stand for balancing.
- Identify Heavy Spot: Allow the wheel to spin freely and come to a complete stop. The heaviest part of the wheel will naturally settle at the bottom. Mark the top-most point of the tire, directly opposite the heavy spot.
- Add Balance Weights: Apply appropriate balance weights to the rim at the marked top position. Start with a smaller weight and gradually increase until the wheel no longer consistently settles in the same heavy spot. The goal is for the wheel to remain stationary at any rotational position.
- Re-check Balance: Gently spin the wheel several times to confirm it is balanced. The wheel should not show a preference for any resting position.
Wheel Truing
- Position Rim Pointer: With the wheel mounted on the stand, adjust the integrated rim pointer so its tip is very close to the rim's edge, without touching.

Image: The truing pointer in position to check wheel runout.
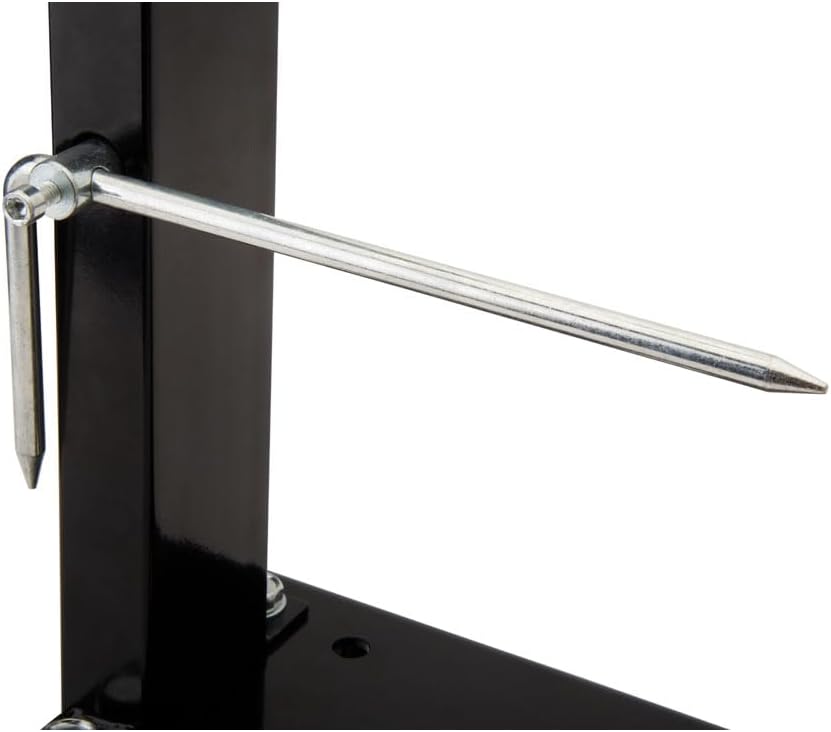
Image: Detailed view of the adjustable truing pointer.
- Check Radial Runout: Slowly rotate the wheel and observe the gap between the rim pointer and the rim. Any variation indicates radial runout (up and down movement).
- Check Lateral Runout: Adjust the rim pointer to check the side of the rim. Slowly rotate the wheel and observe any side-to-side movement.
- Adjust as Needed: If runout is detected, adjustments to spokes (for spoked wheels) or other wheel components may be necessary. This stand helps identify the areas requiring attention.
Maintenance
- Cleaning: After each use, wipe down the stand with a clean, dry cloth to remove dirt, grease, and debris.
- Lubrication: Periodically apply a light lubricant to the low-friction bearings on the rollers and the centering shaft to ensure smooth operation.
- Inspection: Regularly check all bolts and fasteners for tightness. Inspect the support arms, base, and pointer for any signs of wear, damage, or bending.
- Storage: Store the stand in a dry environment to prevent rust. If storing for extended periods, consider applying a thin coat of rust preventative to exposed metal surfaces.
Troubleshooting
- Wheel Does Not Spin Freely:
- Ensure the stand is perfectly level.
- Check that the centering cones are not overtightened, allowing the wheel to rotate on its bearings.
- Inspect the low-friction rollers and shaft for any obstructions or damage.
- Difficulty Identifying Heavy Spot:
- Confirm the stand is level and the wheel spins freely.
- Ensure all old balance weights have been removed.
- Stand Appears Bent or Damaged:
- If the stand arrived bent or with missing parts (e.g., bubble level), contact customer support for assistance. Do not attempt to force or modify bent components, as this may compromise the stand's accuracy and safety.
Specifications
- Product Dimensions: 17 x 8.5 x 4 inches
- Item Weight: 13.57 pounds
- Maximum Wheel Diameter: Up to 21 inches
- Centering Cone Range: 15 mm to 32 mm
- Manufacturer: Tusk
- Model Number: 5
Warranty and Support
For warranty information, technical support, or to inquire about replacement parts, please contact Tusk customer service. Keep your purchase receipt and product model number handy for faster service.


