
Mitsubishi XD280U(D) DLP Projector User Manual
Model: XD280U D
Your comprehensive guide to setting up, operating, and maintaining your Mitsubishi projector.
1. Product Overview
The Mitsubishi XD280U(D) DLP Projector is designed for versatile use, particularly in educational and corporate environments. It offers advanced features for simplified presentation management and enhanced visual experiences, including 3D readiness.
Key features include:
- 3000 ANSI Lumens: Provides bright and clear images suitable for various lighting conditions.
- 1024 x 768 Resolution (XGA): Delivers crisp and detailed visuals.
- 2000:1 Contrast Ratio: Ensures good distinction between light and dark areas of the image.
- 3D Ready: Capable of rendering images in stunning 3D, requiring field sequential format content, a high-end graphic card, and special electronic shutter glasses.
- Color Background Adjustment: Automatically adjusts for color tone when projecting on colored surfaces such as beige, light blue, light green, pink, blackboards, and whiteboards.
- HDMI Input: For true digital connections from both PC and video sources.
- ProjectorView Global+ Software: Allows connection of multiple projectors to your LAN for monitoring, input switching, and power control.
- Visual PA: Broadcasts important messages and news (up to 350 characters) to all connected classrooms simultaneously through a simple interface.
- Portable Design: Weighing only 7 lbs, it can be easily transported or permanently installed.

Figure 1: Front view of the Mitsubishi XD280U(D) DLP Projector, showing the lens, lamp access panel, and DLP 3D Ready branding. The lamp type label indicates VLT-XD280LP.
2. Setup
Follow these steps to set up your projector for optimal performance.
2.1. Physical Placement
Place the projector on a stable, flat surface or mount it securely. Ensure adequate ventilation around the projector to prevent overheating. Avoid placing it in direct sunlight or near heat sources.
2.2. Connecting Power
- Connect the power cord to the AC IN port on the rear of the projector.
- Plug the other end of the power cord into a grounded electrical outlet.
2.3. Connecting Input Sources
The projector offers various input options for connecting your devices.
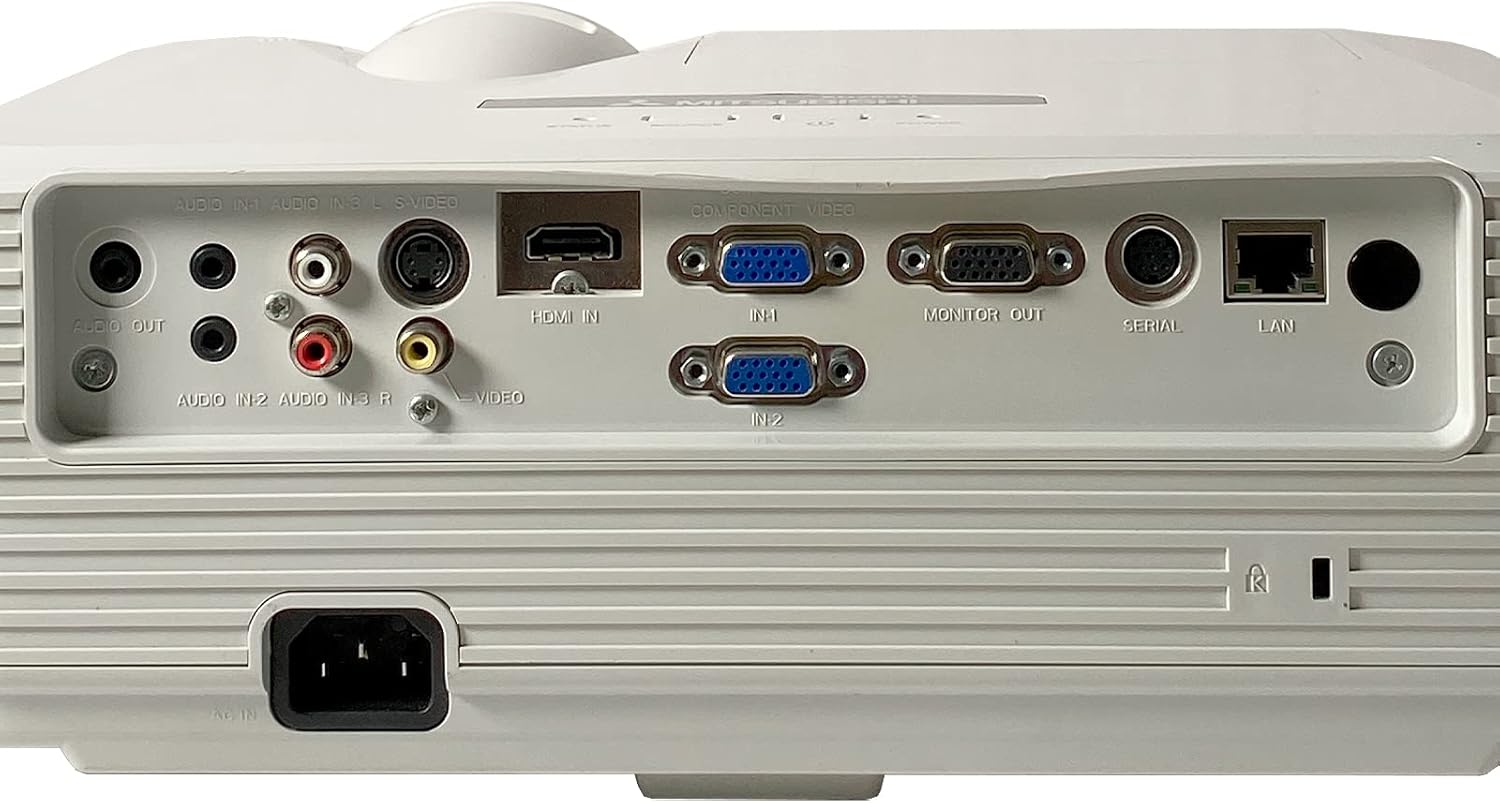
Figure 2: Rear view of the Mitsubishi XD280U(D) DLP Projector, detailing the various input and output ports including HDMI IN, VGA (IN1, IN2, MONITOR OUT), S-VIDEO, VIDEO, AUDIO IN (1, 2, 3), AUDIO OUT, SERIAL, and LAN.
- HDMI IN: For digital video and audio signals from devices like laptops, Blu-ray players, or gaming consoles.
- COMPUTER IN (IN1, IN2): Two VGA ports for connecting computers.
- MONITOR OUT: A VGA output to connect an external monitor, mirroring the projector's display.
- VIDEO / S-VIDEO / COMPONENT VIDEO: For analog video sources.
- AUDIO IN (1, 2, 3): For connecting audio sources corresponding to video inputs.
- AUDIO OUT: For connecting external speakers or an audio system.
- SERIAL (RS-232C): For remote control and system integration.
- LAN: For network connectivity and control via ProjectorView Global+ software.
Connect your desired source device using the appropriate cable.
2.4. Initial Power On and Image Adjustment
- Press the POWER button on the projector or remote control to turn it on.
- Adjust the FOCUS ring around the lens until the image is sharp and clear.
- Use the ZOOM lever (if available) to adjust the image size to fit your screen.
- If the image is trapezoidal, adjust the keystone correction (refer to the operating section for details).

Figure 3: Top view of the Mitsubishi XD280U(D) DLP Projector, highlighting the focus and zoom controls near the lens, and the control panel with Status, Source, and Power buttons.
3. Operating the Projector
3.1. Power On/Off
- To turn on: Press the POWER button once. The power indicator light will turn green.
- To turn off: Press the POWER button twice. The projector will enter a cool-down cycle, and the power indicator will flash before turning off. Do not unplug the projector during the cool-down cycle.
3.2. Source Selection
Press the SOURCE button on the projector's control panel or remote control to cycle through available input sources (HDMI, Computer 1, Computer 2, Video, S-Video, Component Video).
3.3. Menu Navigation
Use the arrow buttons and ENTER button on the control panel or remote to navigate the on-screen display (OSD) menu. The OSD allows you to adjust various settings such as image mode, aspect ratio, keystone correction, and network settings.
3.4. 3D Projection
The XD280U(D) is 3D ready. To experience 3D content, ensure your source material is in field sequential format. You will also need a compatible high-end graphic card and special electronic shutter glasses (sold separately).
3.5. Color Background Correction
This feature automatically adjusts the image color balance when projecting onto non-white surfaces. Access this setting through the OSD menu to select the color of your projection surface (e.g., blackboard, light blue wall) for optimized image quality.
3.6. Network Control (ProjectorView Global+)
Connect the projector to your local area network (LAN) using an Ethernet cable. Install the ProjectorView Global+ software on a connected computer to remotely monitor projector status, switch inputs, and manage power for multiple projectors across your network.
3.7. Visual PA Function
Utilize the Visual PA feature to broadcast text messages (up to 350 characters) to all connected projectors simultaneously. This is particularly useful for announcements in educational or corporate settings.
4. Maintenance
Regular maintenance ensures the longevity and optimal performance of your projector.
4.1. Lamp Replacement
The projector lamp has a finite lifespan. When the lamp indicator lights up or the image becomes dim, it's time to replace the lamp. The compatible lamp model for the XD280U(D) is VLT-XD280LP.
- Turn off the projector and unplug the power cord. Allow it to cool down completely (at least 30 minutes).
- Locate the lamp cover on the top of the projector (refer to Figure 1).
- Loosen the screw(s) securing the lamp cover and remove it.
- Carefully loosen the screws holding the lamp module in place.
- Gently pull out the old lamp module.
- Insert the new lamp module, ensuring it is seated correctly.
- Secure the new lamp module with its screws, then replace the lamp cover and tighten its screw(s).
- Plug in the power cord and turn on the projector. Reset the lamp timer through the OSD menu.
4.2. Air Filter Cleaning/Replacement
The air filter prevents dust from entering the projector and affecting performance. Clean the filter regularly (e.g., every 100 hours of use) or replace it if heavily soiled.

Figure 4: Side view of the Mitsubishi XD280U(D) DLP Projector, illustrating the ventilation grille for airflow. The air filter is typically located behind such grilles.
- Turn off the projector and unplug the power cord.
- Locate the air filter cover (usually on the side or bottom).
- Remove the filter. Use a small vacuum cleaner or compressed air to remove dust. If the filter is washable, follow manufacturer instructions for cleaning and ensure it is completely dry before reinserting.
- Reinsert the clean filter and replace the cover.
4.3. General Cleaning
- Projector Casing: Wipe with a soft, dry, lint-free cloth. For stubborn marks, slightly dampen the cloth with water. Avoid abrasive cleaners or solvents.
- Lens: Use a professional lens cleaning cloth or lens paper with a specialized lens cleaning solution. Never touch the lens directly with your fingers.
5. Troubleshooting
This section addresses common issues you might encounter with your projector.
| Problem | Possible Cause | Solution |
|---|---|---|
| No image on screen |
|
|
| Image is blurry |
|
|
| Image is trapezoidal |
|
|
| Projector overheats or shuts down |
|
|
If the problem persists after trying these solutions, please contact Mitsubishi customer support.
6. Specifications
| Feature | Detail |
|---|---|
| Brand | Mitsubishi |
| Model Number | XD280U D |
| Display Resolution | 1024 x 768 (XGA) |
| Brightness | 3000 ANSI Lumens |
| Contrast Ratio | 2000:1 (on/off) |
| Connectivity Technology | HDMI, VGA, S-Video, Composite Video, LAN, Serial (RS-232C) |
| Special Feature | 3D-Ready, Color Background Correction, Network Control |
| Recommended Uses | Education |
| Product Dimensions | 9 x 13 x 4 inches |
| Item Weight | 10.35 pounds |
| Date First Available | June 9, 2010 |
| Manufacturer | Mitsubishi |
7. Warranty and Support
For specific warranty terms and conditions, please refer to the warranty card included with your product or contact your point of purchase. Warranty details can vary by region and retailer.
For technical support, service, or inquiries regarding your Mitsubishi XD280U(D) DLP Projector, please contact Mitsubishi customer support. Visit the official Mitsubishi website for the most up-to-date contact information and support resources.
You can also refer to the Mitsubishi Store on Amazon for additional product information and resources.