Introduction
This manual provides detailed instructions for the setup, operation, maintenance, and troubleshooting of your Avaya 9640G IP Phone. Please read this manual thoroughly before using the device to ensure proper functionality and to prevent damage.
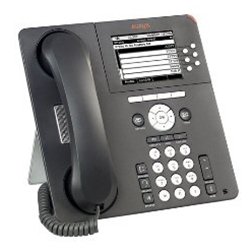
Figure 1: Front view of the Avaya 9640G IP Phone, showing the display, keypad, and function buttons.
1. Setup
1.1 Unpacking
Carefully remove all components from the packaging. Verify that the following items are present:
- Avaya 9640G IP Phone unit
- Handset
- Handset cord
- Ethernet cable
- Desk stand (if applicable)
- Power adapter (if not using Power over Ethernet - PoE)
1.2 Connecting the Phone
Follow these steps to connect your IP phone:
- Connect the Handset: Plug one end of the coiled handset cord into the handset and the other end into the handset port on the phone base (usually marked with a handset icon).
- Connect the Headset (Optional): If using a headset, plug it into the headset port (usually marked with a headset icon).
- Connect to Network:
- Plug one end of the Ethernet cable into the LAN port on the phone (often labeled with a network icon or "LAN").
- Plug the other end of the Ethernet cable into a network jack or a network switch/router.
- If your network provides Power over Ethernet (PoE), the phone will power on automatically.
- Connect Power (if not using PoE): If PoE is not available, connect the power adapter to the phone's power port and then plug the adapter into a wall outlet.
- Initial Boot-up: The phone will power on and begin its boot-up sequence. This may take a few minutes. The display will show progress and eventually indicate readiness for use.
1.3 Initial Configuration
Upon first boot-up or after a factory reset, the phone may require network configuration or login credentials. Consult your network administrator for specific settings such as IP address, subnet mask, gateway, and SIP server details.
2. Operating Instructions
2.1 Basic Call Functions
- Making a Call:
- Lift the handset, press the Speaker button, or press a Line button.
- Dial the desired number using the keypad.
- Press the "Call" or "Dial" softkey, or wait for the call to connect automatically.
- Answering a Call:
- Lift the handset, press the Speaker button, or press the flashing Line button.
- Ending a Call:
- Replace the handset, press the Speaker button again, or press the "End Call" softkey.
2.2 Advanced Call Functions
- Hold: During an active call, press the "Hold" button. The call will be placed on hold, and the line button may flash. To resume, press the flashing line button again.
- Transfer: During an active call, press the "Transfer" button. Dial the number to which you want to transfer the call. You can either announce the call (wait for the other party to answer) or perform a blind transfer (press "Transfer" again before they answer).
- Conference: During an active call, press the "Conference" button. Dial the number of the third party. Once they answer, press "Conference" again to join all parties.
2.3 Voicemail
To access your voicemail, press the "Message" or "Voicemail" button (often indicated by an envelope icon). Follow the audio prompts to listen to, save, or delete messages. You may need to enter a PIN.
2.4 Directory/Contacts
The phone may have a local directory or access to a corporate directory. Press the "Directory" or "Contacts" button to access these lists. Use the navigation buttons to scroll and select entries, then press "Dial" to call.
2.5 Feature Buttons and Display Navigation
The Avaya 9640G features a color display and several programmable buttons. Use the navigation cluster (up, down, left, right arrows, and Select button) to move through menus and options on the display. Softkeys (buttons directly below the display) change their function based on the current context.
3. Maintenance
3.1 Cleaning
To clean your phone, use a soft, damp, lint-free cloth. Do not use abrasive cleaners, solvents, or aerosol sprays directly on the phone. Disconnect the phone from power before cleaning.
3.2 Software and Firmware Updates
Software and firmware updates are typically managed by your system administrator. Do not attempt to manually update the phone's software unless instructed to do so by qualified personnel. Regular updates ensure optimal performance and security.
4. Troubleshooting
| Problem | Possible Cause | Solution |
|---|---|---|
| No dial tone | Phone not powered, network cable loose, network issue. | Check power connection (PoE or adapter). Ensure Ethernet cable is securely connected. Contact your network administrator. |
| Cannot make/receive calls | Network connectivity issues, incorrect configuration, account not registered. | Verify network connection. Check phone's IP address and registration status. Contact your system administrator. |
| Display is blank or frozen | Power issue, software error. | Disconnect and reconnect power. If the issue persists, contact technical support. |
| Poor audio quality | Network congestion, faulty cable, handset/headset issue. | Check network activity. Try a different handset or headset. Report to network administrator if problem persists. |
For issues not listed here, or if the suggested solutions do not resolve the problem, please contact your IT or network support department.
5. Specifications
- Brand: Avaya
- Model: 9640G
- ASIN: B003P5AA8Y
- Answering System Type: Digital
- Caller Identification: No
- Connectivity: Ethernet (PoE capable)
- Display: Color display
- Handset: Wired
- Headset Support: Yes
Note: Specifications are subject to change without notice.
6. Warranty and Support
6.1 Warranty Information
The Avaya 9640G IP Phone typically comes with a limited manufacturer's warranty. Please refer to the warranty card included with your product or visit the official Avaya website for detailed terms and conditions regarding warranty coverage, duration, and claims procedures. Keep your proof of purchase for warranty purposes.
6.2 Technical Support
For technical assistance, troubleshooting beyond this manual, or service requests, please contact your authorized Avaya reseller or your organization's IT support department. You may also find additional resources and support documentation on the official Avaya support website: support.avaya.com.