
Nilox 733275
Nilox TV and Monitor Mount - Model 733275 Instruction Manual
MAX VESA 200x200, Swivel and Tilt Functionality
Introduction
Thank you for choosing the Nilox TV and Monitor Mount, Model 733275. This mount is designed to securely hold your television or monitor, offering flexible viewing angles with its swivel and tilt capabilities. Please read this manual carefully before installation and use to ensure proper setup and safe operation.
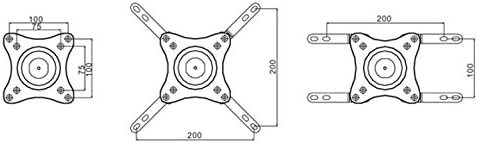
This mount is suitable for screens up to 32 inches and supports a maximum weight of 25 kg. It is compatible with VESA mounting patterns 75x75mm, 100x100mm, and up to 200x200mm using the included additional arm.
Safety Information
- Weight Capacity: Do not exceed the maximum weight capacity of 25 kg (55 lbs).
- Screen Size: For optimal 360° rotation, screens up to 32 inches are recommended.
- Installation: Ensure the mounting surface can support the combined weight of the mount and the display. Professional installation is recommended if you are unsure about the structural integrity of your wall.
- Tools: Use appropriate tools for installation.
- Children: Keep small parts away from children to prevent choking hazards.
- Maintenance: Regularly check all screws and connections to ensure they are secure.
Package Contents
Please verify that all parts are present before beginning installation. If any parts are missing or damaged, contact customer support.
- Wall Mount Assembly
- VESA Extension Arms (for 200x200mm)
- Mounting Hardware Kit (screws, anchors, washers)
- Security Lock with Keys
- Instruction Manual (this document)

Setup and Installation
Before you begin, ensure you have the necessary tools: drill, stud finder (if mounting to wood studs), level, screwdriver, and pencil.
Step 1: Determine Mounting Location
Choose a suitable location on your wall. Ensure there are no hidden electrical wires or plumbing. For wood stud walls, locate the center of a stud. For concrete or brick walls, use appropriate anchors (not always included, may need to be purchased separately).
Step 2: Attach Wall Plate
- Place the wall plate of the mount against the wall at the desired height.
- Use a level to ensure it is perfectly horizontal.
- Mark the drilling holes with a pencil.
- Drill pilot holes at the marked locations. The size of the drill bit will depend on your wall type and the anchors/screws used.
- Secure the wall plate to the wall using the provided screws and anchors (if applicable). Do not overtighten.
Step 3: Attach VESA Plate to Display
- Lay your TV or monitor face down on a soft, clean surface to prevent scratches.
- Identify the VESA mounting holes on the back of your display.
- If your display uses a 75x75mm or 100x100mm VESA pattern, attach the main VESA plate directly.
- If your display uses a 200x200mm VESA pattern, attach the included extension arms to the main VESA plate first, then attach the assembly to your display.
- Use the appropriate screws and washers from the hardware kit. Ensure screws are not too long, which could damage internal components.

Step 4: Mount Display to Wall Plate
With assistance, carefully lift the display and align the VESA plate attached to the display with the arm on the wall plate. Slide the VESA plate onto the arm until it is securely seated. Ensure the connection is firm before releasing the display.
Step 5: Install Security Lock
For added security, attach the provided security lock to the designated slot on the mount. This helps prevent accidental dislodgement or theft.

Operating Instructions
The Nilox TV and Monitor Mount offers flexible adjustments to achieve your desired viewing angle.
Adjusting Tilt
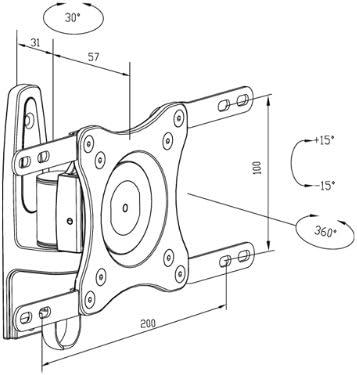
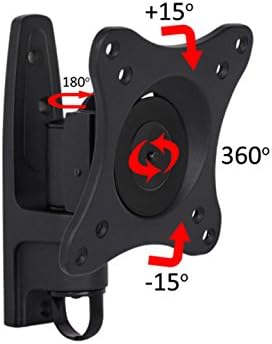
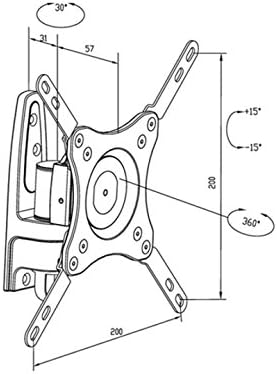
The mount allows for a tilt adjustment of +15° to -15°. To adjust, gently push or pull the top or bottom of your display to the desired angle. The friction mechanism will hold it in place.
Adjusting Swivel
The mount features a 180° swivel capability. Carefully rotate the display left or right to achieve your preferred viewing position.
Adjusting Rotation
A full 360° rotation is possible, allowing you to switch between landscape and portrait orientations. For optimal 360° rotation, screens up to 32 inches are recommended.
Maintenance
- Cleaning: Wipe the mount with a soft, dry cloth. Do not use abrasive cleaners or solvents.
- Periodic Checks: Every few months, check all mounting screws and connections to ensure they remain tight and secure.
- Lubrication: No lubrication is typically required for the moving parts. If movement becomes stiff, contact customer support.
Troubleshooting
| Problem | Possible Cause | Solution |
|---|---|---|
| Mount feels unstable. | Screws are loose; wall not strong enough; incorrect installation. | Tighten all mounting screws. Verify wall integrity and re-install if necessary, possibly with professional help. Ensure weight capacity is not exceeded. |
| Display does not tilt/swivel smoothly. | Friction points need adjustment; mount is overtightened. | Check for any adjustment screws on the articulation points and loosen slightly if movement is too stiff. Do not loosen to the point of instability. |
| Display cannot achieve full 360° rotation. | Screen size exceeds recommended limit for full rotation. | Ensure your screen is 32 inches or smaller for optimal 360° rotation. Larger screens may be physically obstructed. |
Specifications
| Feature | Detail |
|---|---|
| Brand | Nilox |
| Model Number | 733275 |
| Compatible Devices | Televisions, Monitors |
| Max Weight Capacity | 25 kg (55 lbs) |
| Recommended Screen Size (for 360° rotation) | Up to 32 inches |
| VESA Compatibility | 75x75mm, 100x100mm, 200x200mm (with extension arms) |
| Movement Type | Swivel, Tilt, Rotation |
| Tilt Range | +15° to -15° |
| Swivel Range | 180° |
| Rotation Range | 360° |
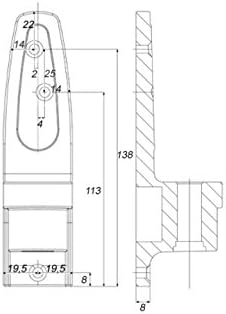
| Distance from Wall | Approximately 31mm - 57mm (adjustable) |
| Product Dimensions (Mount) | 16 x 12 x 9 cm (approximate, folded) |
| Product Weight | 70 g (Note: This weight appears unusually low for a TV mount; please verify with product packaging.) |
| Color | Black |
| Security Feature | Included Security Lock |
Warranty Information
Nilox products are covered by a limited warranty. Please refer to the official Nilox website or your purchase documentation for specific warranty terms and conditions. Keep your proof of purchase for warranty claims.
Customer Support
If you have any questions, require technical assistance, or need to report missing/damaged parts, please contact Nilox customer support through their official website or the contact information provided with your purchase.
Website: www.nilox.com (Please check for the correct regional website)
Ask a question about this manual
Ask about setup, troubleshooting, compatibility, parts, safety, or missing instructions. Manuals+ will review the question and use this page’s manual context to help answer it.