1. Introduction
This manual provides comprehensive instructions for the proper installation, adjustment, and maintenance of the Competition Engineering C2017 4-Link Kit. This kit is engineered to enhance the rear suspension performance of street and strip vehicles, optimizing traction and handling characteristics. Adherence to these instructions is crucial for safe and effective operation.
2. Safety Information
WARNING: Improper installation or adjustment of this 4-link kit can lead to severe vehicle instability, loss of control, and serious injury or death. Professional installation by a qualified automotive technician is strongly recommended.
- Always wear appropriate personal protective equipment, including eye protection and gloves, during installation.
- Ensure the vehicle is securely supported on jack stands or a lift designed for the vehicle's weight. Never work under a vehicle supported only by a jack.
- Use only appropriate tools for all procedures.
- Do not modify any components of the 4-link kit. Unauthorized modifications can compromise structural integrity and performance.
- Verify all fasteners are torqued to the manufacturer's specifications.
3. Package Contents
The Competition Engineering C2017 4-Link Kit typically includes the following components. Please verify all parts are present before beginning installation:
- Upper and Lower Link Bars (4 total)
- Frame Brackets
- Axle Brackets
- Rod Ends and Bushings
- Mounting Hardware (bolts, nuts, washers)
Note: The specific contents are described as "Brackets and hardware" in the product listing. This list represents typical components of a 4-link kit.
4. Setup and Installation
This section outlines the general steps for installing the C2017 4-Link Kit. Specific vehicle modifications may be required depending on the application.
4.1. Vehicle Preparation
- Safely lift and support the vehicle on a level surface. Remove the rear wheels and existing suspension components as necessary.
- Clean the frame and axle housing areas where the new brackets will be mounted.
4.2. Bracket Installation
The frame and axle brackets must be precisely located and welded or bolted to the vehicle's chassis and rear axle housing. This step often requires specialized fabrication skills and tools.
- Position the frame brackets according to your desired suspension geometry and vehicle specifications. Mark and prepare the frame for welding or drilling.
- Attach the axle brackets to the rear axle housing. Ensure they are aligned correctly with the frame brackets.
- Secure all brackets using appropriate welding techniques or high-grade fasteners, torqued to specifications.
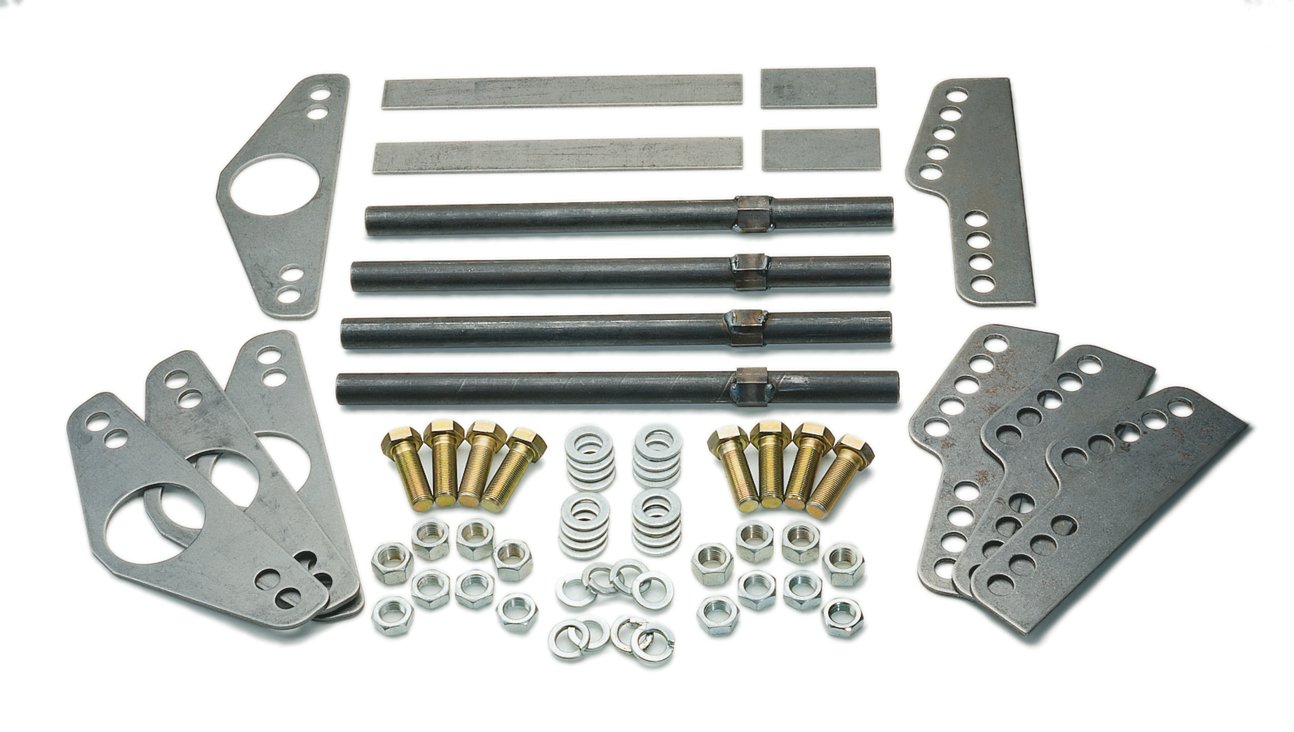
Figure 1: Example of Competition Engineering C2017 4-Link Kit components, including link bars, brackets, and hardware. This image illustrates the general appearance of the kit's parts.
4.3. Link Bar Installation
- Install the rod ends and bushings into the link bars.
- Attach the upper and lower link bars to their respective frame and axle brackets using the provided hardware. Do not fully tighten fasteners at this stage.
4.4. Initial Adjustments
With the link bars loosely installed, the vehicle can be lowered to ride height for initial adjustments. This is a critical step for setting suspension geometry.
- Adjust the length of the link bars to achieve the desired wheelbase and pinion angle.
- Ensure the axle is centered under the vehicle.
- Once initial settings are established, fully tighten all fasteners to the manufacturer's recommended torque specifications.
5. Operating and Adjustment
The C2017 4-Link Kit allows for fine-tuning of the rear suspension to optimize performance for various driving conditions (street, drag racing). Adjustments primarily involve changing the length and angle of the link bars.
5.1. Pinion Angle Adjustment
Adjusting the upper and lower link bar lengths can change the pinion angle, which is critical for driveline efficiency and preventing vibration. Consult a driveline specialist or performance suspension guide for optimal pinion angle settings for your specific application.
5.2. Anti-Squat Adjustment
The mounting points of the link bars on the frame and axle brackets determine the anti-squat percentage. Higher anti-squat values generally provide more traction under acceleration but can lead to harsher ride quality. Experiment with different mounting holes to find the optimal balance for your vehicle and intended use.
6. Maintenance
Regular inspection and maintenance are essential to ensure the longevity and safe operation of your Competition Engineering C2017 4-Link Kit.
- Visual Inspection: Periodically inspect all components for signs of wear, damage, cracks, or corrosion. Pay close attention to welds, rod ends, and bushings.
- Fastener Torque: Re-check the torque of all mounting bolts and nuts after the first 100 miles of operation and then every 3,000-5,000 miles or before significant track events.
- Lubrication: If equipped with greaseable fittings, lubricate rod ends and bushings according to their specific requirements.
- Cleaning: Keep components clean from dirt, debris, and corrosive materials.
7. Troubleshooting
This section addresses common issues that may arise after installing a 4-link suspension.
| Symptom | Possible Cause | Solution |
|---|---|---|
| Poor traction under acceleration | Incorrect anti-squat setting, worn bushings, loose fasteners | Adjust link bar angles, inspect and replace worn components, check and tighten fasteners |
| Driveline vibration | Incorrect pinion angle | Adjust link bar lengths to correct pinion angle |
| Unstable handling / Rear steer | Unequal link bar lengths, loose components | Ensure link bars are set to equal lengths (side-to-side), check all fasteners for proper torque |
| Clunking or rattling noises | Loose fasteners, worn rod ends/bushings, component interference | Inspect and tighten all fasteners, replace worn parts, check for clearance issues |
8. Specifications
- Model Number: C2017
- Manufacturer Part Number: C2017
- Product Type: Auto Accessory
- Approximate Product Dimensions: 23 x 8 x 5 inches (packaging)
- Intended Application: Performance rear suspension for street and strip vehicles
9. Warranty and Support
Competition Engineering stands by the quality of its products. For specific warranty information, please refer to the documentation included with your purchase or visit the official Competition Engineering website. For technical assistance, installation guidance, or troubleshooting support, please contact Competition Engineering's Technical Services department. Contact information can typically be found on the manufacturer's website or product packaging.