1. Introduction
This instruction manual provides guidance for the assembly of the Italeri 1292S B2 Ju 87 Stuka 1:72 scale model kit. This kit is designed for adult modelers (recommended age 14 years and up) and requires assembly, painting, and decal application. Please read through all instructions before beginning the assembly process.
Note: Tools, adhesives, and paints are not included with this model kit and must be purchased separately.

Figure 1.1: The product box for the Italeri Ju-87 B2/R2 Stuka model kit, showing the aircraft artwork and branding.

Figure 1.2: A rendered image depicting the completed Italeri Ju-87 Stuka model, showcasing its detailed camouflage and markings.
2. Safety Information
- Small Parts: This kit contains small parts that may pose a choking hazard. Keep out of reach of small children.
- Sharp Tools: Assembly requires the use of sharp tools such as hobby knives and tweezers. Exercise caution to prevent injury.
- Adhesives and Paints: Use glues and paints in a well-ventilated area. Refer to the manufacturer's safety data sheets for specific product warnings and instructions.
- Proposition 65 Warning: This product may contain chemicals known to the State of California to cause cancer and birth defects or other reproductive harm.
3. Components Overview
Before starting assembly, verify that all components are present and undamaged. The kit typically includes:
- Plastic sprues containing model parts
- Clear plastic sprue for canopy and windows
- Decal sheet
- Instruction guide

Figure 3.1: One of the plastic sprues, showing larger components such as wing sections and fuselage halves.

Figure 3.2: Another plastic sprue containing various smaller parts, including the propeller, landing gear components, and external ordnance.
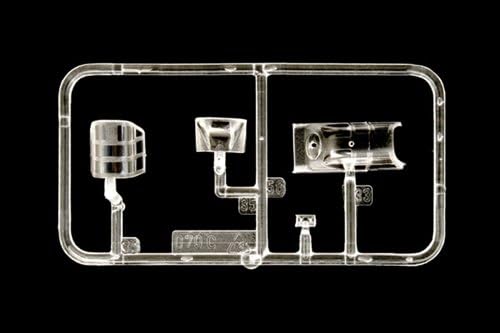
Figure 3.3: The clear plastic sprue, which includes the canopy and other transparent parts for the model.
4. Assembly Instructions
Follow the detailed, step-by-step illustrated instruction guide included in your kit for precise assembly. General steps include:
- Part Preparation: Carefully cut parts from the sprues using a hobby knife or sprue cutters. Clean any excess plastic (flash) with a hobby knife or fine sandpaper.
- Dry Fit: Before applying adhesive, dry fit parts to ensure proper alignment and fit.
- Adhesion: Apply plastic cement sparingly to the mating surfaces and hold parts together until the adhesive sets.
- Sub-Assemblies: Assemble smaller sections (e.g., cockpit, landing gear, wings) before joining them to the main fuselage.
- Painting (Pre-Assembly): Some parts may be easier to paint before full assembly, such as cockpit interiors or landing gear. Refer to the painting guide for details.
5. Painting Guide
The instruction guide provides specific painting schemes for different versions of the Ju 87 Stuka. Refer to the color key for suggested Italeri paint numbers. Proper surface preparation, such as priming, is recommended for best results.

Figure 5.1: Illustration of various painting schemes for the Ju-87 B2 and R2 Stuka, including suggested Italeri color codes for each section.

Figure 5.2: A comprehensive chart listing the required Italeri paints by article number and description for the Ju-87 B2 Stuka model.
Optional Weathering/Aging
For a more realistic finish, consider applying optional weathering and aging effects using specialized products. The kit's painting guide may offer suggestions for these techniques.

