1. Product Overview
The Seiko Alba Picco Schoolmaster Timer ADMG001 is a versatile digital timer designed for ease of use in various settings, including educational environments. It features a large, clear display for easy readability and a non-slip rubber backing for stable placement. This device combines stopwatch, timer, and alarm functions, making it a practical tool for time management.
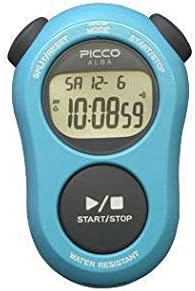
Figure 1: Seiko Alba Picco Schoolmaster Timer (Blue Model). This image displays the front view of the timer, highlighting its large digital screen and primary control buttons for mode selection and start/stop operations.
2. Setup
2.1 Initial Battery Installation/Activation
The timer typically comes with a pre-installed battery. If the display is blank or dim, the battery may need activation or replacement. Refer to the "Maintenance" section for battery replacement instructions.
2.2 Setting the Time and Date
- Press the MODE button repeatedly until the time setting mode is displayed.
- Use the START/STOP button to adjust the hour.
- Press the SPLIT/RESET button to move to the minute setting.
- Use the START/STOP button to adjust the minutes.
- Repeat for setting the year, month, and day.
- Press the MODE button to exit the setting mode.
3. Operating Instructions
3.1 Stopwatch Function
- Press the MODE button until the stopwatch display (00:00:00) appears.
- Press START/STOP to begin timing.
- Press START/STOP again to pause/resume.
- To record a split time, press SPLIT/RESET while the stopwatch is running. The display will show the split time, while the internal timer continues. Press SPLIT/RESET again to return to the running time.
- To stop the stopwatch, press START/STOP.
- To reset the stopwatch to zero, press SPLIT/RESET when the stopwatch is stopped.
3.2 Timer Function (Countdown)
- Press the MODE button until the timer display appears.
- To set the countdown time, press and hold the SPLIT/RESET button until the digits flash.
- Use START/STOP to adjust the hours, minutes, or seconds. Press SPLIT/RESET to cycle through hours, minutes, and seconds.
- Once the desired time is set, press MODE to confirm.
- Press START/STOP to begin the countdown.
- An alarm will sound when the countdown reaches zero.
- To stop the alarm, press any button.
- The timer features a repeat function. If enabled, the timer will automatically restart the countdown after reaching zero.
3.3 Alarm Function
- Press the MODE button until the alarm setting display appears.
- Press and hold SPLIT/RESET to enter alarm setting mode.
- Use START/STOP to adjust the hour and SPLIT/RESET to switch to minutes.
- Press MODE to confirm the alarm time.
- To activate/deactivate the alarm, press START/STOP while in the alarm display mode (not setting mode). An alarm icon will appear/disappear on the screen.
4. Maintenance
4.1 Cleaning
Wipe the timer with a soft, dry cloth. For stubborn dirt, a slightly damp cloth can be used. Avoid using harsh chemicals or abrasive cleaners, as these can damage the display or casing.
4.2 Battery Replacement
When the display becomes dim or unresponsive, the battery needs replacement. This model typically uses a standard button cell battery. To replace:
- Carefully open the battery compartment cover on the back of the timer using a small screwdriver.
- Remove the old battery.
- Insert a new battery of the correct type (refer to specifications for battery type), ensuring correct polarity (+/-).
- Securely close the battery compartment cover.
- Dispose of old batteries according to local regulations.
4.3 Water Resistance
The timer is designed with daily life waterproof capabilities. This means it can withstand splashes or brief exposure to water, but it is not suitable for swimming, showering, or submersion. Avoid pressing buttons when the timer is wet to prevent water ingress.
5. Troubleshooting
| Problem | Possible Cause | Solution |
|---|---|---|
| Display is blank or dim. | Low or dead battery. | Replace the battery (refer to Section 4.2). |
| Buttons are unresponsive. | Battery issue; internal malfunction; water ingress. | Check/replace battery. Ensure the timer is dry. If problem persists, contact customer support. |
| Time/Date is incorrect. | Not set correctly; battery removed/replaced. | Reset time and date (refer to Section 2.2). |
| Alarm does not sound. | Alarm is not activated; volume too low (if adjustable); battery low. | Ensure alarm is activated (Section 3.3). Check battery. |
6. Specifications
- Model: ADMG001 (also known as D795S502)
- Brand: SEIKO
- Dimensions: Approximately 80mm (H) x 54.3mm (W) x 20.4mm (D) / 0.8"D x 2.14"W x 0.8"H
- Weight: 97 Grams
- Material: Rubber casing
- Screen Size: 3.1 Inches
- Functions: Stopwatch, Countdown Timer (with repeat function), Alarm, Full Auto Calendar, Daily Life Waterproof
- Battery Type: Button cell (specific type not provided, typically CR2032 or similar)
- Number of Settings: 5 (likely referring to modes or alarm settings)
- Included Accessories: Neck strap
7. Warranty and Support
For warranty information and customer support, please refer to the documentation included with your purchase or visit the official SEIKO website. Keep your proof of purchase for warranty claims.
SEIKO Official Website: www.seikowatches.com


