Introduction
Thank you for purchasing the Panasonic NP-TR3 Dishwasher. This manual provides essential information for the safe and efficient use of your appliance. Please read these instructions thoroughly before operating the dishwasher and retain them for future reference.
Safety Information
Always follow basic safety precautions when using electrical appliances to reduce the risk of fire, electric shock, or injury.
- Ensure the dishwasher is properly grounded.
- Do not operate the dishwasher if it is damaged or malfunctioning.
- Keep children away from the dishwasher, especially when it is operating.
- Use only detergents and rinse aids specifically designed for automatic dishwashers.
- Do not touch the heating element during or immediately after use.
- Sharp items should be loaded with handles up to prevent injury.
- Disconnect power before performing any maintenance or cleaning.
Package Contents
Verify that all components are present upon unpacking.
- Panasonic NP-TR3 Dishwasher Unit
- Upper and Lower Dish Racks
- Cutlery Basket
- Water Supply Hose
- Drain Hose
- Instruction Manual (this document)

Figure 1: Front view of the Panasonic NP-TR3 Dishwasher with the door open, showing the interior racks. A label with reference number 05156 is visible on the top right.
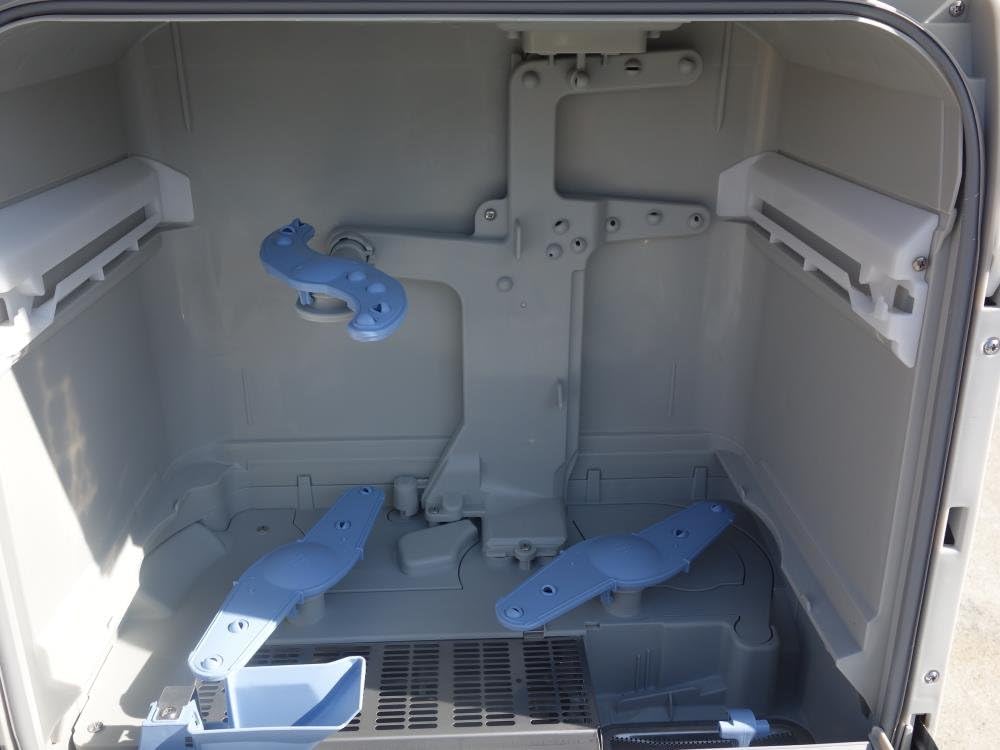
Figure 2: Close-up interior view of the dishwasher, highlighting the upper and lower dish racks and cutlery basket.

Figure 3: Interior view showing the dishwasher's spray arms, responsible for water distribution during washing.

Figure 4: The control panel of the dishwasher and the included water supply and drain hoses.
Setup
1. Placement
Place the dishwasher on a stable, level surface near a water supply, drain, and electrical outlet. Ensure adequate clearance around the unit for proper ventilation and operation.
- Clearance from Combustibles: Top: 8.0 cm, Sides: 0.5 cm, Rear: 0.5 cm, Bottom: 0 cm.
2. Water Connection
Connect the water supply hose to a cold water tap and the dishwasher's water inlet. Ensure all connections are tight to prevent leaks. Connect the drain hose to a suitable drain point, ensuring it is securely fastened and allows for proper water drainage.
3. Power Connection
Plug the power cord into a grounded electrical outlet. Verify that the voltage and frequency match the specifications of the dishwasher.
Operating Instructions
1. Loading Dishes
Scrape off large food particles from dishes before loading. Place larger items in the lower rack and smaller items, glasses, and cups in the upper rack. Ensure dishes do not block the spray arms. Place cutlery in the designated basket with handles facing down for safety and better cleaning.
2. Adding Detergent
Add the recommended amount of dishwasher detergent to the detergent dispenser. Refer to the detergent manufacturer's instructions for proper dosage.
3. Selecting a Program
Close the dishwasher door firmly. Press the Power On button. Use the Course button to select the desired wash program. Available programs include:
- 30 / 45 / 60: Timed wash cycles.
- 低温ソフト (Low Temp Soft): For delicate items or light soil.
- 標準 (Standard): Regular daily wash.
- 強力 (Strong): For heavily soiled dishes.
- 除菌ミスト (Sterilization Mist): A sterilization mist option.
- 洗い (Wash): Wash cycle only.
- すすぎ (Rinse): Rinse cycle only.
- 乾燥 (Dry): Drying cycle only.
- 記憶 (Memory): Recalls a previously used setting.
- 予約 (Reservation): Delay start function.
- 乾燥(分) (Dry (min)): Adjust drying time in minutes.
4. Starting the Cycle
Press the スタート一時停止 (Start/Pause) button to begin the selected wash cycle. The dishwasher will automatically proceed through the wash, rinse, and dry phases.
5. Drying Options
The dishwasher includes a drying function. You can select 乾燥のみ (Dry Only) or adjust the drying duration using 乾燥(分) (Dry (min)) if available for your chosen program.
Maintenance
Regular maintenance ensures optimal performance and extends the lifespan of your dishwasher.
1. Cleaning Filters
Periodically remove and clean the filters located at the bottom of the dishwasher tub. Rinse them under running water to remove food particles. Reinstall them correctly after cleaning.
2. Cleaning Spray Arms
Check the spray arm nozzles for blockages. If necessary, remove the spray arms and clear any debris from the holes using a small brush or toothpick. Ensure they rotate freely after reinstallation.
3. Exterior Cleaning
Wipe the exterior surfaces of the dishwasher with a soft, damp cloth. Do not use abrasive cleaners or solvents.
4. Interior Cleaning
Run an empty cycle with a dishwasher cleaner or a cup of white vinegar to remove mineral buildup and odors.
Troubleshooting
Before contacting customer service, refer to the following common issues and solutions:
| Problem | Possible Cause | Solution |
|---|---|---|
| Dishwasher does not start. | Power cord unplugged, door not closed properly, circuit breaker tripped. | Check power connection, ensure door is latched, reset circuit breaker. |
| Dishes are not clean. | Improper loading, clogged spray arms, insufficient detergent, incorrect program. | Reload dishes, clean spray arms and filters, use appropriate detergent and program. |
| Water remains in the tub. | Clogged drain hose or filter, drain pump malfunction. | Clean drain hose and filters. If problem persists, contact service. |
| Dishwasher leaks. | Loose hose connections, damaged door seal, excessive suds. | Check hose connections, inspect door seal, use correct detergent amount. |
Specifications
| Brand | Panasonic |
| Model | NP-TR3 |
| Color | White |
| Installation Type | Freestanding |
| Operating Frequency | 60 Hz |
| Rated Power | 1100 W |
| Maximum Power Consumption | 1165 / 1180 W |
| Electric Motor Rated Power | 65 / 80 W |
| Manufacturing Year | 2010 |
| Serial Number | 1073E01772 |
| Clearance from Combustibles (Top/Side/Rear/Bottom) | 8.0 cm / 0.5 cm / 0.5 cm / 0 cm |

Figure 5: Rear view of the dishwasher showing the product specification label.
Warranty and Support
For warranty information and customer support, please refer to the warranty card included with your purchase or visit the official Panasonic website. Keep your purchase receipt as proof of purchase for warranty claims.
For service inquiries, please contact Panasonic customer support. When contacting support, please have your model number (NP-TR3) and serial number (1073E01772) ready.