1. Introduction
Thank you for choosing the SONAX PM-2210 Fixed Wall Mount. This product is designed to securely mount flat and curved panel televisions ranging from 40 to 100 inches to a wall. It features a robust steel construction and a slight forward tilt for optimal viewing. Please read this manual thoroughly before installation to ensure safe and correct setup and operation.
2. Safety Information
WARNING: Failure to read and follow these instructions may result in serious personal injury, property damage, or voiding of your warranty.
- Ensure the mounting surface (wall) can safely support the combined weight of the mount and your television. Consult a qualified professional if you are unsure about your wall's structural integrity.
- Do not exceed the maximum weight capacity of 165 lbs (75 kg).
- This mount is designed for TVs between 40 and 100 inches. Do not attempt to mount TVs outside this size range.
- Always use appropriate safety equipment and tools during installation.
- Keep children and pets away from the work area during installation.
- Verify that the VESA mounting pattern on your TV is compatible with this mount (200x200 to 800x400).
- Tighten all screws firmly but do not overtighten. Overtightening can damage components.
3. Package Contents
Please verify that all components are present and undamaged before beginning installation. If any parts are missing or damaged, contact customer support.
- Wall Plate (1)
- TV Brackets (2)
- Mounting Hardware Kit (various screws, washers, spacers, wall anchors)
- Bubble Level (1)
- Instruction Manual (this document)

Image: Front view of the wall plate and TV brackets, illustrating the main components of the mount.
4. Setup (Installation)
Follow these steps carefully for a secure installation. Two people are recommended for safe installation, especially when lifting the television.
4.1 Pre-Installation Check
- Verify your TV's weight and size are within the mount's limits (165 lbs / 75 kg, 40-100 inches).
- Determine your TV's VESA mounting pattern by measuring the horizontal and vertical distances between the screw holes on the back of your TV. This mount supports VESA patterns from 200x200 to 800x400.

Image: Diagram illustrating how to measure the horizontal and vertical distances for determining your TV's VESA mounting pattern.
4.2 Wall Plate Placement
- Locate the desired mounting position on your wall. Use a stud finder to locate at least two adjacent wooden studs. The extra wide wall plate (35.75 inches / 90.5 cm) accommodates 16-inch and 24-inch wall stud spacing.
- Hold the wall plate against the wall at the desired height and use the included bubble level to ensure it is perfectly horizontal. Mark the drilling points for the fasteners.

Image: Dimensional drawing of the wall mount, showing overall width and height, and the adjustable rails.
4.3 Mount Wall Plate
- Drill pilot holes at the marked locations. Ensure the drill bit size is appropriate for your chosen fasteners (lag bolts for wood studs, or anchors for concrete/brick walls).
- Attach the wall plate to the wall using the provided mounting hardware. Ensure all fasteners are securely tightened.
4.4 Attach TV Brackets
- Carefully place your TV face down on a soft, clean surface.
- Attach the two TV brackets to the back of your television using the appropriate screws, washers, and spacers from the hardware kit that match your TV's VESA pattern. Ensure the brackets are centered and securely fastened.
4.5 Mount TV to Wall Plate
- With assistance, carefully lift the television and hook the TV brackets onto the top edge of the wall plate.
- Gently lower the TV until the brackets are fully seated on the wall plate. Ensure the TV is level.

Image: An example of a television securely mounted to a wall using the SONAX wall mount, positioned above an entertainment console.
4.6 Secure TV
- Locate the locking mechanism at the bottom of the TV brackets. Engage the locking system to prevent accidental dislodgement of the TV.
- For additional security, a padlock (not included) can be used with the integrated locking system.

Image: Close-up view of the bottom section of the TV bracket, showing the locking mechanism and an optional padlock for enhanced security.
5. Operating (Usage)
The SONAX PM-2210 mount provides a fixed position with a slight forward tilt capability.
5.1 Adjusting Tilt Angle
- The mount allows for a 5-degree forward tilting angle. This angle is typically set during the installation process by adjusting the tilt mechanism on the TV brackets before securing the TV.
- To adjust the tilt, carefully loosen the tilt adjustment bolts on the TV brackets, set the desired angle, and then re-tighten the bolts securely. Always ensure the TV is stable after adjustment.
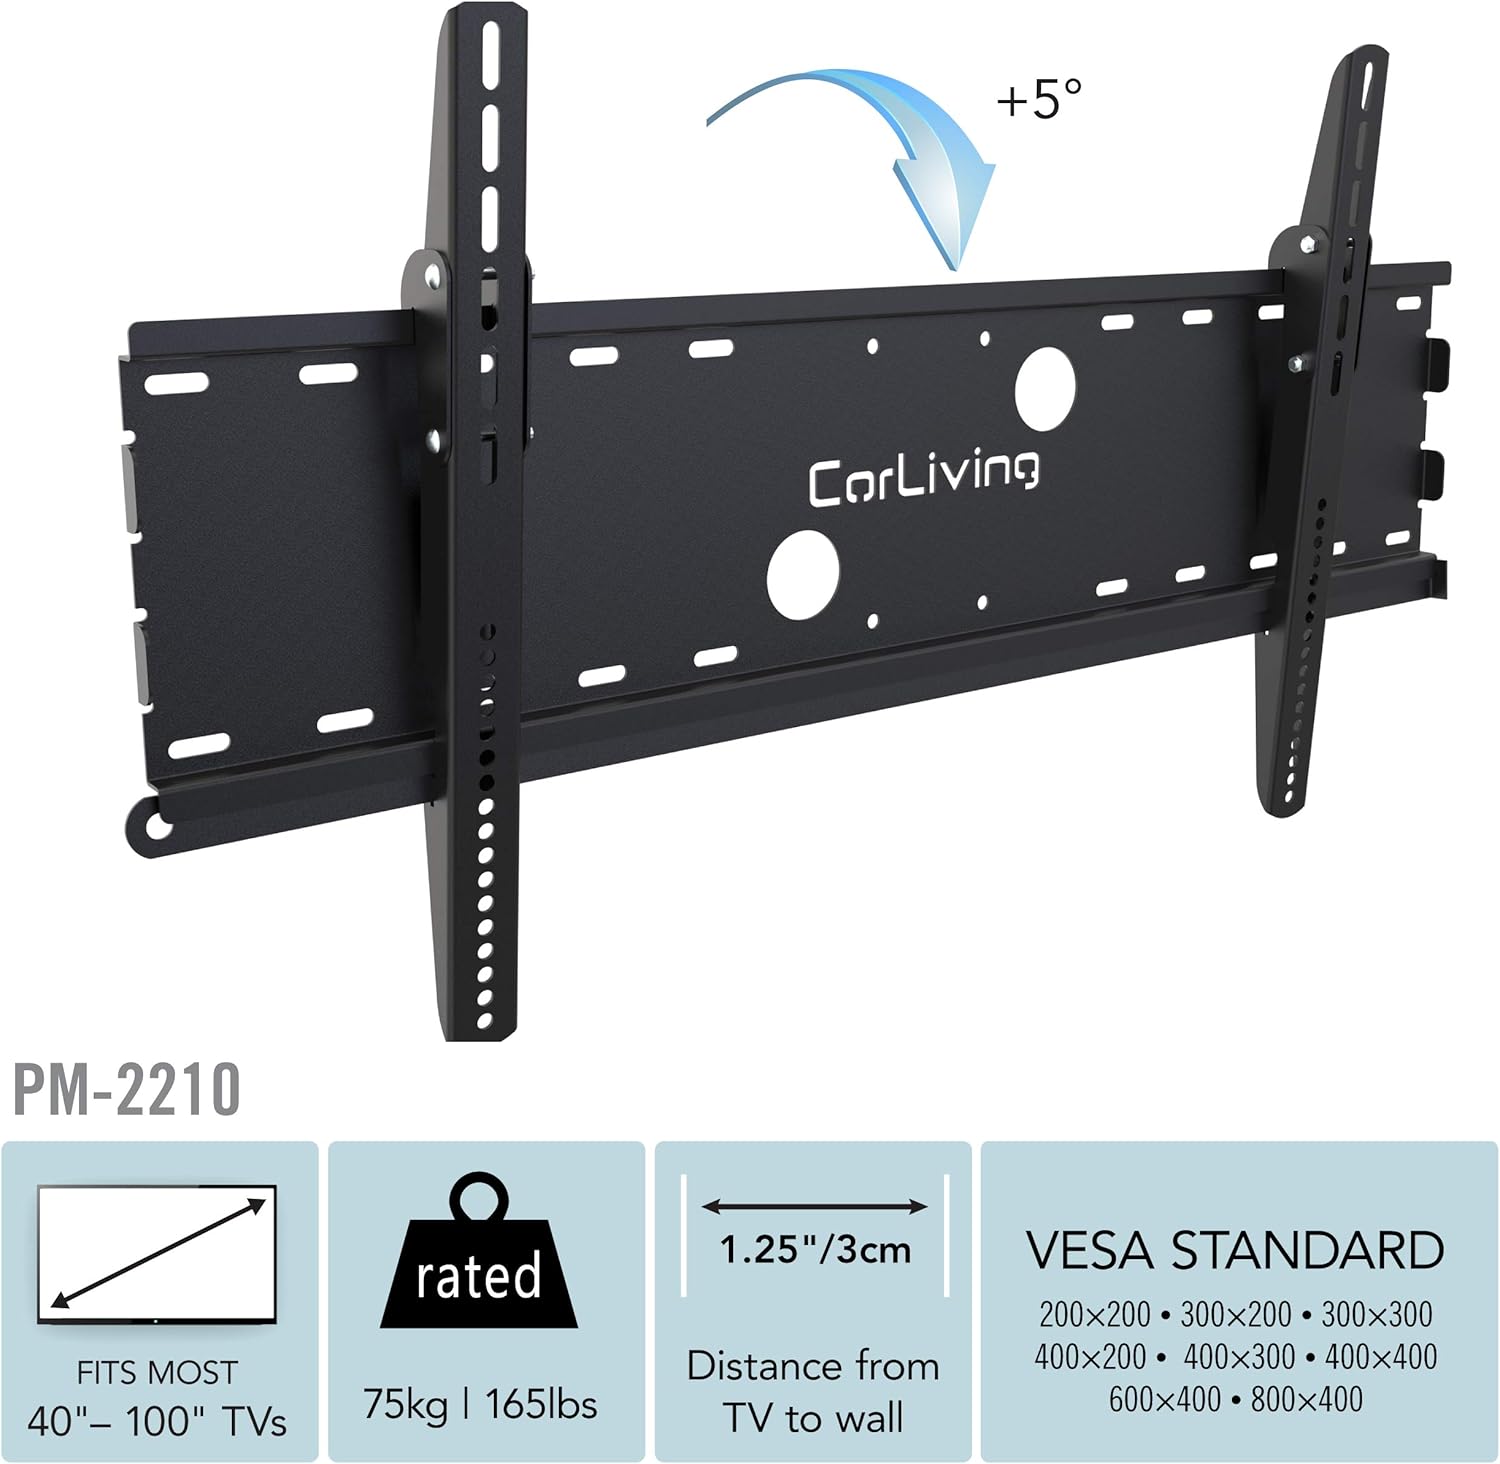
Image: Diagram illustrating the 5-degree forward tilt capability of the SONAX PM-2210 wall mount.
6. Maintenance
- Periodically check all mounting screws and bolts to ensure they remain tight and secure.
- Clean the mount with a soft, dry cloth. Avoid abrasive cleaners or solvents that could damage the finish.
- Do not hang objects from the mount or TV.
7. Troubleshooting
7.1 TV Not Level
- Ensure the wall plate was installed perfectly level using the bubble level. If not, minor adjustments might be possible by slightly loosening and re-tightening the TV brackets on the TV, or by re-leveling the wall plate if necessary.
7.2 TV Not Secure
- Verify that the TV brackets are fully seated on the wall plate.
- Ensure the locking mechanism at the bottom of the TV brackets is engaged.
- Check all screws and bolts for tightness. Do not overtighten.
7.3 Missing Parts
- Refer to the 'Package Contents' section. If any parts are missing, contact SONAX customer support immediately.
8. Specifications
| Model Number | PM-2210 |
| Mounting Type | Wall Mount |
| Movement Type | Tilt |
| Material | Heavy Duty Steel |
| Color | Black |
| Compatible Devices | Television |
| Minimum Screen Size | 40 Inches |
| Maximum Screen Size | 100 Inches |
| Weight Capacity | 165 lbs (75 kg) |
| VESA Compatibility | 200x200 to 800x400 |
| Maximum Tilt Angle | 5 Degrees (Forward) |
| Wall Profile | 1.25 inches (3.5 cm) from wall |
| Wall Plate Width | 35.75 inches (90.5 cm) |
| Stud Spacing Compatibility | 16 inches and 24 inches |
| Security Feature | Locking system (padlock not included) |
| Included Accessories | Bubble Level |
| Item Weight | 11 Pounds |
9. Warranty Information
This SONAX product is covered by a 6-month limited warranty. This warranty covers defects in materials and workmanship under normal use. For specific terms and conditions, please refer to the warranty documentation included with your purchase or contact SONAX customer support.
10. Customer Support
If you have any questions, require assistance with installation, or need to report missing or damaged parts, please contact SONAX customer service. Have your model number (PM-2210) and proof of purchase ready when contacting support.
For further information, you may visit the SONAX Store on Amazon.