1. Introduction
The Estes Alpha III rocket launch kit is a beginner-friendly project designed to inspire creativity and STEM learning. This kit is suitable for individuals aged 10 and older, with adult supervision recommended for those under 12. It provides a hands-on experience in physics, engineering, and aerospace principles. The Alpha III model is capable of reaching a projected altitude of 1,150 feet (351 meters).
The estimated preparation time for this model is approximately 1 hour, not including glue and paint drying times. To ensure safe operation, always adhere to the National Association of Rocketry (NAR) model-rocket safety code.

Image: The Estes Alpha III Rocket Kit, including the rocket, launch pad, and controller.
2. What's Included
The Estes Alpha III Rocket Launch Set (Model 1427, E2X series) includes the following components:
- Alpha III Rocket parts (nose cone, body tube, fins)
- Engine mount components
- Decals
- Parachute
- Porta-Pad II Launch Pad
- Electron Beam Launch Controller
- Instructions

Image: Visual representation of the Estes Alpha III rocket kit components and key dimensions.

Image: An overhead view displaying all the individual parts and accessories included in the Estes Alpha III Rocket Kit.
3. Tools and Materials Required (Not Included)
To build and launch your Estes Alpha III rocket, you will need the following items, which are not included in the kit:
- Scissors
- Pencil
- Ruler
- Fine sandpaper
- Carpenter’s glue
- Hobby knife
- Compatible Estes model-rocket engine (e.g., 1/2A6-2, A8-3, A8-5, B4-4, B6-4, B6-6, C6-5, or C6-7)
- Starters
- Recovery Wadding
- 4 high-quality 1.5-volt AA alkaline batteries (for the launch controller)
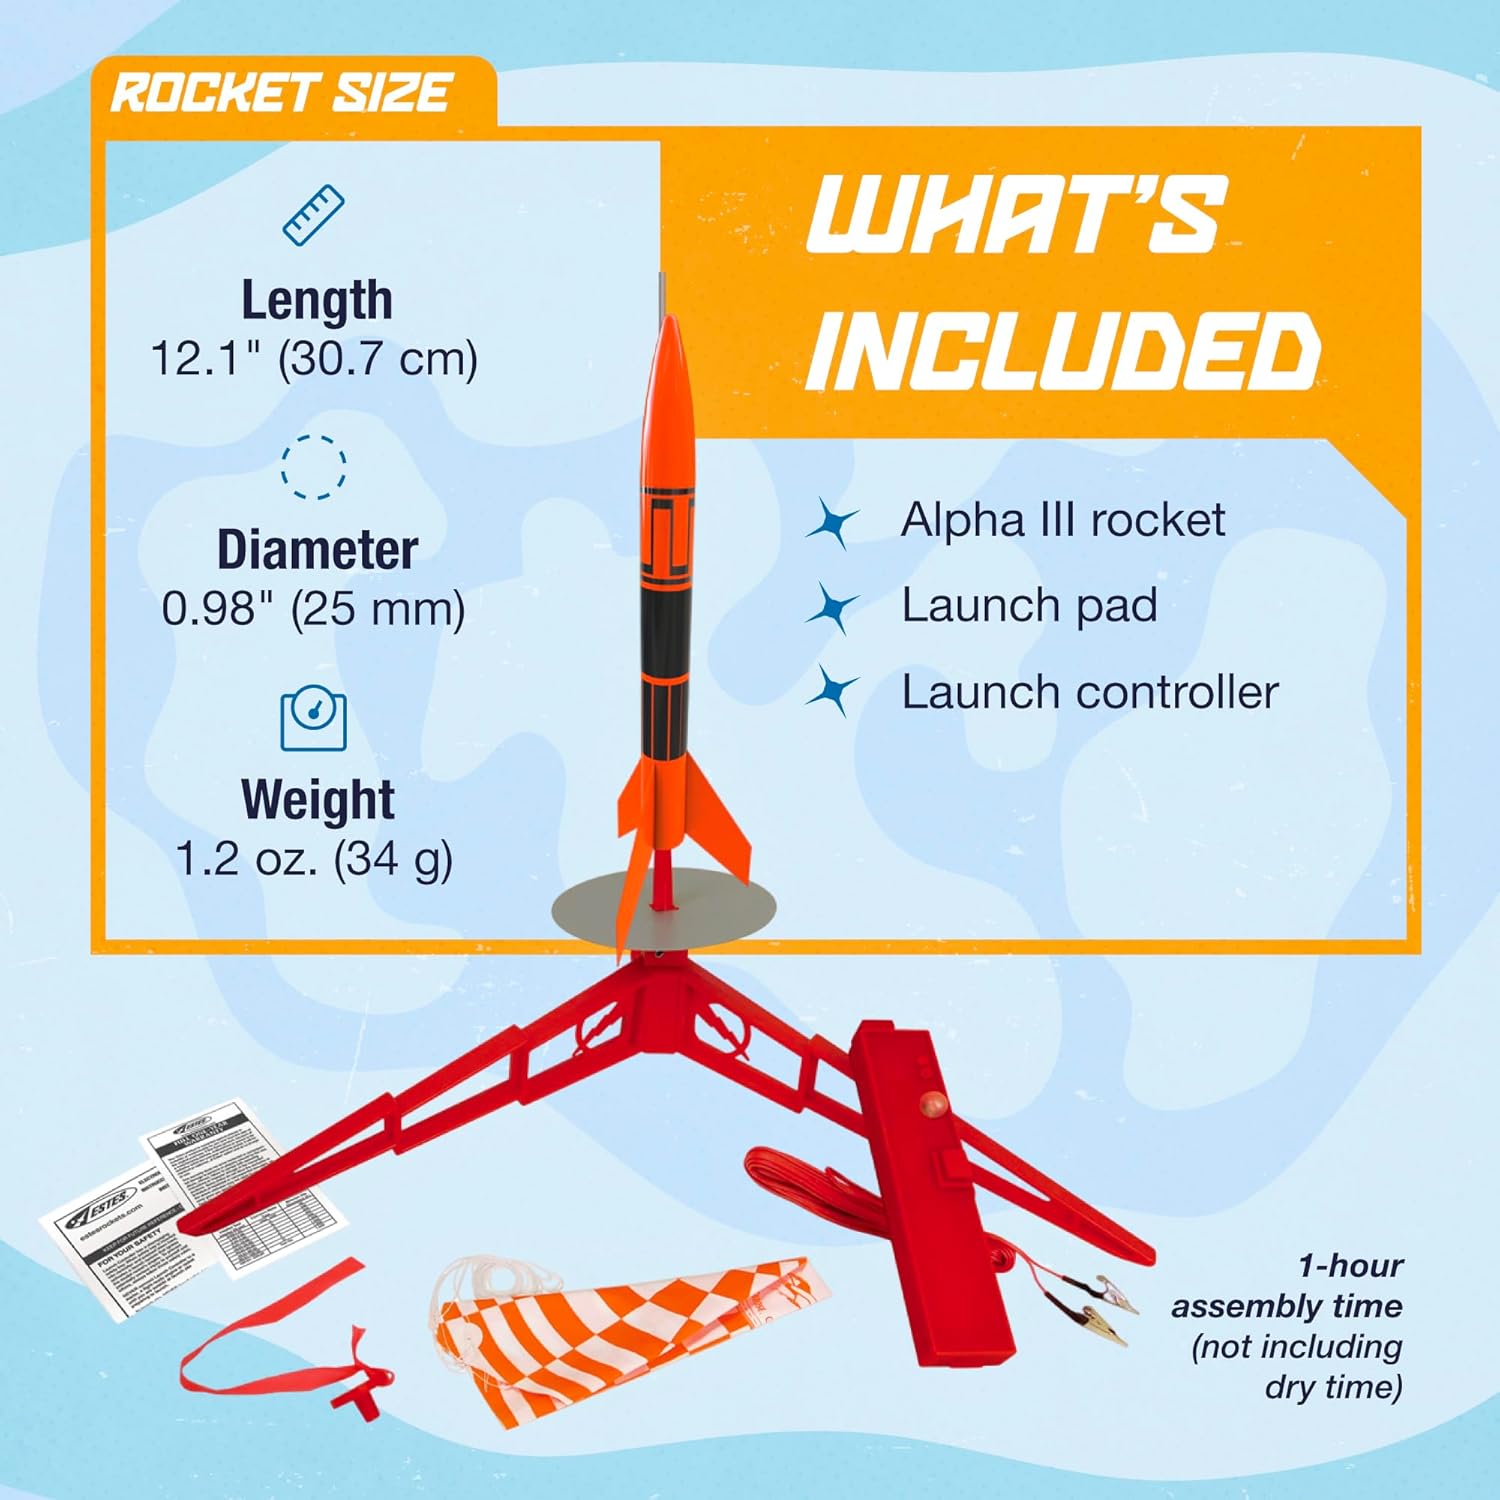
Image: A visual guide to the tools and additional materials required for the rocket's assembly and launch.

Image: Close-up of hands applying glue to a rocket component during the assembly process.

Image: A pack of Estes Recovery Wadding, essential for protecting the parachute during engine ejection.
4. Assembly Instructions
Follow the detailed instructions provided within your kit for precise assembly. The general steps are as follows:
- Carefully remove all rocket parts from the kit packaging.
- Using scissors, a pencil, a ruler, fine sandpaper, and carpenter’s glue, assemble the rocket components. Pay close attention to the fit and alignment of each part, especially the fins and engine mount.
- Allow the glue to dry completely according to the adhesive manufacturer's recommendations. This is crucial for structural integrity.
- If desired, paint the rocket for customization. Ensure the paint is fully dry before proceeding to launch preparation.
The E2X (Easy to Assemble) design ensures a straightforward building process, typically completed within an hour, excluding drying times.
5. Launch Preparation
Before each launch, ensure your rocket is properly prepared and your launch site is safe.
- Insert a compatible Estes model-rocket engine, starters, and recovery wadding into the rocket as per the kit instructions.
- Install 4 high-quality 1.5-volt AA alkaline batteries into the Electron Beam Launch Controller.
- Set up the Porta-Pad II Launch Pad in a large, open area free from dry weeds, brown grass, or other flammable materials.
- Place the rocket onto the launch rod of the Porta-Pad II Launch Pad.

Image: The Porta-Pad II Launch Pad, ready for rocket placement.

Image: The Electron Beam Launch Controller, used to initiate the rocket launch.
6. Operating Instructions (Launch Sequence)
Once the rocket is assembled and the launch pad is set up, you are ready to launch. Always prioritize safety during this process.
- Ensure all spectators and operators are at a safe distance, at least 15 feet away from the launch pad.
- Insert the safety key into the Electron Beam Launch Controller.
- Initiate a clear countdown (e.g., "5, 4, 3, 2, 1, Launch!").
- Press and hold the launch button on the controller to ignite the engine and launch the rocket.
- Observe the rocket's flight path and recovery.
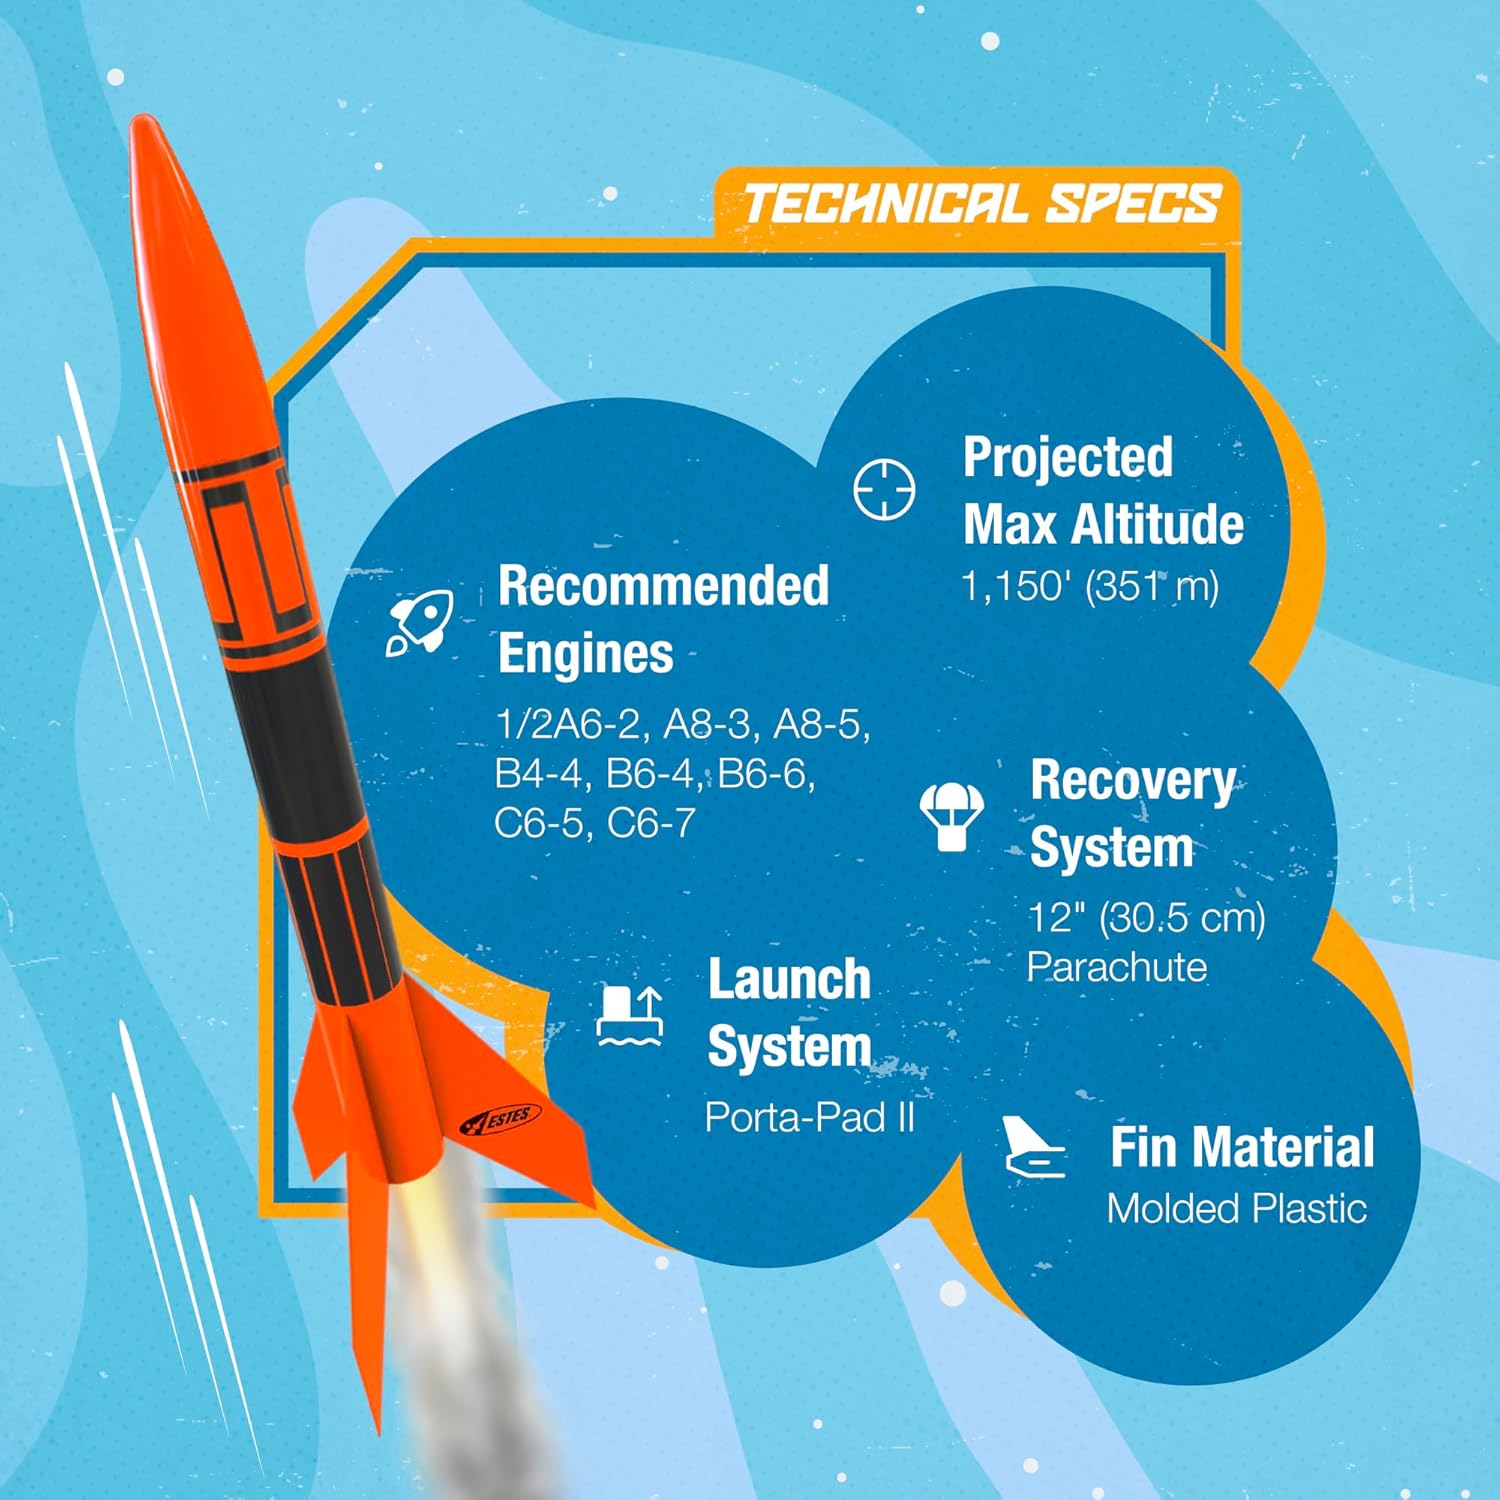
Image: A visual diagram detailing the typical flight sequence of a model rocket, from launch to parachute deployment and recovery.
Official Launch Videos
Video: An official Estes video showcasing the Alpha III rocket in flight, demonstrating its launch and recovery.
Video: A short official Estes video demonstrating the launch of the Alpha III model rocket.
7. Safety Guidelines
Safety is paramount when operating model rockets. Always follow these guidelines:
- Adult Supervision: Adult supervision is strongly recommended for users under 12 years of age.
- Launch Site: Choose a large, open launch site free from obstacles, dry vegetation, power lines, and buildings.
- Safe Distance: Maintain a minimum safe distance of 15 feet from the launch pad for all individuals.
- Safety Key: Always insert the safety key into the launch controller only when ready to launch and remove it immediately after launch.
- Countdown: Use a clear and audible countdown to alert everyone before launch.
- Weather Conditions: Do not launch in high winds, near clouds, or during thunderstorms.
- Recovery: Never attempt to catch a falling rocket. Allow it to land naturally and retrieve it safely.
- NAR Safety Code: Familiarize yourself with and strictly follow the National Association of Rocketry (NAR) Model Rocket Safety Code.
8. Maintenance
Proper maintenance ensures the longevity and safe operation of your Estes Alpha III rocket.
- Pre-Flight Inspection: Before each launch, inspect all rocket components (nose cone, body tube, fins, engine mount, recovery system) for any signs of damage, cracks, or loose parts.
- Post-Flight Inspection: After each flight, check the rocket for any damage from landing. Repair any minor damage with appropriate adhesives.
- Cleaning: Keep the rocket and launch system clean and free of debris.
- Storage: Store the rocket and all components in a dry, cool place away from direct sunlight and extreme temperatures. Ensure batteries are removed from the launch controller during storage.
9. Troubleshooting
If you encounter issues with your Estes Alpha III rocket, consider the following common troubleshooting steps:
- Failure to Launch:
- Ensure the launch controller batteries are fresh and correctly installed.
- Check all electrical connections from the controller to the igniter for secure contact.
- Verify the igniter is properly inserted into the engine and making contact with the propellant.
- Confirm the safety key is fully inserted into the controller.
- Erratic Flight:
- Inspect fins for damage or misalignment.
- Ensure the nose cone is securely attached but can still separate for recovery.
- Verify the rocket is properly seated on the launch rod.
- Recovery System Failure:
- Ensure recovery wadding was used to protect the parachute from hot gases.
- Check that the parachute is correctly packed and not tangled.
- Verify the shock cord is securely attached and not frayed.
For further assistance, refer to the detailed troubleshooting section in your kit's instruction manual or contact Estes customer support.
10. Specifications
| Feature | Detail |
|---|---|
| Brand Name | Estes |
| Model Name | Estes 1427 Alpha III Model Rocket Launch Set |
| Model Number | 1427 |
| Age Range Description | Kid (Ages 10+) |
| Projected Max Altitude | 1,150 ft (351 m) |
| Recommended Engines | 1/2A6-2, A8-3, A8-5, B4-4, B6-4, B6-6, C6-5, C6-7 (sold separately) |
| Recovery System | 12" (30.5 cm) Parachute |
| Launch System | Porta-Pad II Launch Pad, Electron Beam Launch Controller |
| Fin Material | Molded Plastic |
| Assembly Required | Yes |
| Assembly Time | 1 hour or less (excluding drying time) |
| Power Source | Battery Powered (4 AA batteries, not included) |
| Item Weight | 1.2 Ounces |
| Item Dimensions | 12.1 x 0.98 x 12.1 inches |
| Color | Black, Orange |

Image: The Estes Alpha III rocket with an overlay of its technical specifications, including altitude, engine compatibility, and recovery system.
11. Warranty and Support
The Estes Alpha III Rocket-Building Kit comes with a 1 Year Warranty Against Manufacturer Defects.
For warranty claims or product support, please contact Estes Industries directly:
- Estes Industries
- 1295 H Street Penrose, CO 81240
- Toll-Free: 800-525-7561
- Telephone: 719-372-6565
- Fax: 719-372-3419
- Website: www.estesrockets.com