Kramer Electronics VS-1616A
Kramer VS-1616A 16x16 Balanced Stereo Audio Matrix Switcher User Manual
Model: VS-1616A | Brand: Kramer Electronics
1. Introduction
This manual provides comprehensive instructions for the installation, operation, and maintenance of the Kramer VS-1616A 16x16 Balanced Stereo Audio Matrix Switcher. The VS-1616A is designed to switch any of 16 balanced stereo audio inputs to any or all of 16 balanced stereo audio outputs. It is a high-performance device suitable for various professional audio applications, offering flexible routing and control options.
2. Product Overview
The Kramer VS-1616A is a rack-mountable audio matrix switcher featuring 16 balanced stereo audio inputs and 16 balanced stereo audio outputs. It supports various control methods, including front panel buttons, RS-232, and RS-485, allowing for seamless integration into existing control systems. The unit can store multiple switching configurations as presets for quick recall.
2.1 Front Panel Features
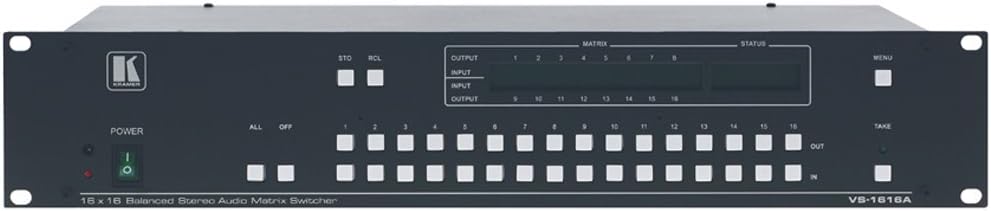
Figure 1: Front Panel of Kramer VS-1616A. This image displays the front panel of the VS-1616A, showing the power switch, input and output selection buttons (1-16), a matrix display for current routing, and control buttons such as STD, RCL, ALL, OFF, TAKE, and MENU.
- POWER Switch: Toggles the unit's power on or off.
- Input/Output Selection Buttons (1-16): Used to select specific inputs and outputs for routing.
- Matrix Display: Shows the current input-to-output routing configuration.
- STD (Store): Stores the current routing configuration as a preset.
- RCL (Recall): Recalls a previously stored preset.
- ALL: Selects all outputs simultaneously.
- OFF: Disconnects all selected outputs.
- TAKE: Executes the selected routing change.
- MENU: Accesses system settings and configuration options.
2.2 Rear Panel Features

Figure 2: Rear Panel of Kramer VS-1616A. This image illustrates the rear panel, featuring 16 balanced stereo audio inputs and 16 balanced stereo audio outputs via terminal block connectors. It also shows RS-232 IN/OUT ports, an RS-485 port, a SETUP port, and the AC power inlet.
- Balanced Stereo Audio Inputs (1-16): Terminal block connectors for 16 balanced stereo audio sources.
- Balanced Stereo Audio Outputs (1-16): Terminal block connectors for 16 balanced stereo audio destinations.
- RS-232 IN/OUT Ports: For serial control and communication with a computer or control system.
- RS-485 Port: For extended serial control in multi-unit installations.
- SETUP Port: Used for initial configuration and firmware updates.
- AC Power Inlet: Connects to the main power supply.
- EXTENSION / UNBALANCED OUT: Additional output options.
3. Setup
3.1 Rack Mounting
The VS-1616A is designed for standard 19-inch rack mounting. Secure the unit using appropriate rack screws through the mounting ears on the front panel. Ensure adequate ventilation around the unit to prevent overheating.
3.2 Connecting Audio Devices
- Ensure the VS-1616A and all audio devices are powered off before making connections.
- Connect your balanced stereo audio sources (e.g., mixers, media players) to the Balanced Stereo Audio Inputs (1-16) on the rear panel using appropriate terminal block connectors.
- Connect your balanced stereo audio destinations (e.g., amplifiers, recording devices) to the Balanced Stereo Audio Outputs (1-16) on the rear panel using appropriate terminal block connectors.
- Ensure all connections are secure and correctly wired for balanced stereo audio.
3.3 Connecting Control Systems (Optional)
For remote control, connect a computer or control system to the RS-232 IN port using a serial cable. For multi-unit control or longer distances, utilize the RS-485 port. Refer to the Kramer control protocol documentation for detailed serial communication commands.
3.4 Power Connection
After all audio and control connections are made, connect the supplied AC power cord to the AC Power Inlet on the rear panel and then to a grounded electrical outlet.
4. Operating Instructions
4.1 Powering On/Off
Press the POWER switch on the front panel to turn the unit on or off. The front panel display will illuminate upon power-up.
4.2 Basic Audio Routing
- Press an INPUT button (1-16) to select the desired audio source.
- Press an OUTPUT button (1-16) to select the desired destination for the audio.
- The matrix display will show the pending connection.
- Press the TAKE button to execute the routing change. The display will update to show the active connection.
- To route one input to multiple outputs, select the input, then select each desired output, and finally press TAKE.
- To disconnect an output, select the output and press the OFF button, then TAKE.
- To disconnect all outputs, press the ALL button, then OFF, then TAKE.
4.3 Storing and Recalling Presets
- Storing a Preset:
- Configure the desired audio routing using the input and output buttons.
- Press the STD (Store) button.
- Use the input/output buttons to select a preset number (e.g., 1-16) where you want to save the configuration.
- Press TAKE to confirm and save the preset.
- Recalling a Preset:
- Press the RCL (Recall) button.
- Use the input/output buttons to select the desired preset number.
- Press TAKE to recall and activate the stored routing configuration.
4.4 Menu Navigation
Press the MENU button to access system settings such as display brightness, control options, and advanced routing features. Use the input/output buttons to navigate through menu options and the TAKE button to select or confirm. Refer to the detailed Kramer VS-1616A programming guide for advanced menu functions.
5. Maintenance
- Cleaning: Disconnect power before cleaning. Use a soft, dry cloth to wipe the exterior of the unit. Do not use liquid or aerosol cleaners.
- Ventilation: Ensure that the ventilation openings are not blocked. Proper airflow is crucial for preventing overheating and ensuring long-term reliability.
- Environmental Conditions: Operate the unit within the specified temperature and humidity ranges. Avoid exposing the unit to direct sunlight, excessive dust, or moisture.
6. Troubleshooting
| Problem | Possible Cause | Solution |
|---|---|---|
| No power | Power cord disconnected; power switch off; faulty power outlet. | Check power cord connection; ensure power switch is ON; test power outlet with another device. |
| No audio output | Incorrect routing; audio cables disconnected; source device off; destination device off/muted. | Verify routing on the matrix display; check all audio cable connections; ensure source and destination devices are powered on and unmuted. |
| Unit unresponsive to front panel controls | Unit frozen; internal error. | Power cycle the unit (turn off, wait 10 seconds, turn on). If problem persists, contact support. |
| Remote control (RS-232/RS-485) not working | Incorrect cable; wrong serial settings; software issue. | Verify serial cable type and connection; check baud rate, data bits, parity, stop bits settings; consult Kramer control protocol documentation. |
7. Specifications
| Feature | Detail |
|---|---|
| Model | VS-1616A |
| Inputs | 16 x Balanced Stereo Audio (Terminal Block) |
| Outputs | 16 x Balanced Stereo Audio (Terminal Block) |
| Control Ports | 1 x RS-232 In, 1 x RS-232 Out, 1 x RS-485, 1 x SETUP |
| Form Factor | Rack-Mountable (19-inch) |
| Data Link Protocol | RS-232; RS-485 |
| Features | Stores multiple switches as presets, expandable to 96x96 using multiple units. |
| Product Dimensions | 54.86 x 29.46 x 16 cm (21.6 x 11.6 x 6.3 inches) |
| Weight | 3.63 kg (8 lbs) |
| Manufacturer | Kramer |
| Date First Available | Sept. 30 2012 |
8. Warranty and Support
For detailed warranty information, please refer to the warranty card included with your product or visit the official Kramer Electronics website. For technical support, service, or additional documentation, please contact Kramer Electronics customer support through their official channels.