1. Introduction
The WOODRIVER Clamping System is designed to apply equal pressure from all four directions (top, bottom, and both sides) to your workpiece. This system is ideal for various woodworking tasks, including gluing table tops, shelving, veneer, and laminates, ensuring flat and strong joints. The system includes two clamps, two short bars, two long bars, and necessary screws. Please read this manual thoroughly before use to ensure safe and efficient operation.

Figure 1: The WoodRiver Clamping System in use, demonstrating its ability to apply pressure from multiple directions on a wooden workpiece.
2. Safety Information
Always observe basic safety precautions when using woodworking tools and equipment. Failure to do so may result in personal injury or damage to the equipment.
- Read Instructions: Read and understand all instructions before operating the clamping system.
- Wear Safety Gear: Always wear appropriate personal protective equipment, such as safety glasses, when working with wood and tools.
- Stable Work Surface: Ensure your workpiece and clamping setup are stable and secure on a flat, sturdy workbench.
- Inspect Components: Before each use, inspect all components of the clamping system for damage or wear. Do not use damaged equipment.
- Proper Wood Stock: Use only sound, straight 2x2 lumber (or 2x4 ripped in half) for the clamp bars.
- Avoid Over-tightening: Tighten the clamps only until the desired pressure is achieved. Excessive force can damage the workpiece or the clamp.
- Keep Children Away: Keep children and unauthorized persons away from the work area.
3. Package Contents
Verify that all items listed below are present in your package. If any parts are missing or damaged, contact customer support immediately.
- 2 x Clamping Units (each with a handle and pressure pads)
- 2 x Short Notched Plastic Clamping Bars (19-1/2 inches long)
- 2 x Long Notched Plastic Clamping Bars (19-1/2 inches long)
- Screws for attaching clamps to wood bars
- Instruction Manual (this document)
Note: 2x4 lumber (to be ripped into 2x2s) is not included and must be supplied by the user.
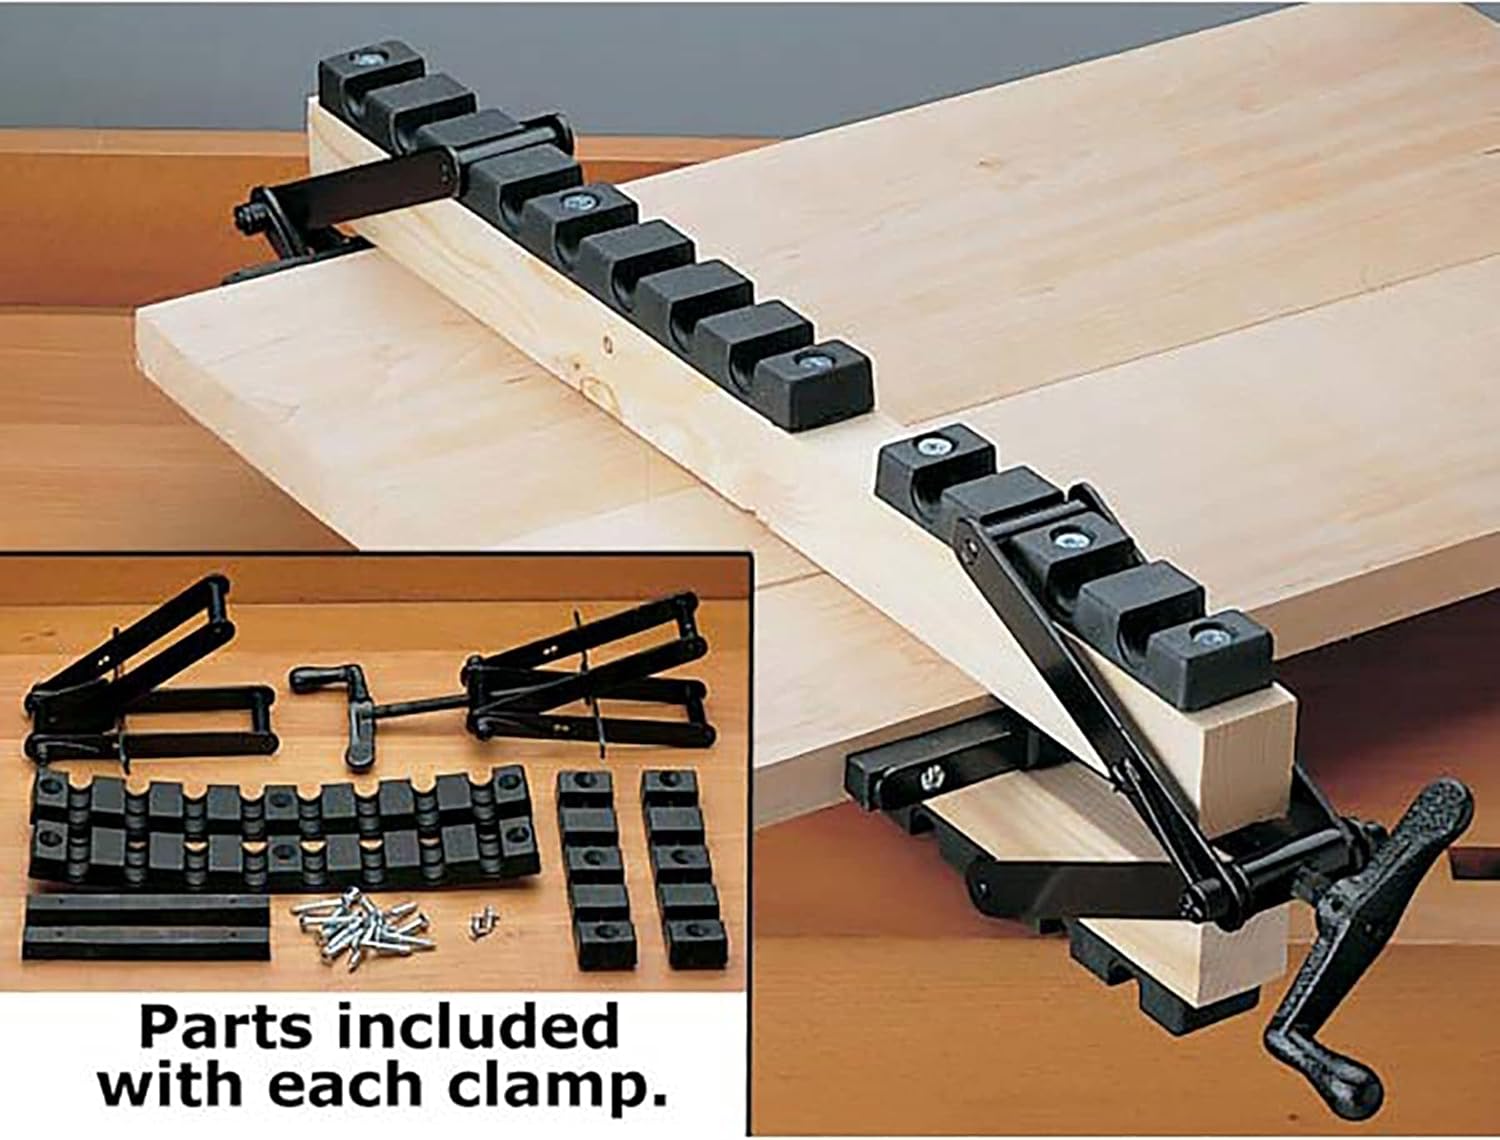
Figure 2: An illustration showing the individual components included with each WoodRiver Clamping System, alongside a view of the clamp in operation.
4. Setup Instructions
Follow these steps to prepare your WoodRiver Clamping System for use.
- Prepare Wood Bars: Obtain straight, sound 2x4 lumber and rip it lengthwise to create two 2x2 pieces. The length of these 2x2s will determine the maximum width of your clamping setup. For large pieces, you may need multiple sets of clamps and 2x2s.
- Attach Clamping Units: Position one clamping unit at each end of your prepared 2x2 wood bars. Ensure the plastic pressure pads face inwards towards where your workpiece will be.
- Secure with Screws: Use the provided screws to firmly attach the clamping units to the 2x2 wood bars. Make sure they are securely fastened to prevent movement during clamping.
- Insert Notched Bars: Slide the short and long notched plastic clamping bars into the designated slots on the clamping units. These bars provide the multi-directional pressure.

Figure 3: The WoodRiver Clamping System fully assembled with user-supplied 2x2 wood bars, ready for a workpiece.
5. Operating Instructions
This section details how to effectively use your WoodRiver Clamping System.
- Prepare Workpiece: Apply adhesive to your workpiece as required for gluing.
- Position Workpiece: Place your workpiece between the assembled clamping units and the notched plastic bars. The system can accommodate boards up to 6 inches thick.
- Set Jig: Adjust the position of the notched plastic bars to align with the thickness of your workpiece. The 12 notches on the 19-1/2 inch tail bars allow for various stock widths.
- Tighten Clamps: Turn the handle on each clamping unit to apply pressure. The system is designed to apply equal pressure from the top, bottom, and both sides simultaneously.
- Optimal Placement: For maximum clamping efficiency on large pieces, position additional clamping systems every 12 to 18 inches along the length of the workpiece.
- Curing Time: Allow the adhesive to cure completely according to the manufacturer's instructions before removing the clamps.

Figure 4: The WoodRiver Clamping System actively holding a glued panel on a workbench, demonstrating its stability and effectiveness during the curing process.
6. Maintenance
Proper maintenance will extend the life and performance of your clamping system.
- Cleaning: After each use, wipe down all components, especially the plastic pressure pads and notched bars, to remove any glue residue or sawdust. A damp cloth can be used, followed by a dry cloth.
- Lubrication: Periodically apply a light lubricant to the threaded rod of the clamping mechanism to ensure smooth operation.
- Storage: Store the clamping system in a clean, dry environment away from direct sunlight and extreme temperatures.
- Inspection: Regularly inspect the plastic components for cracks or excessive wear. Replacement "long" and "short" notched plastic clamping bars are available separately if needed.
7. Troubleshooting
This section addresses common issues you might encounter with the clamping system.
- Uneven Pressure:
- Ensure the 2x2 wood bars are straight and free from warps.
- Verify that the clamping units are securely attached to the wood bars and are parallel.
- Check that the notched plastic bars are correctly seated in their slots.
- Difficulty Tightening:
- Apply a light lubricant to the threaded rod if it feels stiff.
- Ensure no glue or debris is obstructing the mechanism.
- Workpiece Slipping:
- Confirm the workpiece is properly seated against all four pressure points.
- Increase clamping pressure gradually until the workpiece is secure.
8. Specifications
| Model Number | 125392W |
| Brand | WOODRIVER |
| Material | Plastic (Clamping Units, Notched Bars), Metal (Handle, Threaded Rod) |
| Maximum Board Thickness | 6 inches |
| Notched Bar Length | 19-1/2 inches (each) |
| Product Dimensions (Approx.) | 35.31 x 17.27 x 12.07 cm (assembled with short bars) |
| Item Weight (Approx.) | 2.06 kg |
| Included Components | 2 Clamping Units, 2 Short Notched Bars, 2 Long Notched Bars, Screws |
| User-Supplied Components | 2x2 Wood Bars (from ripped 2x4s) |
9. Warranty Information
WOODRIVER products are manufactured to high-quality standards. This product is covered by a limited manufacturer's warranty against defects in materials and workmanship. For specific warranty terms and conditions, please refer to the warranty card included with your purchase or visit the official Woodcraft website. Keep your proof of purchase for warranty claims.
10. Customer Support
If you have any questions, require assistance, or need to order replacement parts for your WOODRIVER Clamping System, please contact Woodcraft customer support.
- Online Support: Visit the official Woodcraft website for FAQs, product information, and contact options. www.woodcraft.com
- Replacement Parts: Replacement "long" and "short" notched plastic clamping bars are available separately through Woodcraft.