Introduction
This manual provides essential information for the safe and efficient use of your Pacer Pumps SE2UL E5HCP water transfer pump. Designed for multi-purpose water transfer, this self-priming pump features a robust Honda GX engine and is capable of moving up to 200 gallons per minute. Adhering to the instructions outlined herein will ensure reliable operation and extend the lifespan of your equipment.
Setup
Before initial use, carefully inspect the pump for any damage that may have occurred during shipping. Ensure all components listed in the accompanying documentation are present. Refer to the engine's specific manual for detailed instructions on engine setup.
Initial Preparation
- Oil Fill: Fill the crankcase with high-grade oil as specified on the engine nameplate or in the engine's instruction book.
- Fuel Fill: Fill the fuel tank with fresh gasoline.
Pump Placement
Set the pump on a firm, level footing to prevent movement due to vibration during operation. Utilize boards or a hard surface, or Pacer's optional roll cage, rather than soft ground. Improper placement can lead to the pump falling into excavations, especially if the suction line is full of water.
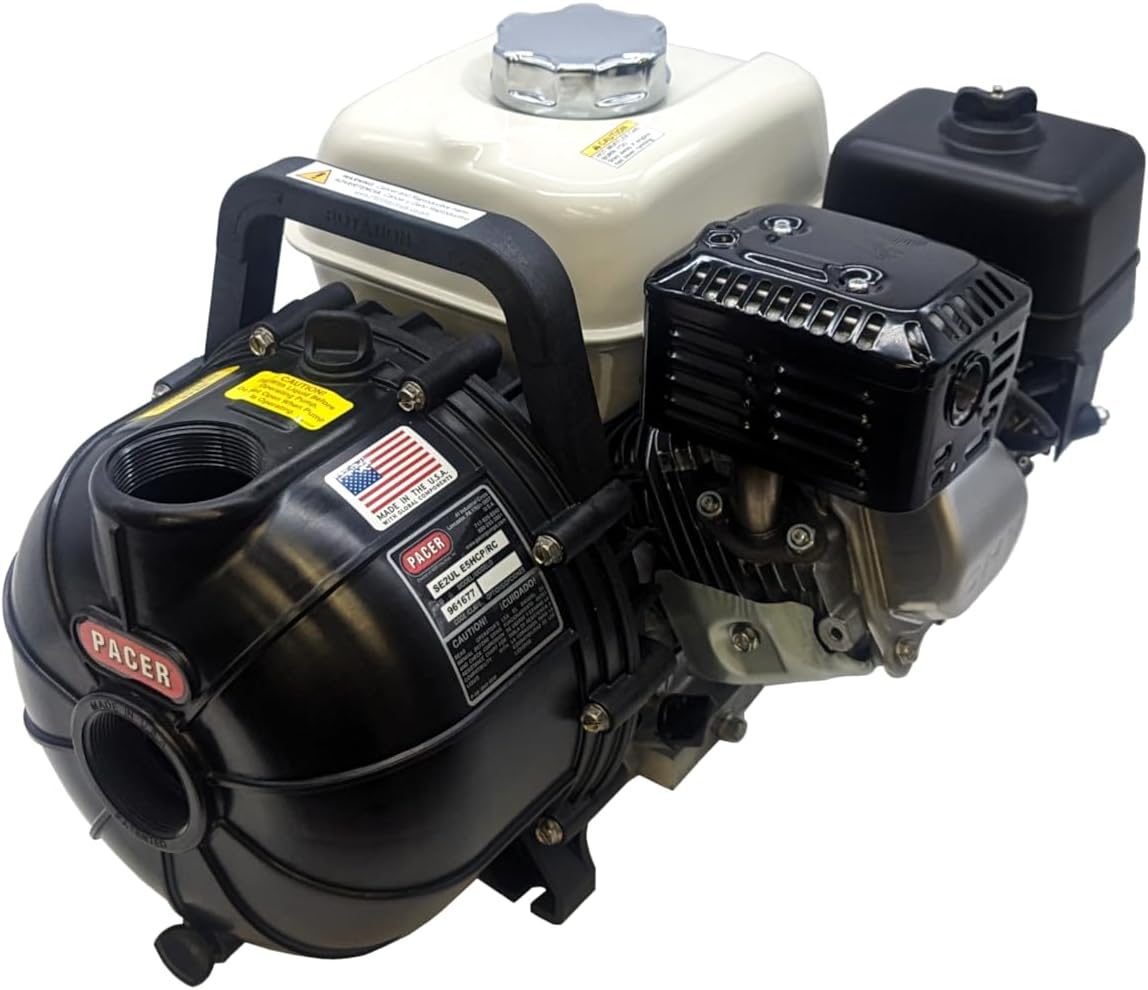
Figure 1: Overall view of the Pacer Pumps SE2UL E5HCP water transfer pump.

Figure 2: The Honda GX160 engine, showing the oil fill cap and warning labels.

Figure 3: Top view of the pump, highlighting the fuel tank for filling.
Setup and Operation Video Guide
Video 1: "Pacer Pump - How to start your pump" (Courtesy of Pacer Pumps). This video demonstrates initial setup, priming, and operational procedures.
Operation
Priming the Pump
When first installed, it is necessary to fill the pump casing with liquid to provide the initial prime. Remove the priming fitting at the top of the pump casing, fill the casing with liquid, and then replace the plug. It is not necessary to fill the suction line. The shorter the suction lift, the faster the pump will prime. Never restrict the inlet or outlet on initial startup.
Hose Connections
Ensure that the hose used on the suction side does not have a collapsed liner, breaks, cuts, or pinholes. An air leak will prevent priming and reduce the pump's capacity. A hose size larger than the pump's connections will increase capacity under low heads but may decrease priming speed.
When using rigid piping, proper independent support should be provided for the piping; it should not be supported or carried by the pump. It is advisable to install a short length of hose between the pump and rigid pipe on both suction and discharge sides. All piping, especially on the suction side, should be made as short as possible with the fewest elbows to avoid unnecessary friction loss.
The hose on the discharge side may be of the collapsible or rigid type. Again, ensure that hoses and fittings are in good condition. While it is not advisable to use pipe sizes smaller than those for which the pump is fitted, larger sizes may be advisable in some cases to maintain high capacity.
Strainer Use
A proper strainer must always be installed on the suction line. Failure to do so may damage the pump, cause clogging, and reduce its capacity. The strainer should have a net area of at least four times that of the suction pipe and should be inspected and cleaned at regular intervals, more or less frequently depending on operating conditions.
Suction Lift
Self-priming centrifugal pumps can be located as high as 25 feet above the liquid source. However, it is good practice to keep the suction lift to a minimum; 15 feet is ideal. It is best if the suction pipe has a gradual rise towards the pump. While essential for regular centrifugal pumps, this is also best practice for self-priming pumps.
Check Valves
For high head jobs, a check valve should be installed in the discharge line close to the pump. A check valve is required to protect the pump against excessive surge of pressure from a vertical discharge line. Self-priming centrifugal pumps are provided with a built-in check valve in the pump on the suction side. This valve prevents the loss of priming liquid in the pump casing during idle pump periods. A foot valve on the end of the suction pipe is not a necessity.
Throttling
Should conditions require that the pump be throttled, slow down the engine when possible. However, it is essential to maintain full engine speed to prime properly.
Maintenance
Proper maintenance of your engine-powered pump will provide years of uninterrupted service. The engine manufacturer recommends the following services:
- Engine Oil: Drain and replace the engine oil after the first 5 hours of use, and then every 50 hours or annually, whichever comes first. A synthetic 5W-30 oil will suffice for all types of climate. Be sure to check the oil level before each start.
- Air Filter: Clean the air filter every 25 hours of use or after use in a dusty environment. Replace the air filter annually.
- Spark Plug: Replace the spark plug annually. Refer to your engine manual for proper plug and gap setting.
- Fuel: Use clean gasoline, ethanol-free if possible. If ethanol is added, use a stabilizer mix to prevent possible fuel system problems.
Troubleshooting
This section provides guidance for common issues you might encounter with your pump. For more complex problems, consult a qualified service technician.
Pump Not Priming or Low Flow
- Check Priming Liquid: Ensure the pump casing is filled with liquid.
- Inspect Suction Hose: Look for air leaks, kinks, or blockages in the suction hose. Even small leaks can prevent priming.
- Clean Strainer: A clogged strainer on the suction line can severely restrict flow. Clean it regularly.
- Verify Suction Lift: Ensure the pump is not exceeding its maximum suction lift (25 feet). Ideally, keep it to 15 feet or less.
- Hose Sizing: Confirm that both suction and discharge hoses are of appropriate size. Undersized hoses can cause excessive friction loss.
Engine Issues
- Engine Won't Start: Check fuel level, oil level, spark plug condition, and air filter cleanliness. Refer to the Honda GX engine manual for specific starting procedures and troubleshooting.
- Engine Runs Poorly: Ensure fresh, clean fuel is used. Check the air filter for clogs and the spark plug for proper gap and condition.
Specifications
| Brand | PACER |
| Model Numbers | SE2UL E5HCP, 201094 |
| Color | Black, Red, White, Silver |
| Material | Glass-reinforced polyester |
| Product Dimensions (L x W x H) | 21" x 17" x 15" |
| Power Source | Gasoline-powered |
| Maximum Flow Rate | 200 Gallons Per Minute (GPM) |
| Maximum Lifting Height | 25 Feet |
| Horsepower | 4 hp |
| Item Weight | 49.9 pounds |
| Suction & Discharge Ports | 2 inches |
| Built-in Check Valve | Yes |
| Stainless Steel Hardware | Yes |
| Honda GX160 Features | OHV design, Cast iron cylinder sleeve, Low oil shut off, Meets CARB and EPA emission standards |
| Assembly Location | Molded & Assembled in the USA (Lancaster, PA) |

Figure 4: Key dimensions of the pump unit.
Warranty
Your Pacer Pumps SE2UL E5HCP is covered by a standard manufacturer's warranty. For specific details regarding warranty coverage, duration, and claims procedures, please refer to the warranty card included with your product packaging or visit the official Pacer Pumps website.
Support
For technical assistance, replacement parts, or any other support inquiries, please contact Pacer Pumps customer service. You can find contact information, including phone numbers and online support options, on the official Pacer Pumps website: Visit the PACER Store on Amazon.