Intermec PD42
Intermec PD42 Series Commercial Printer User Manual
Model: PD42BJ1000002021
1. Introduction
This manual provides essential information for the safe and efficient operation of your Intermec PD42 Series Commercial Printer. The PD42 is a dependable and versatile direct thermal printer designed for medium-duty applications in manufacturing, transportation, and warehousing environments. It features a robust all-metal chassis, proven printing mechanics, and powerful electronics to ensure reliable performance. The integrated monochrome graphical display allows for direct setup and configuration, enhancing user control and reducing reliance on host commands.
2. Safety Information
Please read and understand all safety instructions before operating the printer. Failure to follow these instructions may result in injury or damage to the equipment.
- Always connect the printer to a grounded power outlet.
- Do not operate the printer with a damaged power cord or plug.
- Avoid placing the printer in areas with excessive dust, humidity, or extreme temperatures.
- Do not attempt to service the printer yourself. Refer all servicing to qualified personnel.
- Keep hands and loose clothing away from moving parts during operation.
3. Package Contents
Verify that all items are present in the package. If any items are missing or damaged, contact your supplier immediately.
- Intermec PD42 Series Commercial Printer
- Power Cord (Euro and US compatible)
- Quick Start Guide (if included)
- Documentation CD (if included)
4. Physical Overview
Familiarize yourself with the external components and connection ports of the Intermec PD42 printer.

Figure 4.1: Front and Side View of the Intermec PD42 Printer. This image displays the printer's front panel with its graphical display and control buttons, along with a label partially ejected from the print mechanism. The robust casing and compact design are visible.
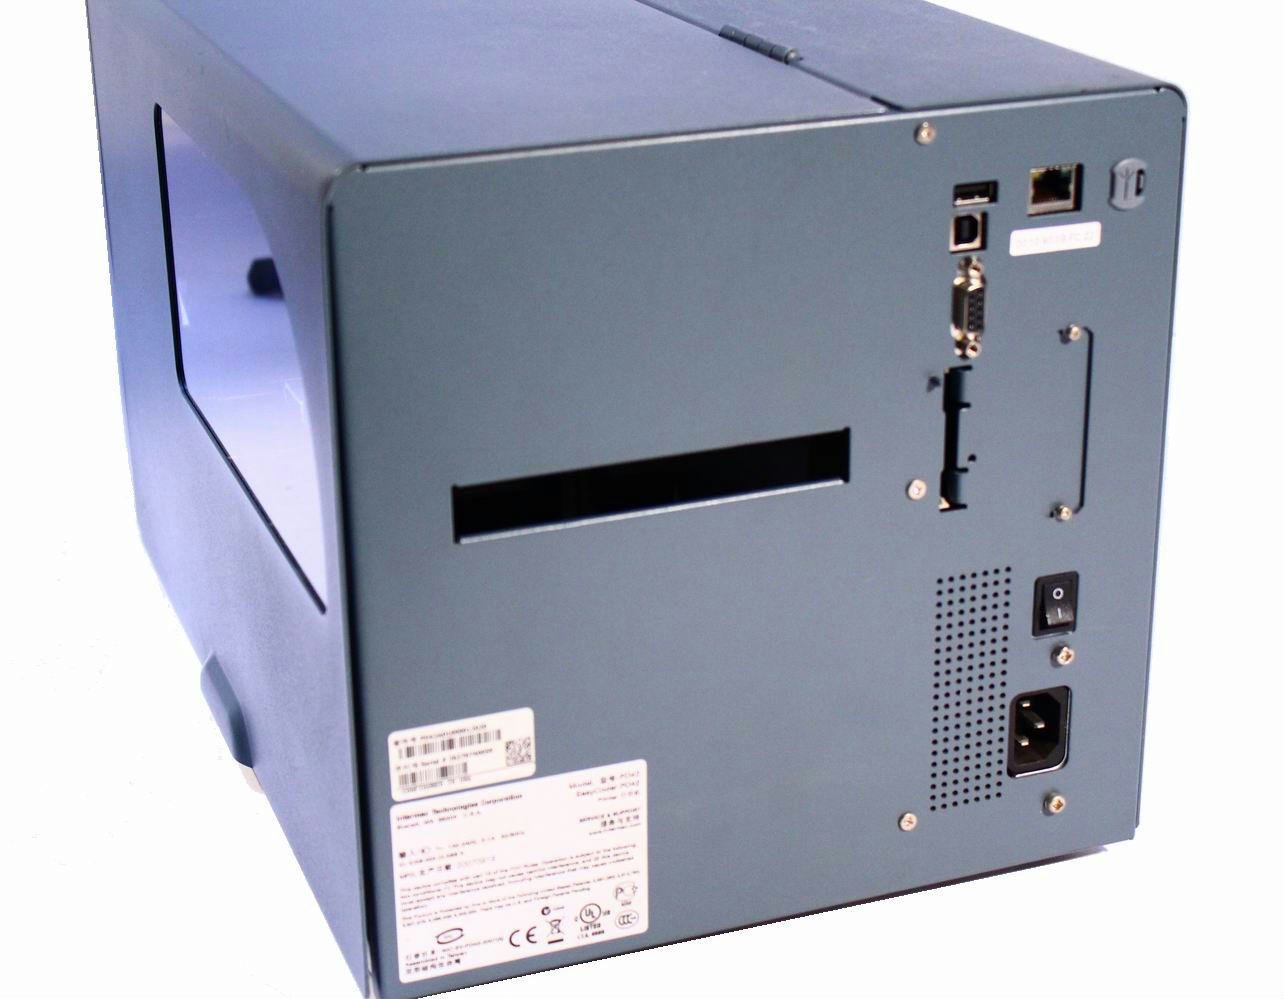
Figure 4.2: Rear View of the Intermec PD42 Printer. This image highlights the various connectivity options available on the back of the printer, including USB, Serial, and Ethernet ports. The power input and main power switch are also visible.

Figure 4.3: Internal View of the Intermec PD42 Printer. With the top cover open, this image reveals the internal mechanisms for loading labels and ribbon. Key components such as the printhead assembly, media guides, and ribbon spindles are visible, illustrating the media path.
5. Setup
5.1 Unpacking and Placement
- Carefully remove the printer from its packaging.
- Place the printer on a stable, level surface with adequate ventilation.
- Ensure sufficient space around the printer for media loading and maintenance.
5.2 Connecting Power
- Connect the power cord to the power input on the rear of the printer (refer to Figure 4.2).
- Plug the other end of the power cord into a grounded electrical outlet.
5.3 Connecting Data Cables
The PD42 offers multiple connectivity options:
- USB: Connect a USB cable from the printer's USB port to your computer.
- Serial: Connect a serial cable from the printer's serial port to your computer or host system.
- Ethernet: Connect an Ethernet cable from the printer's Ethernet port to your network.
5.4 Loading Media (Labels and Ribbon)
The PD42 supports industry-standard 200-mm (8-inch) label rolls and 450-m (18,000-inch) ribbon rolls.
- Open the printer's top cover (refer to Figure 4.3).
- Follow the internal diagrams or specific instructions for your media type to correctly load the label roll onto the media spindle.
- Thread the labels through the media guides and under the printhead assembly.
- If using thermal transfer printing, load the ribbon onto the ribbon supply spindle and thread it according to the internal guides.
- Close the top cover securely.
6. Operating Instructions
6.1 Powering On/Off
- To Power On: Flip the main power switch on the rear of the printer to the 'On' position. The graphical display will illuminate.
- To Power Off: Flip the main power switch to the 'Off' position.
6.2 Using the Graphical Display
The monochrome graphical display and control buttons on the front panel allow you to configure printer settings directly. Navigate through menus using the arrow buttons and confirm selections with the 'Enter' button. Refer to the on-screen prompts for specific options.
6.3 Driver and Software Installation
Before printing from a computer, install the appropriate printer drivers. These are typically available on the manufacturer's website or an included CD. Follow the on-screen instructions during installation.
6.4 Printing a Test Label
After setup, it is recommended to print a test label to verify proper operation and media loading. This option is usually available through the printer's front panel menu or via the printer driver software.
7. Maintenance
Regular maintenance ensures optimal performance and extends the life of your printer.
7.1 Cleaning the Printhead
The printhead should be cleaned regularly, especially if print quality degrades. Use a lint-free cloth or a printhead cleaning pen with isopropyl alcohol. Ensure the printer is powered off and cooled down before cleaning.
7.2 Cleaning Rollers and Media Path
Dust and adhesive residue can accumulate on rollers and within the media path. Use a lint-free cloth dampened with isopropyl alcohol to clean these components. Always power off the printer before cleaning.
7.3 Replacing Media
When the label roll or ribbon runs out, follow the steps in Section 5.4 to load new media.
8. Troubleshooting
This section addresses common issues you might encounter with your PD42 printer.
- Printer Not Powering On: Check power cord connections and ensure the power outlet is functional.
- No Print Output: Verify that the printer is online, connected correctly to the host, and that media is loaded properly. Check for error messages on the graphical display.
- Poor Print Quality: Clean the printhead. Ensure the correct media and ribbon (if applicable) are used and properly loaded. Adjust print darkness settings via the display or driver.
- Connectivity Issues: Check all cable connections. Verify network settings for Ethernet connections. Reinstall printer drivers if necessary.
- Error Messages on Display: Consult the printer's graphical display for specific error codes or messages, then refer to the full product documentation or manufacturer's support website for detailed solutions.
9. Specifications
| Feature | Specification |
|---|---|
| Model Name | PD42BJ1000002021 |
| Printing Technology | Direct Thermal |
| Printer Output | Monochrome |
| Resolution | 203 dpi |
| Print Speed | Up to 150 mm/s (6 ips) |
| Connectivity Technology | USB, Serial, Ethernet |
| Special Feature | Graphical Display, Ethernet |
| Item Weight | 28.7 Pounds |
| Product Dimensions | 25 x 15 x 15 inches |
| Controller Type | Push Button |
| Print Media | Labels |
10. Warranty and Support
For warranty information and technical support, please refer to the documentation provided with your printer or visit the official Intermec (now Honeywell) website. Keep your purchase receipt as proof of purchase for warranty claims.
Online Resources: For the latest drivers, firmware updates, and detailed troubleshooting guides, visit the manufacturer's support portal.
Ask a question about this manual
Ask about setup, troubleshooting, compatibility, parts, safety, or missing instructions. Manuals+ will review the question and use this page’s manual context to help answer it.