1. Introduction
This manual provides detailed instructions for operating your Sony DSC-W350 Digital Camera. The DSC-W350 is a compact digital camera featuring a 14.1-megapixel Super HAD CCD image sensor, a Carl Zeiss Vario-Tessar lens with 4x optical zoom, and a 2.7-inch LCD display. It is equipped with Optical SteadyShot image stabilization and various intelligent shooting modes to help you capture high-quality photos and 720p HD videos.
2. Package Contents
Please check that all the following items are included in your camera package:
- Sony DSC-W350 Digital Camera
- Rechargeable Battery Pack (NP-BN1)
- Battery Charger
- USB Connection Cable
- Wrist Strap
- CD-ROM (Picture Motion Browser Software)
- Printed Documentation (Basic Guide)
3. Camera Parts and Controls
3.1 Front View

- Lens: Carl Zeiss Vario-Tessar lens with 4x optical zoom.
- Flash: Built-in flash for illuminating subjects in low light.
- Self-timer Lamp/AF Illuminator: Indicates self-timer countdown and assists autofocus in dark conditions.
- Microphone: Records audio during video recording.
3.2 Back View
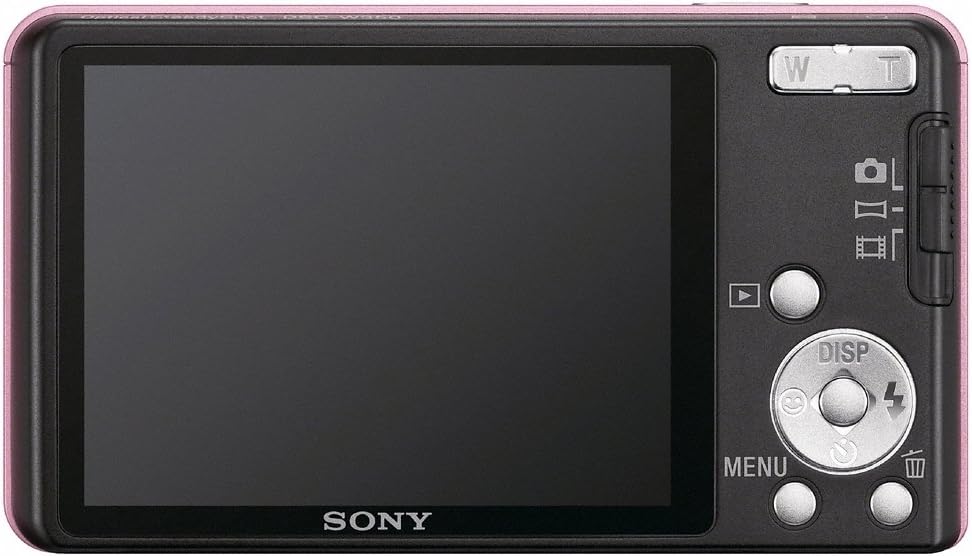
- LCD Screen: 2.7-inch Clear Photo LCD display for composing shots, viewing menus, and playing back images.
- Zoom Lever (W/T): Controls optical and digital zoom. "W" for wide-angle, "T" for telephoto.
- Mode Selector Switch: Allows switching between Still Image, Sweep Panorama, and Movie recording modes.
- Playback Button: Enters playback mode to view captured photos and videos.
- Control Button (Directional Pad): Used for navigation through menus and selecting options. Also functions as shortcuts for Display (DISP), Flash, Self-timer, and Smile Shutter.
- MENU Button: Accesses the camera's menu system for various settings.
- Delete Button: Deletes selected photos or videos in playback mode.
4. Setup
4.1 Charging the Battery
- Insert the battery pack into the supplied battery charger.
- Plug the charger into a wall outlet. The charge lamp will light up.
- Charging is complete when the charge lamp turns off. A full charge typically takes approximately 8 hours.
Note: Use only genuine Sony battery packs and chargers.
4.2 Inserting the Battery and Memory Card
- Open the battery/memory card cover on the bottom of the camera.
- Insert the charged battery pack with the correct orientation until it clicks into place.
- Insert a Memory Stick Duo/PRO Duo/PRO-HG Duo or SD/SDHC/SDXC memory card into the memory card slot until it clicks. Ensure the card is facing the correct way.
- Close the battery/memory card cover securely.
Note: The camera has a small internal memory, but a memory card is highly recommended for storing more photos and videos.
4.3 Setting Date and Time
The first time you turn on the camera, the date and time setting screen will appear. Follow the on-screen instructions to set the correct date, time, and time zone. This information is recorded with your photos and videos.
5. Basic Operation
5.1 Turning the Camera On/Off
- To turn on: Press the POWER button.
- To turn off: Press the POWER button again.
5.2 Taking Still Photos
- Set the Mode Selector Switch to the Still Image icon (camera symbol).
- Frame your subject on the LCD screen.
- Press the Shutter button halfway down to focus. The focus indicator will turn green when focus is achieved.
- Press the Shutter button all the way down to take the picture.
5.3 Using the Zoom
Use the Zoom Lever (W/T) located on the back of the camera:
- Push the lever towards T (Telephoto) to zoom in on your subject.
- Push the lever towards W (Wide-angle) to zoom out.
5.4 Flash Modes
Press the Flash button (right side of the control button) to cycle through flash modes:
- Auto Flash: Flash fires automatically when needed.
- Fill-flash: Flash fires for every shot.
- Slow Sync: Flash fires, and shutter speed is slowed to capture background illumination.
- No Flash: Flash is disabled.
6. Advanced Features
6.1 Sweep Panorama Mode
Capture breathtaking panoramic images by simply sweeping the camera.
- Set the Mode Selector Switch to the Sweep Panorama icon.
- Press the Shutter button and sweep the camera horizontally or vertically in the direction indicated on the screen.
- The camera will automatically stitch the images together to create a single panoramic photo.
6.2 HD MP4 Movie Mode
Record high-definition videos in 720p resolution.
- Set the Mode Selector Switch to the Movie icon.
- Press the Shutter button to start recording.
- Press the Shutter button again to stop recording.
6.3 Intelligent Auto (iAuto) Mode
The camera automatically detects the scene and adjusts settings for optimal results. Simply point and shoot.
6.4 Optical SteadyShot Image Stabilization
This feature helps reduce blur caused by camera shake, especially in low light or when using zoom, ensuring sharper images.
6.5 Face Detection and Smile Shutter
- Face Detection: Automatically detects up to eight faces in a scene and optimizes focus, exposure, and white balance.
- Smile Shutter: When activated, the camera automatically takes a picture when it detects a smile on a subject's face. Press the Smile Shutter button (down arrow on control button) to activate.
6.6 Dynamic Range Optimizer (DRO)
Helps to recover details in both bright highlights and dark shadows, resulting in more natural-looking images, especially in high-contrast scenes.
6.7 Self-Portrait Timer
Utilizes Face Detection to automatically trigger a 2-second timer and snap a picture once your face enters the frame, perfect for self-portraits.
6.8 Easy Shooting Mode
Simplifies camera operation by displaying basic instructions on the LCD and setting the camera to fully automatic settings, ideal for beginners.
7. Viewing and Managing Photos/Videos
7.1 Playback Mode
Press the Playback button (triangle icon) to view your captured images and videos. Use the control button to navigate through your media.
7.2 In-Camera Retouching Tools
The camera offers basic editing functions directly on the device, including:
- Trimming: Crop your photos.
- Red-Eye Correction: Reduce red-eye effect.
- Unsharp Masking: Enhance sharpness.
Access these options via the MENU in playback mode.
7.3 Connecting to a Computer
Use the supplied USB cable to connect your camera to a computer. The camera will appear as a removable drive, allowing you to transfer photos and videos. The included Picture Motion Browser (PMB) software can also be used for more advanced management.
7.4 Connecting to a TV (PhotoTV HD)
Connect the camera to a PhotoTV HD-compatible Sony BRAVIA HDTV using an HDMI cable (sold separately) to view your photos and videos in high definition with optimized settings.
8. Maintenance
8.1 Cleaning the Camera
- Camera Body: Wipe gently with a soft, dry cloth. For stubborn dirt, use a cloth lightly dampened with water or a mild detergent, then wipe dry.
- Lens: Use a lens brush to remove dust, then gently wipe with a lens cleaning cloth. Do not use strong solvents.
- LCD Screen: Wipe gently with a soft, dry cloth. Avoid pressing hard on the screen.
8.2 Battery Care
- Store batteries in a cool, dry place when not in use.
- Do not expose batteries to extreme temperatures.
- Recharge the battery before long periods of disuse to maintain its life.
8.3 Storage
When storing the camera for an extended period, remove the battery and memory card. Store the camera in a dry, well-ventilated area, away from direct sunlight and extreme temperatures.
9. Troubleshooting
| Problem | Solution |
|---|---|
| Camera does not turn on. | Ensure the battery is fully charged and correctly inserted. Check if the battery contacts are clean. |
| Photos are blurry. | Hold the camera steady. Ensure Optical SteadyShot is enabled. Check lighting conditions; use flash if necessary. Clean the lens. |
| Memory card error. | Ensure the memory card is inserted correctly. Try reformatting the card (this will erase all data). Use a compatible memory card. |
| Battery drains quickly. | Reduce LCD brightness. Limit flash usage. Turn off the camera when not in use. Ensure the battery is not old or damaged. |
| Cannot transfer photos to computer. | Ensure the USB cable is securely connected to both the camera and the computer. Check the camera's USB connection settings. Try a different USB port. |
10. Specifications
| Feature | Detail |
|---|---|
| Model Name | DSC-W350 |
| Image Sensor | 14.1 MP Super HAD CCD (1/2.3-inch) |
| Lens | Carl Zeiss Vario-Tessar, 4x Optical Zoom |
| Focal Length (35mm equivalent) | 26mm - 105mm |
| LCD Screen | 2.7-inch Clear Photo LCD (230,000 dots) |
| Image Stabilization | Optical SteadyShot |
| Video Recording | 720p HD (MP4) |
| Storage Media | Memory Stick Duo/PRO Duo/PRO-HG Duo, SD/SDHC/SDXC |
| Battery Type | Lithium-ion (NP-BN1) |
| Connectivity | USB 2.0, HDMI |
| Dimensions (Approx.) | 90.9 x 51.5 x 17.3 mm (W x H x D) |
| Weight (Approx.) | 118 g (including battery and memory card) |
11. Warranty and Support
For information regarding your product's warranty, please refer to the warranty card included in your package or visit the official Sony support website.
If you encounter any issues not covered in this manual or require further assistance, please contact Sony customer support. Support contact details can typically be found on the Sony website or in your product's documentation.