
Introduction
Thank you for choosing the Homebasix YLR1-5-D12A-3L Water Cooler. This manual provides important information regarding the safe operation, installation, maintenance, and troubleshooting of your new appliance. Please read this manual thoroughly before use and retain it for future reference.
Important Safety Information
To reduce the risk of injury or property damage, always follow basic safety precautions when using electrical appliances. This includes, but is not limited to, the following:
- Read all instructions before using the appliance.
- Do not operate any appliance with a damaged cord or plug, or after the appliance malfunctions or has been damaged in any manner.
- Ensure the appliance is placed on a firm, level surface to prevent tipping.
- Do not immerse the cord, plug, or any part of the appliance in water or other liquids.
- Keep children away from the hot water dispenser to prevent burns.
- Unplug the water cooler from the power outlet before cleaning or performing any maintenance.
- This appliance is for indoor use only. Do not use outdoors.
- Use only 2, 3, or 5-gallon water bottles with this unit.
Package Contents
Please check the box to ensure all items are present:
- Homebasix YLR1-5-D12A-3L Water Cooler Unit
- Drip Tray
- User Manual
Setup
1. Unpacking
Carefully remove the water cooler from its packaging. Retain all packaging materials for future transport or storage.
2. Placement
Place the water cooler on a flat, stable, and level surface. Ensure there is adequate ventilation around the unit (at least 4 inches from walls) and that it is not exposed to direct sunlight or heat sources. This is a countertop model, designed for placement on a sturdy counter.
3. Water Bottle Installation
- Clean the neck of a new 2, 3, or 5-gallon water bottle.
- Remove the protective cap from the water bottle.
- Carefully invert the water bottle and place it firmly onto the bottle support on top of the water cooler. Ensure it is seated securely.
- Water will begin to flow into the internal reservoirs.
4. Initial Power-Up
Before plugging in the unit, ensure water has filled both the hot and cold reservoirs. Dispense a small amount of water from both the hot and cold spouts to confirm water flow and remove any air. Then, plug the power cord into a grounded electrical outlet.
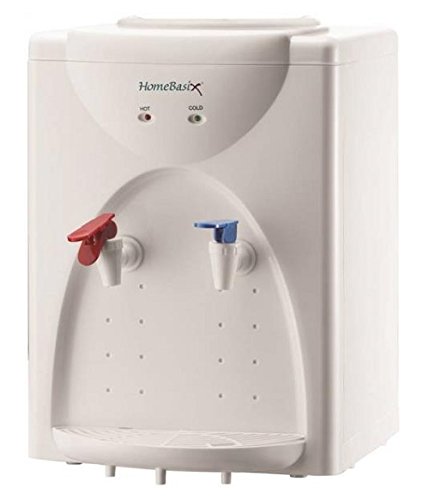
Image: Homebasix YLR1-5-D12A-3L Water Cooler with a water bottle installed on top.
Operating Instructions
The Homebasix YLR1-5-D12A-3L Water Cooler features push-button valves for convenient dispensing of hot and cold water.
1. Dispensing Cold Water
- Place a cup or glass under the cold water spout.
- Press the blue push-button valve for cold water.
- Release the button once the desired amount of cold water is dispensed.
2. Dispensing Hot Water
Caution: Hot water can cause severe burns. Exercise extreme care.
- Place a heat-resistant cup or mug under the hot water spout.
- Press the red push-button valve for hot water.
- Release the button once the desired amount of hot water is dispensed.
3. First-Time Use Considerations
Allow approximately 15-30 minutes after initial power-up for the water to reach its optimal cold and hot temperatures. The thermoelectric cooling system operates silently without a compressor.
Maintenance
Regular cleaning and maintenance will ensure the longevity and optimal performance of your water cooler.
1. Cleaning the Drip Tray
The removable drip tray should be emptied and cleaned regularly to prevent overflow and bacterial growth. Simply slide out the tray, empty any collected water, wash with mild soap and water, rinse thoroughly, and replace.
2. Cleaning the Exterior
Wipe the exterior surfaces of the water cooler with a soft, damp cloth. Do not use abrasive cleaners or solvents, as these can damage the finish.
3. Water Bottle Replacement
When the water bottle is empty, carefully lift it off the unit. Dispose of the empty bottle properly and replace it with a new, full bottle following the steps in the 'Setup' section.
Troubleshooting
If you encounter any issues with your water cooler, please refer to the following table for common problems and solutions:
| Problem | Possible Cause | Solution |
|---|---|---|
| No water dispensing | Empty water bottle; Air lock; Spout clogged. | Replace water bottle; Dispense water from both spouts to clear air; Check spouts for obstructions. |
| Water not cold/hot enough | Unit recently plugged in; Poor ventilation; Thermoelectric system issue. | Allow 15-30 minutes for temperature stabilization; Ensure adequate space around unit; Contact customer support if issue persists. |
| Water leaking | Water bottle not seated correctly; Drip tray overflowing; Internal leak. | Re-seat water bottle; Empty and clean drip tray; Unplug unit and contact customer support. |
| Unusual noise | Unit not level; Vibration from internal components. | Ensure unit is on a level surface; This unit uses silent thermoelectric technology, so significant noise is unusual. Contact customer support if noise is loud. |
Product Specifications
The following are the technical specifications for the Homebasix YLR1-5-D12A-3L Water Cooler:
| Feature | Detail |
|---|---|
| Model Number | YLR1-5-D12A-3L |
| Brand | Homebasix |
| Product Type | Countertop Water Cooler |
| Loading Style | Top Loading |
| Water Temperatures | Hot and Cold |
| Cooling Technology | Thermoelectric (Silent, no compressor) |
| Compatible Bottle Sizes | 2, 3, or 5 Gallons (not included) |
| Color | White |
| Dimensions (L x W x H) | 34.9 x 43.8 x 34.9 cm (approx. 11.75" W x 11.75" D x 15.25" H) |
| Item Weight | 3.79 kg (approx. 15.4 lbs) |
| Power Source | Corded Electric |
| UPC | 045734620889 |
Warranty and Customer Support
For warranty information, please refer to the documentation included with your purchase or contact Homebasix customer support directly. Keep your proof of purchase for warranty claims.
If you require further assistance or have questions not covered in this manual, please contact Homebasix customer service through their official website or the contact information provided with your product.