1. Introduction
This manual provides detailed instructions for the safe and proper installation and operation of your Mount-It! MI-318L Low-Profile Tilt TV Wall Mount. This mount is designed to securely hold 43 to 90 inch televisions with VESA patterns from 100x100mm to 800x600mm and a maximum weight capacity of 220 lbs (100 kg).
The mount features an ultra-slim, low-profile design, positioning the TV approximately 1.5 inches from the wall. It also offers an 8° downward tilt capability to reduce screen glare and optimize viewing angles.
2. Safety Information
WARNING: Failure to read and follow all instructions may result in personal injury, property damage, or voiding of warranty. If you do not understand these instructions or have doubts about the safety of the installation, please contact Mount-It! customer support.
- Do not install on walls that are not structurally sound.
- Ensure the mounting surface can support the combined weight of the mount and the TV.
- Always use a stud finder to locate wood studs accurately.
- For concrete or brick walls, use appropriate masonry drill bits and anchors.
- Do not overtighten screws, as this may cause damage.
- Keep children and pets away during installation.
3. Package Contents
Verify that all components are present and undamaged before beginning installation. If any parts are missing or defective, contact Mount-It! customer support.
- Wall Plate Assembly
- TV Brackets (2)
- Extension Brackets (2)
- Integrated Bubble Level
- Assorted Mounting Hardware (Lag Screws, Washers, Concrete Anchors, TV Bolts, Spacers)
4. Installation
This mount is designed for installation on wood studs (16-inch or 24-inch spacing) or solid concrete/brick walls.
4.1. Wood Stud Installation
- Locate Studs: Use a stud finder to locate the edges and center of the wood studs where you intend to mount the TV. Mark the center of the studs at your desired TV height.
- Position Wall Plate: Hold the wall plate against the wall, aligning it with the marked stud centers. Use the integrated bubble level to ensure the plate is straight. Mark the center of the four mounting holes on the wall.
- Drill Pilot Holes: Using a 3/16 inch (4.5 mm) drill bit, drill pilot holes at the marked locations.
- Secure Wall Plate: Attach the wall plate to the wall using the provided lag screws and washers. Tighten until secure.

Image: Wall plate positioned for wood stud installation, indicating 16-inch and 24-inch stud spacing.
4.2. Concrete / Brick Wall Installation
- Position Wall Plate: Hold the wall plate against the concrete or brick wall at your desired TV height. Use the integrated bubble level to ensure the plate is straight. Mark the center of the six mounting holes on the wall.
- Drill Pilot Holes: Using a 3/8 inch (10 mm) masonry drill bit, drill pilot holes at the marked locations to a depth of approximately 2.4 inches (60 mm).
- Insert Anchors: Clear any dust and debris from the drilled holes. Insert the provided concrete anchors into the holes.
- Secure Wall Plate: Attach the wall plate to the wall using the provided lag screws and washers. Tighten until secure.
4.3. Attaching TV Brackets to TV
- Align Brackets: Align the TV brackets over the VESA holes on the back of your television.
- Select Hardware: Choose the appropriate size mounting bolts and washers for your TV's VESA mounting holes.
- Secure Brackets: Attach the TV brackets to the TV using the selected hardware. Ensure they are securely fastened.
- (Optional) Use Extension Brackets: If your TV's VESA pattern exceeds the standard bracket width, remove the nuts from the extension brackets. Place the extension brackets onto the ends of the TV brackets and reinstall the nuts to secure them in place. This allows compatibility with VESA patterns up to 800x600mm.
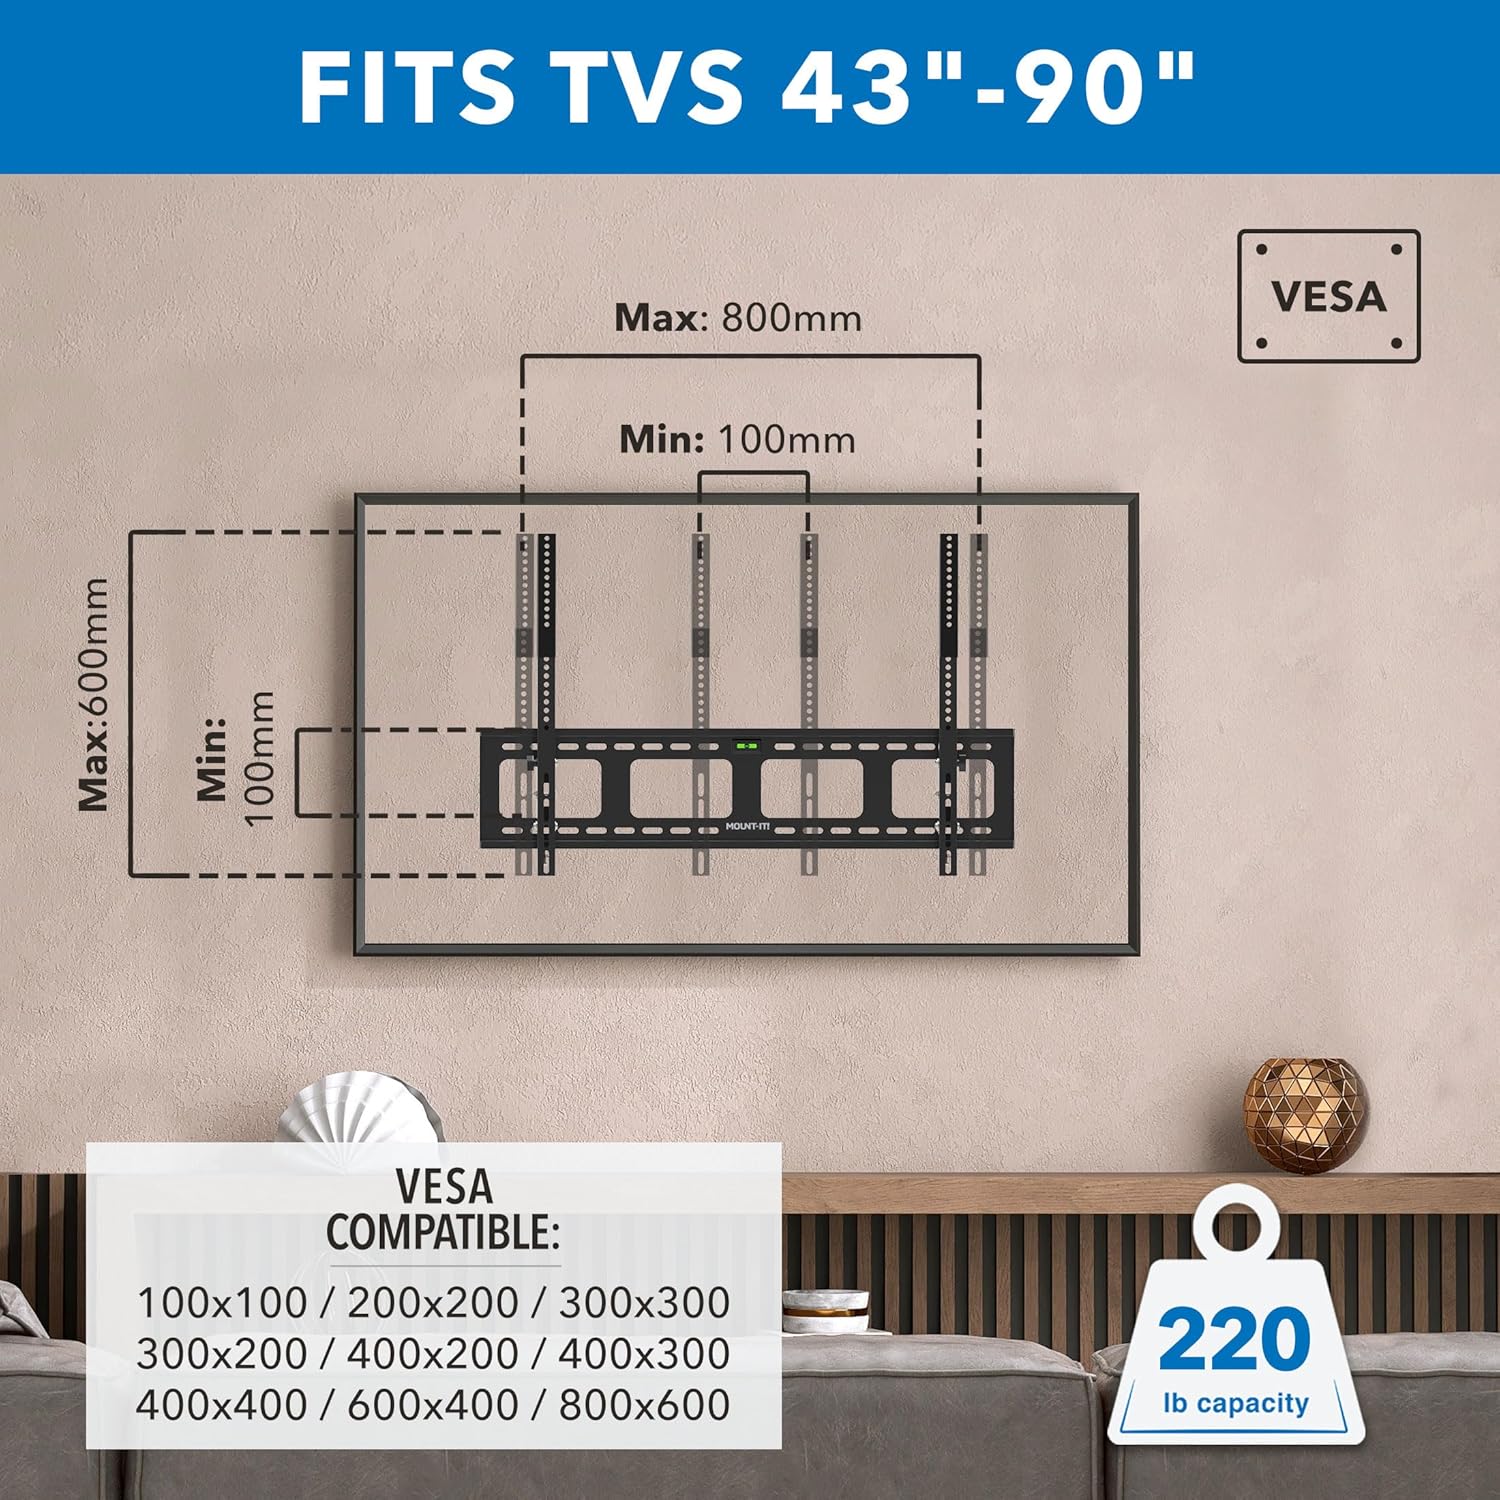
Image: Diagram illustrating VESA compatibility and the use of extension brackets to accommodate larger VESA patterns.
4.4. Attaching TV to Wall Plate
- Hook TV: Carefully lift the TV and hook the top of the TV brackets onto the top edge of the wall plate.
- Lower TV: Slowly swing the TV downwards until the TV brackets are fully seated and lowered onto the wall plate.
- Secure Safety Bolts: Tighten the safety bolts located on the underside of both TV brackets until the bolt is past the lip of the wall bracket. This prevents accidental dislodgement.
Video: This video demonstrates the complete installation process for the Mount-It! MI-318L Heavy-Duty Tilt TV Wall Mount, including wood stud and concrete wall mounting, and attaching the TV.
5. Operation
5.1. Tilt Adjustment
The mount allows for an 8° downward tilt to optimize your viewing angle and reduce glare.
- Loosen Knobs: Locate and loosen the knobs on the TV brackets.
- Adjust Tilt: Carefully adjust the TV to your desired tilt position.
- Tighten Knobs: Once the desired angle is achieved, tighten the knobs to secure the TV in place.

Image: A person demonstrating the 8° downward tilt adjustment feature of the TV mount.
Video: This video highlights the key features of the Mount-It! MI-318L Heavy-Duty Tilt TV Wall Mount, including its low-profile design, tilt capability, and robust construction.
6. Maintenance
Regular maintenance ensures the longevity and safety of your TV mount.
- Periodically check all screws and bolts to ensure they remain tight.
- Clean the mount with a soft, dry cloth. Avoid abrasive cleaners or solvents.
- Inspect the mount for any signs of wear or damage. If damage is found, contact customer support.
7. Troubleshooting
If you encounter any issues during or after installation, refer to the following common solutions:
- TV is not level: Ensure the wall plate was installed level. If the wall plate is level, check that the TV brackets are evenly secured to the TV. Slight adjustments can sometimes be made by loosening and re-tightening the TV bracket bolts.
- TV feels unstable: Recheck all mounting bolts on both the wall plate and the TV brackets to ensure they are securely tightened. Verify that the wall structure is appropriate for the mount and TV weight.
- Difficulty with tilt adjustment: Loosen the tilt adjustment knobs sufficiently before attempting to change the angle. Ensure no cables are obstructing the movement.
For further assistance, contact Mount-It! customer support.
8. Specifications
| Model Number | MI-318L |
| Compatible TV Sizes | 43 to 90 inches |
| Weight Capacity | 220 lbs (100 kg) |
| VESA Compatibility | 100x100mm to 800x600mm |
| Tilt Angle | 8° Downward |
| Profile from Wall | 1.5 inches |
| Material | Cold-rolled high-grade steel |
| Color | Black |
| Product Dimensions | 31.5 x 19 x 1.5 inches |
| Item Weight | 0.16 ounces (Note: This weight seems unusually low for a TV mount and may be an error in the source data. Please refer to product packaging for accurate weight.) |
9. Warranty and Support
Mount-It! provides a lifetime warranty for this product. For any installation questions, product inquiries, or warranty claims, please contact our U.S.-based customer service team. Refer to the product packaging or the official Mount-It! website for contact information.