1. Safety Information
Please read and understand all safety instructions before using the Janome Electric Sewing Machine Model 3090. Failure to follow these instructions may result in electric shock, fire, or personal injury.
- Always unplug the machine from the electrical outlet immediately after using, before cleaning, or when making any adjustments.
- Do not operate the machine with a damaged cord or plug. If the machine is not working properly, has been dropped, damaged, or dropped into water, contact a qualified service technician.
- Keep fingers away from all moving parts, especially the needle area. Use the presser foot lifter to raise and lower the presser foot.
- Never drop or insert any object into any opening.
- Do not use outdoors.
- Do not operate where aerosol (spray) products are being used or where oxygen is being administered.
- To disconnect, turn all controls to the off position, then remove the plug from the outlet.
2. Setup
2.1 Unpacking and Placement
Carefully remove the sewing machine from its packaging. Place the machine on a stable, flat surface. Ensure there is adequate lighting and space for comfortable operation.
2.2 Connecting the Foot Controller and Power
Insert the foot controller plug into the machine's receptacle. Then, connect the power cord to the machine and plug it into a suitable electrical outlet. Ensure the power switch is in the 'OFF' position before connecting.
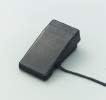
Image: The foot controller, used to regulate sewing speed. Connect it securely to the machine's designated port.
2.3 Winding the Bobbin
- Place a spool of thread on the spool pin.
- Guide the thread through the thread guide and around the bobbin winding tension disc.
- Place an empty bobbin onto the bobbin winder spindle.
- Wind the thread a few times manually around the bobbin.
- Push the bobbin winder spindle to the right.
- Press the foot controller to start winding. Stop when the bobbin is full.
- Cut the thread and push the spindle back to the left.
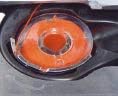
Image: A wound bobbin, ready for insertion into the bobbin case. Proper bobbin winding ensures even stitch formation.
2.4 Threading the Upper Thread
- Raise the presser foot lifter.
- Place a spool of thread on the spool pin.
- Guide the thread through the upper thread guide.
- Follow the numbered threading path down the front of the machine, around the tension discs, and up to the take-up lever.
- Thread the take-up lever from right to left.
- Continue guiding the thread down through the needle bar thread guide.
- Thread the needle from front to back. Pull about 15 cm (6 inches) of thread through the needle eye.

Image: Close-up of the needle and presser foot area. Correct upper threading is crucial for proper stitch formation.
2.5 Inserting the Bobbin
- Open the bobbin cover plate.
- Insert the wound bobbin into the bobbin case, ensuring the thread unwinds in the correct direction (usually counter-clockwise).
- Guide the bobbin thread through the tension spring slot.
- Close the bobbin cover plate.
2.6 Raising the Bobbin Thread
- Hold the upper thread lightly with your left hand.
- Turn the handwheel towards you (counter-clockwise) to lower the needle into the needle plate and then raise it again.
- The upper thread will catch the bobbin thread, pulling a loop up through the needle plate opening.
- Pull both the upper and bobbin threads to the back under the presser foot.
3. Operating Instructions
3.1 Selecting Stitch Patterns
Your Janome Model 3090 offers various stitch patterns. Use the stitch selector dial to choose the desired pattern. Refer to the stitch pattern guide on the machine or below for available options.

Image: A diagram illustrating various stitch patterns available on the Janome Model 3090, including Buttonhole, Straight Stitch, Zigzag Stitch, Blind Hem Stitch, Hem Stitch, Three-Point Zigzag Stitch, Shell Tuck, Triple Straight Stitch, Triple Zigzag Stitch, Decorative Stitch, and Overcast Stitch.
- Buttonhole: For creating buttonholes.
- Straight Stitch: Basic sewing stitch.
- Zigzag Stitch: For finishing raw edges or decorative purposes.
- Blind Hem Stitch: For invisible hems.
- Hem Stitch: For general hemming.
- Three-Point Zigzag Stitch: Stronger zigzag for elastic fabrics.
- Shell Tuck: Decorative edge finish.
- Triple Straight Stitch: Stronger straight stitch for durable seams.
- Triple Zigzag Stitch: Stronger zigzag for stretch fabrics.
- Decorative Stitch: Various ornamental stitches.
- Overcast Stitch: For neatening fabric edges to prevent fraying.
3.2 Adjusting Stitch Length and Width
Use the stitch length dial to adjust the length of your stitches. A higher number indicates a longer stitch. Use the stitch width dial to adjust the width of zigzag or decorative stitches. For straight stitch, the width control typically centers the needle.
3.3 Starting and Stopping Sewing
- Place the fabric under the presser foot.
- Lower the presser foot using the presser foot lifter.
- Turn the handwheel towards you to lower the needle into the fabric at the starting point.
- Gently press the foot controller to start sewing. The harder you press, the faster the machine will sew.
- Guide the fabric gently with both hands, but do not push or pull forcefully.
- To stop, release pressure on the foot controller.
- Raise the needle to its highest position by turning the handwheel.
- Raise the presser foot and remove the fabric.
- Cut the threads using the thread cutter on the machine.

Image: The presser foot holding fabric in place during sewing. Ensure the presser foot is lowered before starting to sew.
3.4 Reverse Sewing
To reinforce stitches at the beginning and end of a seam, press and hold the reverse lever/button. The machine will sew backward. Release the lever/button to resume forward sewing.
3.5 Changing the Needle
Always use the correct needle type and size for your fabric. To change the needle:
- Turn off the power and unplug the machine.
- Raise the needle to its highest position.
- Loosen the needle clamp screw.
- Remove the old needle.
- Insert the new needle with the flat side facing the back, pushing it up as far as it will go.
- Tighten the needle clamp screw securely.
3.6 Changing the Presser Foot
Different sewing tasks require different presser feet. To change the presser foot:
- Turn off the power and unplug the machine.
- Raise the presser foot lifter.
- Press the black button on the back of the presser foot holder to release the current foot.
- Position the new presser foot so its pin aligns with the groove on the presser foot holder.
- Lower the presser foot lifter until the foot snaps into place.
4. Maintenance
Regular maintenance ensures the longevity and optimal performance of your sewing machine.
4.1 Cleaning the Machine
Lint and dust can accumulate in the bobbin area and feed dogs, affecting stitch quality. Clean these areas regularly:
- Turn off the power and unplug the machine.
- Remove the needle and presser foot.
- Remove the needle plate (usually by unscrewing or sliding a latch).
- Use a small brush to remove lint and dust from the bobbin case area and feed dogs. Do not use compressed air, as it can push lint further into the machine.
- Reassemble the needle plate, presser foot, and needle.
4.2 Oiling (If Applicable)
The Janome Model 3090 is designed to be largely maintenance-free regarding lubrication for the user. If your machine requires oiling, refer to a specialized service manual or contact a Janome service center. Do not oil parts unless specifically instructed, as this can damage the machine.
4.3 Storage
When not in use, cover the machine with its dust cover to protect it from dust and debris. Store it in a dry, stable environment.

Image: The protective dust cover for the Janome Electric Sewing Machine. Using the cover helps keep the machine clean when not in use.
5. Troubleshooting
This section addresses common issues you might encounter. For problems not listed here, please contact customer support.
5.1 Machine Not Starting
- Check Power: Ensure the power cord is securely plugged into both the machine and the electrical outlet.
- Power Switch: Verify the power switch is in the 'ON' position.
- Foot Controller: Ensure the foot controller is properly connected.
- Bobbin Winder: Make sure the bobbin winder spindle is pushed to the left (off the winding position).
5.2 Skipped Stitches
- Needle: Replace the needle. A bent or dull needle can cause skipped stitches. Ensure the needle is inserted correctly.
- Needle Type: Use the correct needle type and size for your fabric.
- Threading: Re-thread the upper thread and re-insert the bobbin, ensuring correct tension.
5.3 Thread Breakage
- Threading: Check if the machine is threaded correctly, both upper and bobbin threads.
- Tension: Adjust the upper thread tension. It might be too tight.
- Needle: A bent, dull, or incorrect needle can cause thread breakage. Replace if necessary.
- Thread Quality: Use good quality thread. Old or poor-quality thread can break easily.
- Lint: Clean the bobbin area and tension discs from lint buildup.
5.4 Uneven Stitches / Looping
- Tension: Adjust the upper and bobbin thread tension. Incorrect tension is the most common cause of uneven stitches.
- Threading: Ensure both threads are correctly threaded through all guides and tension discs.
- Bobbin: Check if the bobbin is wound evenly and inserted correctly.
6. Specifications
| Feature | Detail |
|---|---|
| Manufacturer | Janome |
| Model Number | 3090 |
| Package Dimensions | 50.6 x 42.6 x 25.6 cm |
| Material | Aluminum |
| Color | White |
| Package Weight | 8.96 kg |
| Item Weight | 8 kg |
| Power Source | Corded Electric |
| Batteries Required | No |
| Batteries Included | No |
7. Warranty and Support
Janome products are manufactured to high-quality standards. For information regarding your product's warranty, please refer to the warranty card included with your purchase or visit the official Janome website. For technical support, service, or to order replacement parts, please contact Janome customer service through their official channels.
Janome Official Website: www.janome.co.jp (Please note: This link is for informational purposes and may lead to a Japanese website. Look for your regional Janome website for local support.)


