1. Introduction
Thank you for purchasing the VVME-HTPCD-V01B LED Video Projector. This manual provides essential information for the safe and efficient operation of your device. Please read it thoroughly before use and retain it for future reference. This projector is designed for home cinema and video game applications, offering multiple connectivity options and a long-lasting LED lamp.
2. Safety Information
To ensure safe operation and prolong the life of your projector, please observe the following precautions:
- Power Supply: Use only the specified power adapter and ensure the voltage matches your local power supply.
- Ventilation: Do not block the ventilation openings. Ensure adequate airflow around the projector to prevent overheating.
- Liquid Exposure: Keep the projector away from water or other liquids. Do not operate in damp environments.
- Cleaning: Disconnect the power before cleaning. Use a soft, dry cloth. Avoid abrasive cleaners.
- Handling: Handle the projector with care. Avoid dropping or subjecting it to strong impacts.
- Lamp Safety: The LED lamp has a long lifespan. Do not attempt to open the lamp compartment or replace the lamp unless specifically instructed.
- Eye Protection: Do not look directly into the projector lens when the lamp is on, as the bright light can cause eye strain or damage.
3. Package Contents
Please check that all items are present in your package:
- VVME-HTPCD-V01B LED Video Projector
- Remote Control (AAA batteries not included)
- Power Cable
- VGA Cable
- HDMI Cable
- AV Cable
- User Manual
- Spare Light Bulb (as per some product variations)
4. Product Overview
4.1 Front and Side View
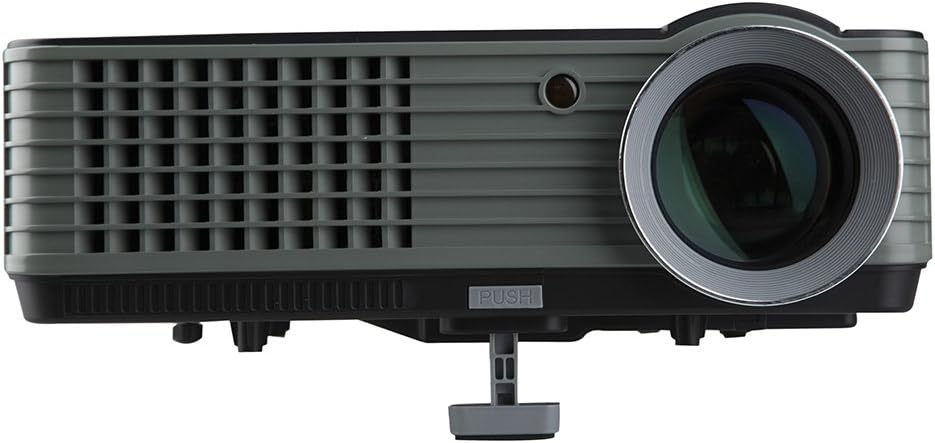
Image: Front and side view of the VVME-HTPCD-V01B projector, showing the main lens and ventilation grilles.

Image: Angled front view of the projector, highlighting the lens, focus ring, and front ventilation.

Image: Side view of the projector, showing the adjustable front foot for elevation and additional ventilation.
4.2 Top View and Control Panel

Image: Top view of the projector, displaying the control panel buttons and the included remote control.
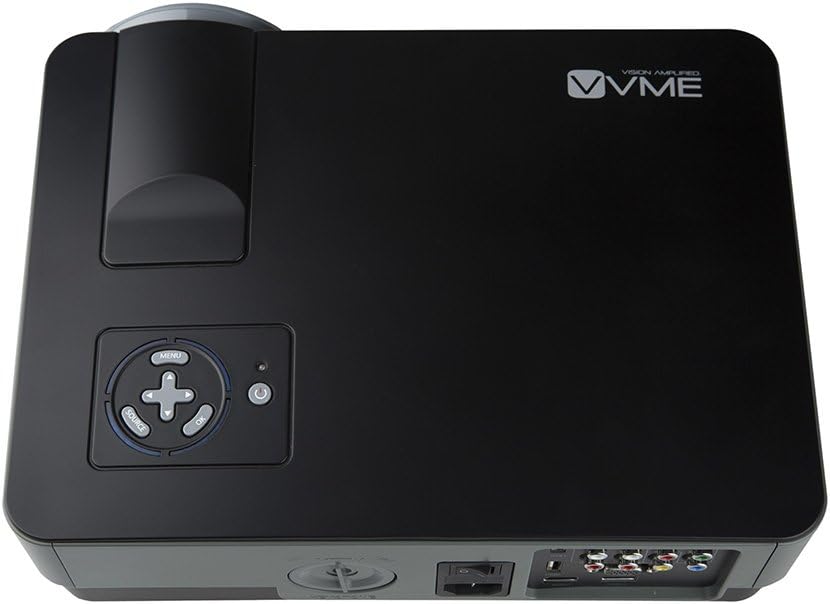
Image: Detailed top view of the projector's control panel, showing the menu, source, navigation, and power buttons.
The top panel features intuitive buttons for power, menu navigation, source selection, and volume control. The remote control provides full functionality for convenient operation from a distance.
4.3 Rear View and Connectivity Ports

Image: Rear view of the projector, showcasing the various input and output ports, including HDMI, VGA, USB, and AV connections.
The rear panel provides a comprehensive array of input options:
- HDMI 1 & HDMI 2: For connecting high-definition sources like Blu-ray players, gaming consoles (PS3, Xbox), or computers.
- VGA: For connecting to computers or laptops.
- Y/Pb/Pr (Component Video): For connecting devices with component video output.
- AV (Composite Video): For connecting standard definition devices like DVD players or VCRs.
- USB 1 & USB 2: For playing media directly from USB storage devices.
- Audio Out: For connecting external speakers or headphones.
- Keystone Correction Dial: Adjusts image distortion.
5. Setup
5.1 Placement
Position the projector on a stable, flat surface. Ensure there is sufficient space around the projector for proper ventilation. The projection distance ranges from 6 to 15 feet, yielding a screen size of 50 to 120 inches. Adjust the front foot to tilt the projector for optimal screen height.
5.2 Power Connection
- Connect the power cable to the projector's power input port.
- Plug the other end of the power cable into a grounded electrical outlet.
- Flip the main power switch on the rear of the projector to the 'ON' position.
5.3 Connecting Input Devices
Choose the appropriate cable for your device and connect it to the corresponding port on the projector:
- HDMI: For high-definition video and audio.
- VGA: For computer video output.
- Component (Y/Pb/Pr): For analog high-definition video.
- Composite (AV): For standard definition video and stereo audio.
- USB: Insert a USB drive directly into one of the USB ports for media playback.
6. Operating Instructions
6.1 Powering On/Off
- Ensure the main power switch on the rear is ON.
- Press the power button on the projector's control panel or the remote control to turn the unit on.
- To power off, press the power button again. The projector fan will continue to run for approximately 6 minutes to cool down the lamp before fully shutting off. Do not unplug the projector during this cooling cycle.
6.2 Selecting Input Source
Press the 'Source' button on the projector or remote control to cycle through available input sources (HDMI1, HDMI2, VGA, AV, Y/Pb/Pr, USB). Select the input corresponding to your connected device.
6.3 Adjusting Image Focus and Keystone
- Focus: Rotate the focus ring around the projector lens until the image appears sharp and clear on the screen.
- Keystone Correction: Use the keystone correction dial on the rear of the projector to correct trapezoidal image distortion if the projector is not perfectly perpendicular to the screen. Note that extreme keystone correction may cause slight blurring at the top or bottom of the image.
6.4 Menu Navigation and Settings
Press the 'Menu' button on the projector or remote to access the on-screen display (OSD) menu. Use the arrow buttons to navigate and 'OK' to select. Adjust settings such as:
- Picture Settings: Brightness, Contrast, Color, Tint, Sharpness, Color Temperature.
- Aspect Ratio: Switch between 4:3 and 16:9 screen formats.
- Image Reverse: Flip the image horizontally or vertically for ceiling mounting or rear projection.
- Sound Settings: Adjust volume (if available for the selected input) and audio modes.
6.5 USB Media Playback
Insert a USB flash drive or external hard drive into a USB port. Select 'USB' as the input source. The projector will display a file browser, allowing you to select and play supported video, audio, or image files directly.
7. Maintenance
7.1 Cleaning the Lens
Use a soft, lint-free cloth specifically designed for optical lenses. Gently wipe the lens surface to remove dust or smudges. Avoid using harsh chemicals or abrasive materials.
7.2 Cleaning the Projector Casing
Wipe the exterior casing with a soft, dry cloth. For stubborn dirt, a slightly damp cloth can be used, followed by a dry cloth. Ensure no liquid enters the projector.
7.3 Ventilation Maintenance
Regularly check the ventilation grilles for dust accumulation. Use a soft brush or a vacuum cleaner with a brush attachment to gently remove dust, ensuring proper airflow and preventing overheating.
7.4 Lamp Life
The projector utilizes an LED lamp with an average lifespan of over 20,000 hours, significantly reducing the need for frequent lamp replacement.
8. Troubleshooting
Refer to the table below for common issues and their solutions:
| Problem | Possible Cause | Solution |
|---|---|---|
| No image on screen | Power not connected; Incorrect input source; Input device not powered on or connected correctly. | Check power cable and main switch; Select correct input source; Ensure input device is on and cables are secure. |
| Image is blurry | Focus not adjusted; Keystone correction too extreme; Projector too close/far from screen. | Adjust the focus ring; Minimize keystone correction; Adjust projection distance. |
| No sound | Volume too low; Incorrect audio settings; External speakers not connected or powered. | Increase volume; Check audio settings in OSD menu; Connect external speakers to Audio Out port. |
| Projector shuts down unexpectedly | Overheating due to blocked ventilation or prolonged use. | Ensure ventilation grilles are clear; Allow projector to cool down; Operate in a well-ventilated area. |
| Remote control not working | Batteries depleted or incorrectly inserted; Obstruction between remote and projector. | Replace batteries (AAA); Ensure clear line of sight to the projector's IR receiver. |
| Fan noise is loud | Normal operation; Dust accumulation; Overheating. | Some fan noise is normal. Clean ventilation grilles; Ensure proper ventilation to prevent excessive fan speed. |
9. Specifications
Technical specifications for the VVME-HTPCD-V01B LED Video Projector:
| Feature | Detail |
|---|---|
| Model Number | VVME-HTPCD-V01B |
| Native Resolution | 800 x 480 pixels |
| Supported Input Resolution | Up to 1920 x 1080 pixels (1080P/720P/480P) |
| Display Technology | 5" Single LCD |
| Lamp Type | LED |
| Lamp Life | Over 20,000 hours (average) |
| Aspect Ratio | 4:3 / 16:9 (Adjustable) |
| Projection Distance | 6 - 15 feet |
| Projection Size | 50 - 120 inches |
| Connectivity | 2x HDMI, 1x VGA, 1x Y/Pb/Pr, 1x AV, 2x USB, Audio Out |
| Built-in Speaker | Yes |
| Dimensions (L x W x H) | 18 x 13 x 7 inches |
| Item Weight | 9 pounds |
10. Support
For further assistance, technical support, or warranty inquiries, please refer to the contact information provided with your purchase documentation or visit the official VVME website. Please have your model number (VVME-HTPCD-V01B) and purchase date ready when contacting support.