1. Introduction
The CB Mini Microcentrifuge is a compact, low-speed device designed for quick spin-down applications in laboratory settings. Its simple operation and small footprint make it ideal for various microtube processing tasks. This manual provides essential information for the safe and efficient use of your microcentrifuge.
Key Features:
- Low speed quick spin mini centrifuge.
- Automatic operation: switches on when the lid is pressed and off when the lid is lifted.
- Safety feature: automatic shut-off if the spin duration is too long and the centrifuge heats up.
2. Safety Precautions
Please read and understand all safety information before operating the microcentrifuge. Failure to follow these instructions may result in injury or damage to the unit.
- Always operate the centrifuge on a stable, level surface.
- Ensure the lid is securely closed before operation. The unit will not spin if the lid is open.
- Balance tubes properly in the rotor. Uneven loading can cause vibration, noise, and potential damage to the unit.
- Do not open the lid while the rotor is spinning. Wait for the rotor to come to a complete stop.
- Do not use the centrifuge with flammable or explosive materials.
- Keep hands, hair, and loose clothing away from the rotor area during operation.
- Disconnect the power cord before cleaning or maintenance.
- If the unit overheats or makes unusual noises, immediately disconnect power and refer to the troubleshooting section.
3. Package Contents
Verify that all items are present and undamaged upon unpacking:
- Mini Microcentrifuge Unit
- Rotor (pre-installed, for 6 x 1.5 ml microtubes)
- Adaptors for 0.5 ml tubes (set of 6)
- Adaptors for 0.2 ml tubes (set of 6)
- Power Cord
4. Setup
Follow these steps to set up your microcentrifuge:
- Unpack the Unit: Carefully remove the microcentrifuge and all accessories from the packaging.
- Placement: Place the unit on a stable, level, and vibration-free surface. Ensure there is adequate ventilation around the unit.
- Power Connection: Connect the power cord to the back of the microcentrifuge and then plug it into a grounded electrical outlet (110 V or 220 V, depending on your model).
- Rotor Check: Ensure the rotor is securely seated in the chamber. It is typically pre-installed.
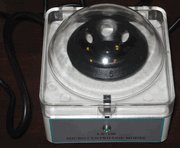
Figure 1: The CB Mini Microcentrifuge unit. This image shows the compact Mini Microcentrifuge unit. It features a white base with a clear, hinged lid, revealing the black rotor inside. A power cord extends from the back of the unit.
5. Operating Instructions
Operating the Mini Microcentrifuge is straightforward:
- Open the Lid: Gently lift the clear lid to access the rotor.
- Load Tubes: Insert your microtubes into the rotor slots. For 0.5 ml or 0.2 ml tubes, use the appropriate adaptors provided.
- Balance Tubes: It is crucial to balance the rotor by placing tubes of equal weight directly opposite each other. For example, if you are spinning one tube, place a tube of equal weight (e.g., a tube filled with water) in the opposite slot.
- Close the Lid: Gently press down the lid until it clicks into place. The centrifuge will automatically begin spinning once the lid is securely closed.
- Spin Cycle: The centrifuge will spin at 3000 rpm. The duration of the spin is controlled manually by the user.
- Stop Operation: To stop the centrifuge, simply lift the lid. The rotor will immediately begin to slow down and stop.
- Remove Tubes: Once the rotor has come to a complete stop, carefully remove your microtubes.
6. Maintenance
Regular maintenance ensures the longevity and optimal performance of your microcentrifuge.
- Cleaning: Wipe down the exterior surfaces and the rotor chamber with a soft, damp cloth. For stubborn stains, use a mild detergent. Do not use abrasive cleaners or solvents.
- Rotor Care: Periodically inspect the rotor for any signs of wear or damage. Ensure the tube slots are clean and free of debris.
- Spills: In case of spills inside the rotor chamber, immediately clean with a suitable disinfectant and dry thoroughly.
- Storage: When not in use, store the centrifuge in a clean, dry environment away from direct sunlight and extreme temperatures.
7. Troubleshooting
Refer to the table below for common issues and their solutions:
| Problem | Possible Cause | Solution |
|---|---|---|
| Centrifuge does not spin when lid is closed. | Power cord not connected; Lid not fully closed; Unit malfunction. | Check power connection; Ensure lid is securely latched; Contact customer support if issue persists. |
| Excessive vibration or noise during operation. | Tubes are not balanced; Unit is on an unstable surface; Damaged rotor. | Re-balance tubes with equal weight; Move unit to a stable, level surface; Inspect rotor for damage. |
| Unit stops unexpectedly or heats up. | Automatic safety shut-off activated due to prolonged spin or overheating. | Allow unit to cool down; Ensure proper ventilation; Reduce spin duration if possible. |
| Rotor does not stop immediately when lid is lifted. | Normal coast-down time; Mechanical issue. | Allow rotor to come to a complete stop naturally; If stopping is excessively slow, contact support. |
8. Specifications
Technical specifications for the CB Mini Microcentrifuge:
- Speed: 3000 rpm
- Rotor Capacity: 6 x 1.5 ml microtubes
- Tube Adaptors: Included for 0.5 ml and 0.2 ml tubes
- Voltage: 110 V (220 V also available, check your specific model)
- Dimensions (Diameter x Height): Approximately 10 cm x 12 cm (3.9 x 4.7 inches)
- Weight: Approximately 500 g (1.1 lbs)
- Manufacturer: CB
- ASIN: B002TK683W
9. Warranty Information
This product typically comes with a limited manufacturer's warranty. For specific details regarding warranty coverage, duration, and terms, please refer to the documentation included with your purchase or contact the seller/manufacturer directly. Keep your proof of purchase for warranty claims.
10. Customer Support
If you have any questions, require technical assistance, or need to report an issue with your CB Mini Microcentrifuge, please contact your point of purchase or the manufacturer, CB. When contacting support, please have your product model number (B002TK683W) and a detailed description of the issue ready.