1. Introduction
This manual provides comprehensive instructions for the Beat-Sonic AOK-02 Navigation Mounting Kit. This kit allows for the integration of aftermarket 1DIN head units into your vehicle's audio system, ensuring that original audio functions and all speaker outputs are retained. Please read this manual thoroughly before installation and operation.
2. Product Overview
The Beat-Sonic AOK-02 kit facilitates the addition of aftermarket 1DIN head units without compromising the vehicle's original audio capabilities. It ensures that all front and rear door speakers remain functional. The system supports both aftermarket and factory head units. When an additional head unit is powered on, the system automatically routes audio through it. The Multi-Vision Automatic Recovery (MAR) system restores the original state when the additional head unit is turned off.
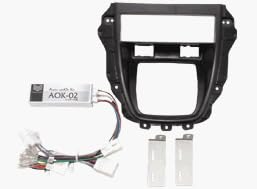
Image 1: Components of the Beat-Sonic AOK-02 Navigation Mounting Kit. This image displays the main mounting frame, the AOK-02 control module, the associated wiring harness with various connectors, and two white mounting brackets.
3. Setup and Installation
Installation of the Beat-Sonic AOK-02 kit requires technical knowledge and should ideally be performed by a qualified professional. Incorrect installation can lead to damage to the product or vehicle.
- Safety First: Disconnect the vehicle's negative battery terminal before beginning any electrical work.
- Remove Factory Unit: Carefully remove the existing factory head unit and associated trim panels from the dashboard.
- Install AOK-02 Module: Connect the AOK-02 control module and wiring harness according to the vehicle-specific wiring diagram. Ensure all connections are secure.
- Mount Aftermarket Unit: Secure the aftermarket 1DIN head unit into the Beat-Sonic mounting frame.
- Connect Wiring: Connect the aftermarket head unit to the AOK-02 harness.
- Test Functionality: Before reassembling the dashboard, reconnect the battery and test all audio functions, including front and rear speakers, and the operation of both the aftermarket and original audio sources.
- Reassemble: Once confirmed operational, reassemble the dashboard and trim panels.
Important: For detailed vehicle-specific installation instructions and compatibility information, please refer to the official Beat-Sonic website: http://www.beatsonic.co.jp/conformity/.
4. Operating Instructions
Once installed, the Beat-Sonic AOK-02 kit seamlessly integrates your aftermarket 1DIN head unit. When the aftermarket unit is powered on, audio will automatically be routed through it, utilizing all existing vehicle speakers. When the aftermarket unit is powered off, the Multi-Vision Automatic Recovery (MAR) system will revert the audio system to its original factory configuration.
- Using Aftermarket Unit: Simply power on your aftermarket 1DIN head unit. The audio output will automatically switch to this unit.
- Returning to Factory Audio: Power off your aftermarket 1DIN head unit. The MAR system will automatically restore the vehicle's original audio system functionality.
5. Maintenance
The Beat-Sonic AOK-02 Navigation Mounting Kit requires minimal maintenance. To ensure optimal performance and longevity:
- Secure Connections: Periodically check that all electrical connections remain secure and free from corrosion.
- Mounting Stability: Ensure the mounting frame and aftermarket unit are stable and not vibrating excessively.
- Environmental Protection: Avoid exposing the unit to excessive moisture, extreme temperatures, or direct sunlight for prolonged periods.
- Cleaning: Clean the exterior of the unit with a soft, dry cloth. Do not use harsh chemicals or abrasive cleaners.
6. Troubleshooting
If you encounter issues with your Beat-Sonic AOK-02 kit, refer to the following troubleshooting guide:
- No Sound from Aftermarket Unit:
- Verify all wiring connections are secure and correctly matched according to the installation diagram.
- Ensure the aftermarket head unit is powered on and functioning correctly.
- Check the vehicle's fuse box for any blown fuses related to the audio system.
- Original Audio Not Restored:
- Confirm the aftermarket unit is completely powered off.
- Check connections to the MAR system module for proper seating.
- Intermittent Audio:
- Inspect all wiring for loose connections, frayed wires, or damage.
- Ensure proper grounding for both the AOK-02 module and the aftermarket head unit.
If problems persist after following these steps, please contact Beat-Sonic customer support or consult a professional installer.
7. Specifications
| Feature | Specification |
|---|---|
| Model Number | AOK-02 |
| Manufacturer | Beat-Sonic |
| Product Weight | 1.02 Kilograms |
| Package Dimensions | 32.6 x 28.2 x 14.8 cm |
8. Warranty and Support
For warranty information, product support, and further technical assistance, please visit the official Beat-Sonic website or contact their customer service department. The manufacturer's website for product specifications and fitment is: http://www.beatsonic.co.jp/conformity/.
Please retain your proof of purchase for any warranty claims.