Introduction
This manual provides essential information for the safe and efficient operation, maintenance, and troubleshooting of your Silverline 262212 350W Bench Pillar Drill Press. Please read these instructions carefully before assembly, operation, or maintenance. Keep this manual for future reference.
The Silverline 262212 is a 350W bench pillar drill press designed for precision drilling tasks. It features a 5-speed belt drive system, a 50mm spindle travel with depth gauge, a stable cast iron base, and a 13mm keyed chuck.
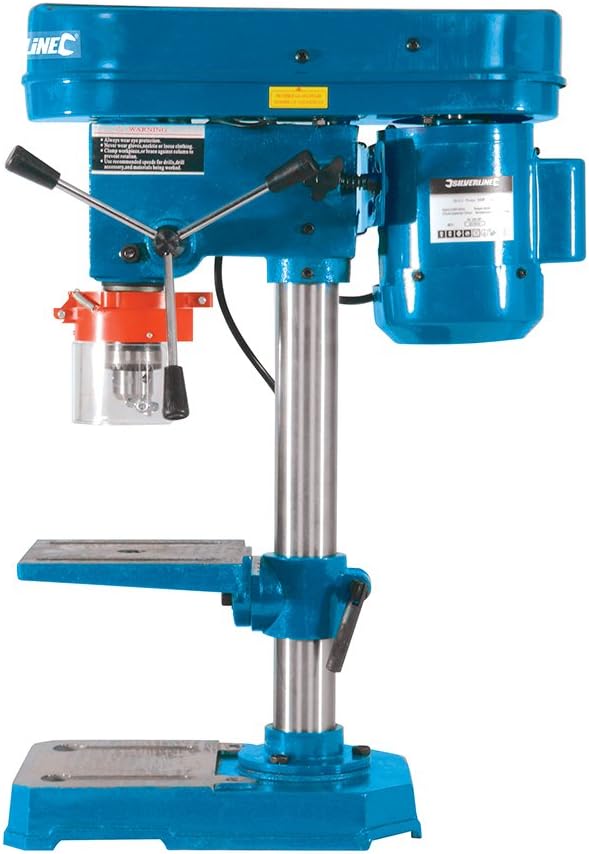
Image 1: Silverline 262212 350W Bench Pillar Drill Press. This image shows the complete drill press unit, highlighting its blue color, motor, column, table, and base.
Safety Instructions
WARNING: Always follow basic safety precautions to reduce the risk of fire, electric shock, and personal injury.
- Work Area Safety: Keep your work area clean and well-lit. Cluttered or dark areas invite accidents. Do not operate power tools in explosive atmospheres, such as in the presence of flammable liquids, gases, or dust.
- Electrical Safety: Power tool plugs must match the outlet. Never modify the plug in any way. Avoid body contact with earthed or grounded surfaces such as pipes, radiators, ranges, and refrigerators.
- Personal Safety: Always wear eye protection. Use hearing protection when operating noisy tools. Dress properly; avoid loose clothing or jewelry that can get caught in moving parts. Secure long hair.
- Tool Use and Care: Do not force the power tool. Use the correct power tool for your application. Disconnect the plug from the power source before making any adjustments, changing accessories, or storing power tools.
- Maintenance: Maintain power tools. Check for misalignment or binding of moving parts, breakage of parts, and any other condition that may affect the power tool’s operation.
- Specific Drill Press Safety:
- Always clamp your workpiece securely to the drill press table.
- Never hold the workpiece by hand.
- Ensure the chuck key is removed from the chuck before starting the drill.
- Adjust the table height and angle before drilling.
- Do not wear gloves while operating the drill press.
- Keep hands clear of the rotating drill bit.
Package Contents
Upon unpacking, ensure all components listed below are present and undamaged. If any parts are missing or damaged, contact your retailer immediately.
- 1x 350W Pillar Drill Press
- 1x Base Plate
- 1x Adjustable Work Surface (Table)
- 1x Steel Central Column
- 1x 13mm Chuck
- 1x Chuck Key
- 1x Protective Cover
- 3x Handles (133 mm)
- 2x Hex Keys (M6, M8)
- 3x Slotted Washers M8
- 3x M8 Nuts

Image 2: Packaging of the Silverline 262212 Drill Press. The box displays the product name "350W Drill Press" and key features in multiple languages.
Setup and Assembly
Follow these steps to assemble your drill press. It is recommended to have assistance for certain steps due to the weight of the components.
- Attach the Column to the Base: Secure the central steel column to the cast iron base plate using the provided fasteners (M8 nuts and slotted washers). Ensure it is firmly tightened.
- Mount the Drill Head: Carefully slide the drill head assembly onto the top of the central column. Ensure it is oriented correctly.
- Install the Work Table: Slide the adjustable work table onto the central column below the drill head. The table should be able to move freely up and down and pivot around the column. Secure it at a comfortable working height using its locking mechanism.
- Attach Handles: Screw the three 133mm handles into the drill feed mechanism on the side of the drill head.
- Install the Chuck: Insert the 13mm keyed chuck onto the spindle. Ensure it is seated firmly. Use the chuck key to firmly tighten the jaws.
- Secure to Workbench: For stability and safety, it is highly recommended to bolt the drill press base to a sturdy workbench using appropriate hardware (not included).
Operating Instructions
1. Adjusting Drilling Speed
The Silverline 262212 features a 5-speed belt drive system, allowing you to select the appropriate speed for different materials and drill bit sizes.
- Access the Belt Compartment: Open the protective cover on top of the drill head to access the motor and spindle pulleys.
- Loosen Belt Tension: Loosen the motor mounting bolts to allow the motor to slide, releasing tension on the belt.
- Change Belt Position: Move the drive belt to the desired pulley combination on both the motor and spindle to achieve the required speed. Refer to the speed chart (usually located inside the belt cover) for recommended settings.
- Re-tension Belt: Slide the motor back to tension the belt. The belt should be taut but not overly tight.
- Secure Motor and Cover: Tighten the motor mounting bolts and close the protective cover.
2. Installing a Drill Bit
- Ensure the drill press is unplugged from the power source.
- Insert the drill bit into the chuck jaws. Ensure the bit is centered and fully seated.
- Use the chuck key to firmly tighten the chuck jaws around the drill bit. Remove the chuck key immediately after tightening.
3. Adjusting the Work Table
- Height Adjustment: Loosen the table locking handle, adjust the table to the desired height, and then firmly tighten the handle.
- Angle Adjustment: The table can be tilted for angled drilling. Loosen the table tilt locking bolts, adjust to the desired angle, and re-tighten.
4. Drilling Operation
- Secure Workpiece: Always clamp your workpiece securely to the drill press table. Never hold it by hand.
- Set Depth Stop: Adjust the depth stop to control the drilling depth. This prevents drilling too deep.
- Power On: Plug in the drill press and turn on the power switch.
- Start Drilling: Slowly lower the drill bit into the workpiece using the feed handles. Apply steady, even pressure. Do not force the drill.
- Clear Chips: Periodically retract the drill bit to clear chips, especially when drilling deep holes.
- Power Off: Once drilling is complete, raise the drill bit, turn off the power switch, and unplug the machine.

Image 3: Silverline 262212 Drill Press in operation, drilling into a wooden workpiece. The image demonstrates the drill press being used on a workbench, with wood shavings visible.
Maintenance
Regular maintenance ensures the longevity and safe operation of your drill press. Always unplug the tool before performing any maintenance.
- Cleaning: After each use, clean the drill press to remove dust, chips, and debris. Use a brush or compressed air. Do not use solvents that may damage plastic parts.
- Lubrication: Periodically apply a light coat of machine oil to the column and other moving parts to ensure smooth operation and prevent rust.
- Belt Inspection: Regularly check the drive belt for wear, cracks, or stretching. Replace if necessary. Ensure proper belt tension.
- Chuck Maintenance: Keep the chuck jaws clean and free of debris. Apply a small amount of lubricant to the chuck threads if it becomes stiff.
- Fastener Checks: Periodically check all nuts, bolts, and screws for tightness. Re-tighten as needed.
Troubleshooting
| Problem | Possible Cause | Solution |
|---|---|---|
| Drill press does not start. | No power supply. Power switch off. Faulty motor. | Check power connection and circuit breaker. Turn power switch ON. Contact qualified service personnel. |
| Excessive vibration or noise. | Loose components. Worn or misaligned belt. Unbalanced drill bit. | Check and tighten all fasteners. Inspect and adjust/replace belt. Ensure drill bit is properly installed and not bent. |
| Drill bit slips in chuck. | Chuck not tightened sufficiently. Dirty chuck jaws. Worn chuck jaws. | Re-tighten chuck with chuck key. Clean chuck jaws. Replace chuck. |
| Inaccurate drilling. | Workpiece not clamped securely. Loose table or column. Bent drill bit or spindle. | Always clamp workpiece firmly. Tighten table and column locking mechanisms. Inspect drill bit and spindle for damage; replace if necessary. |
Specifications
| Model Number | 262212 |
| Power Input | 350 W |
| Voltage | 230 Volts |
| Chuck Size | 13 mm (Keyed) |
| Spindle Travel | 50 mm |
| Speeds | 5-speed belt drive |
| Max Rotational Speed | 2650 rpm |
| Noise Level | 86 Decibels |
| Material | Metal (Cast Iron Base/Table) |
| Approximate Height | 57 cm (23 inches) |
| Weight | 7.86 kg (17.32 lbs) |

Image 4: Size comparison of the Silverline 262212 Drill Press next to a human figure, indicating a height of approximately 57 cm (23 inches).
Warranty and Support
The Silverline 262212 350W Bench Pillar Drill Press comes with a manufacturer's warranty of 3 years. Please retain your proof of purchase for warranty claims.
For technical support, spare parts, or warranty inquiries, please contact Silverline customer service or your local retailer.
Manufacturer: Silverline
Spare Parts Availability: 1 Year