1. Introduction
This manual provides essential information for the safe and efficient operation of your Sony DVP-NS710H 1080p DVD Player. Please read this manual thoroughly before using the player and retain it for future reference. The Sony DVP-NS710H is designed to enhance your viewing experience by upscaling standard definition DVDs to near 1080p resolution via an HDMI connection.
2. Safety Information
- Power Source: Connect the player only to the specified power supply.
- Ventilation: Ensure adequate ventilation. Do not block ventilation openings. Avoid placing the unit on soft surfaces that may block vents.
- Moisture: Do not expose the unit to rain or moisture to prevent fire or electric shock.
- Placement: Place the unit on a stable, level surface. Avoid direct sunlight, heat sources, or excessive dust.
- Servicing: Do not attempt to service the unit yourself. Refer all servicing to qualified personnel.
3. Package Contents
Verify that your package contains the following items:
- Sony DVP-NS710H DVD Player
- HDMI Cable
- Remote Control (with batteries)
- Instruction Manual (this document)
4. Product Overview
Familiarize yourself with the main components of your DVD player.
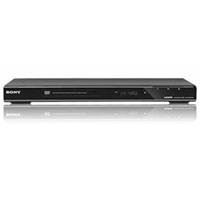
Image 4.1: Front view of the Sony DVP-NS710H 1080p DVD Player. This image displays the sleek, black design of the DVD player, featuring the disc tray, power button, and basic control buttons on the front panel. The Sony logo is visible on the left side.
4.1. Front Panel
- Power Button: Turns the player on or off.
- Disc Tray: For inserting DVDs or CDs.
- Open/Close Button: Opens and closes the disc tray.
- Play/Pause Button: Starts or pauses disc playback.
- Stop Button: Stops disc playback.
- USB Port: For connecting compatible USB devices (if applicable to model variant).
4.2. Rear Panel
- HDMI OUT: Connects to your TV or receiver for high-definition video and audio.
- AUDIO OUT (L/R): Analog stereo audio output.
- VIDEO OUT: Composite video output (yellow RCA jack).
- COAXIAL DIGITAL OUT: Digital audio output.
- AC IN: Power cord connection.
5. Setup
5.1. Connecting to a Television
- HDMI Connection (Recommended for 1080p Upscaling):
- Connect one end of the supplied HDMI cable to the HDMI OUT port on the back of the DVD player.
- Connect the other end of the HDMI cable to an available HDMI IN port on your television. Note the HDMI input number (e.g., HDMI 1, HDMI 2).
- Analog Audio Connection (Optional): If connecting to an audio receiver without HDMI, use the AUDIO OUT (L/R) ports on the DVD player to connect to the corresponding audio input ports on your receiver using RCA cables.
5.2. Power Connection
- Plug the AC power cord into the AC IN port on the back of the DVD player.
- Plug the other end of the power cord into a wall outlet.
6. Operating the DVD Player
6.1. Basic Disc Playback
- Turn on your television and select the correct HDMI input source.
- Press the POWER button on the DVD player or remote control to turn on the unit.
- Press the OPEN/CLOSE button to open the disc tray.
- Place a DVD or CD disc gently into the tray with the label side facing up.
- Press the OPEN/CLOSE button again to close the tray. Playback will usually start automatically. If not, press the PLAY button.
- Use the PLAY, PAUSE, and STOP buttons on the remote or front panel to control playback.
6.2. Using the Remote Control
The remote control allows full access to the player's functions. Key buttons include:
- Directional Arrows (▲▼◄►): Navigate menus.
- ENTER: Confirm selections.
- RETURN/BACK: Go back to the previous menu.
- TOP MENU/POP-UP MENU: Access disc menus.
- SETUP: Access the player's system settings.
- AUDIO/SUBTITLE: Change audio tracks or subtitle languages during playback.
7. Maintenance
7.1. Cleaning the Unit
- Wipe the exterior of the player with a soft, dry cloth.
- Do not use abrasive pads, scouring powder, or solvents such as alcohol or benzene.
7.2. Cleaning Discs
- Wipe discs from the center outwards with a soft, lint-free cloth.
- Do not use solvents or abrasive cleaners on discs.
8. Troubleshooting
| Problem | Solution |
|---|---|
| No power | Check if the power cord is securely connected to the player and the wall outlet. Try a different outlet. |
| No picture | Ensure the HDMI cable is securely connected to both the player and the TV. Verify the TV input is set to the correct HDMI port. |
| No sound | Check audio connections. If using HDMI, ensure TV volume is up and not muted. If using analog audio, check RCA cable connections. |
| Disc not playing | Ensure the disc is clean and free of scratches. Verify the disc is inserted correctly (label side up). Check if the disc format is supported by the player. |
| Remote control not working | Check and replace batteries. Ensure there are no obstructions between the remote and the player's sensor. |
9. Specifications
- Model: DVP-NS710H
- Brand: Sony
- Product Dimensions: 18.5 x 11.5 x 6 inches
- Item Weight: 4.45 pounds
- Resolution: 1920x1080 (upscaled)
- Connector Type: HDMI
- Connectivity Technology: HDMI
- Audio Output Mode: Surround
- Media Type: DVD, CD
10. Warranty and Support
For warranty information or technical support, please refer to the warranty card included with your product or visit the official Sony support website. Contact information for customer service can typically be found on the Sony website or in the product packaging.