
Introduction
Thank you for choosing the iLuv JXMP144 4 GB MP3 Player. This compact and portable device allows you to enjoy your favorite music on the go. This manual provides detailed instructions for setting up, operating, and maintaining your MP3 player, along with troubleshooting tips and product specifications.
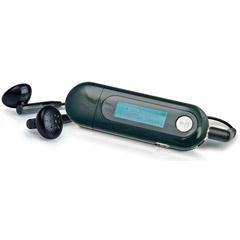
Image: The iLuv JXMP144 MP3 Player, showcasing its compact design and integrated USB plug.
Package Contents
Ensure all items are present in the package:
- iLuv JXMP144 4 GB MP3 Player
- Earphones (3.5 mm stereo jack)
- User Manual (this document)
Setup
1. Battery Installation
The JXMP144 requires one (1) AAA battery for operation.
- Locate the battery compartment cover on the device.
- Slide or open the cover.
- Insert one AAA battery, ensuring the correct polarity (+ and -) as indicated inside the compartment.
- Close the battery compartment cover securely.
2. Connecting to a Computer
The MP3 player features a built-in USB 2.0 plug for direct connection to your computer. No additional cable is required.
- Ensure your computer is running a compatible operating system (Windows 98/ME/2000/XP/Vista).
- Carefully remove the cap covering the USB plug on the MP3 player.
- Insert the MP3 player's USB plug directly into an available USB port on your computer.
- Your computer should detect the device as a removable storage drive.
3. Transferring Music Files
Once connected to your computer, you can transfer MP3 and WMA audio files to the player's 4 GB internal flash memory.
- Open "My Computer" or "This PC" and locate the removable disk drive corresponding to your MP3 player.
- Drag and drop your desired MP3 or WMA files into the player's storage.
- After transferring, safely eject the device from your computer before physically removing it.
4. Connecting Earphones
Plug the included 3.5 mm stereo jack earphones into the earphone port on the MP3 player.
Operating Instructions
Power On/Off
To power on the device, press and hold the Power/Play button. To power off, press and hold the Power/Play button again until the screen turns off.
Basic Playback
- Play/Pause: Press the Play/Pause button to start or pause playback.
- Next Track: Press the "Next" button to skip to the next song.
- Previous Track: Press the "Previous" button to go back to the beginning of the current song, or press twice to go to the previous song.
- Volume Control: Use the Volume Up (+) and Volume Down (-) buttons to adjust the listening volume.
LCD Display
The backlit LCD displays track information, playback status, battery level, and menu options. The device supports ID3 tag and lyric display for compatible files.
Menu Navigation
Use the navigation buttons (usually Next/Previous and Play/Pause) to browse through menus and select options. Refer to the on-screen prompts for specific functions like:
- Preset EQ: Select from various equalizer settings (e.g., Pop, Rock, Jazz, Classical) to enhance audio.
- Repeat Mode: Choose to repeat the current track, all tracks, or a specific folder.
- Random Play: Enable shuffle mode for random track playback.
- Languages: Select your preferred display language.
Hold Function
Activate the hold function to prevent accidental button presses during transport. Locate the "Hold" switch on the device and slide it to the "On" position. Slide it back to "Off" to resume normal operation.
Maintenance
- Cleaning: Use a soft, dry cloth to clean the exterior of the MP3 player. Do not use liquid cleaners or abrasive materials.
- Storage: When not in use for extended periods, remove the AAA battery to prevent leakage. Store the device in a cool, dry place away from direct sunlight and extreme temperatures.
- Battery Replacement: Replace the AAA battery when the low battery indicator appears on the LCD or when the device fails to power on. Dispose of used batteries responsibly.
- Avoid Moisture: Keep the MP3 player away from water and high humidity to prevent damage to internal components.
Troubleshooting
| Problem | Possible Cause | Solution |
|---|---|---|
| Device does not power on. | Low or dead battery; incorrect battery installation. | Replace the AAA battery; ensure correct polarity. |
| No sound from earphones. | Earphones not properly connected; volume too low; corrupted audio file. | Ensure earphones are fully plugged in; increase volume; try a different audio file. |
| Computer does not detect the MP3 player. | Loose USB connection; incompatible operating system; driver issue. | Ensure the USB plug is firmly inserted; verify OS compatibility (Windows 98/ME/2000/XP/Vista); try a different USB port. |
| Files not playing. | Unsupported file format; corrupted file. | Ensure files are MP3 or WMA format; re-transfer the files. |
| Screen is blank or frozen. | Temporary software glitch. | Remove and reinsert the battery to reset the device. |
Specifications
| Model Number | JXMP144 |
| Brand | iLuv |
| Memory Storage Capacity | 4 GB (internal flash memory) |
| Supported Audio Formats | MP3, WMA |
| Connectivity Technology | USB 2.0 (built-in plug), 3.5 mm Aux (for earphones) |
| Display | Backlit LCD |
| Power Source | 1 x AAA Battery |
| System Requirements | Windows 98/ME/2000/XP/Vista |
| Item Weight | 0.15 Pounds |
Warranty and Support
The iLuv JXMP144 MP3 Player comes with a 1-year limited warranty from the date of purchase. This warranty covers defects in materials and workmanship under normal use. It does not cover damage caused by misuse, accident, unauthorized modification, or external causes such as power surges.
For warranty claims or technical support, please contact iLuv customer service. Keep your proof of purchase for warranty validation.
Note: Warranty terms may vary by region. Please refer to the specific warranty information provided with your product at the time of purchase.