Konstsmide 7248-759
Konstsmide 7248-759 Milano Outdoor Wall Lamp User Manual
Model: 7248-759
1. Introduction
Thank you for choosing the Konstsmide 7248-759 Milano Outdoor Wall Lamp. This traditional-style, mains-powered outdoor lighting fixture is designed to enhance the aesthetic and functionality of your outdoor spaces. Constructed from high-quality lacquered aluminum with lead effect clear glass, it provides reliable illumination for gardens, porches, and entrances.
This manual provides essential information for the safe installation, operation, and maintenance of your wall lamp. Please read it thoroughly before installation and retain it for future reference.
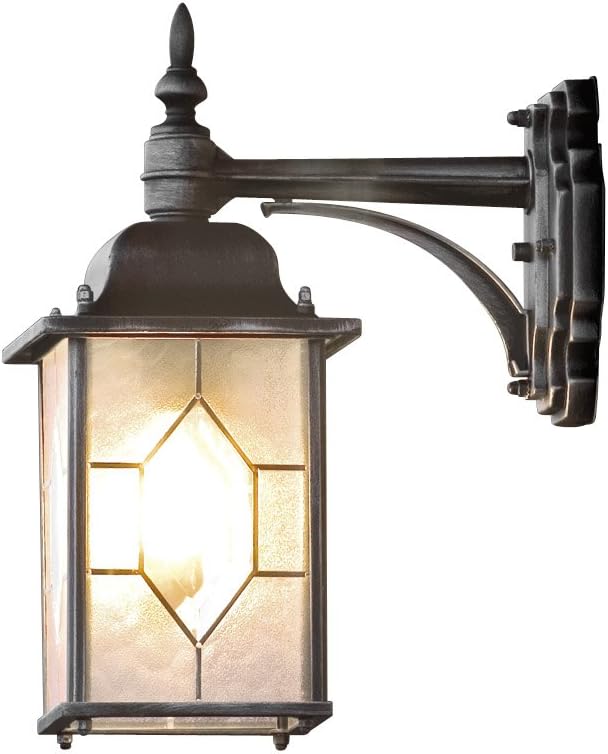
Figure 1: Konstsmide 7248-759 Milano Outdoor Wall Lamp, main view.
2. Safety Instructions
- Electrical Safety: Installation must be carried out by a qualified electrician in accordance with local wiring regulations. Always switch off the main power supply at the fuse box or circuit breaker before commencing any installation, maintenance, or bulb replacement.
- Voltage: This product operates on a mains voltage of 230-240 V. Ensure your electrical supply matches this requirement.
- Bulb Type: Use only E27 bulbs with a maximum wattage of 75W. Do not exceed the specified wattage.
- IP43 Rating: This fixture has an IP43 protection rating, meaning it is protected against solid objects over 1mm and against spraying water. It is suitable for outdoor use but should not be submerged in water.
- Handling: Handle the lamp and glass components with care to prevent breakage.
- Heat: The lamp and bulb can become hot during operation. Allow sufficient time for cooling before handling.
3. Package Contents
Please check that all components are present and undamaged before installation:
- Konstsmide 7248-759 Milano Outdoor Wall Lamp unit
- Mounting bracket
- Fixing screws and wall plugs (may vary)
- Instruction manual (this document)
Note: The E27 bulb is not included and must be purchased separately.
4. Installation
Before you begin: Ensure the power supply to the installation area is switched off at the main circuit breaker. Wear appropriate safety gear.
- Choose Location: Select a suitable outdoor wall location, ensuring it is structurally sound and can support the lamp's weight. Consider the desired light distribution.
- Mark Drilling Points: Hold the mounting bracket against the wall at the desired installation height. Use a pencil to mark the drilling points for the fixing screws.
- Drill Holes: Drill holes at the marked points using an appropriate drill bit for your wall material. Insert wall plugs if necessary.
- Attach Mounting Bracket: Secure the mounting bracket to the wall using the provided screws. Ensure it is firmly attached.
- Wiring: Connect the mains electrical wires to the terminal block inside the lamp's base. Ensure correct polarity (Live, Neutral, Earth) according to local regulations. All connections must be secure.
- Mount the Lamp: Carefully attach the lamp unit to the mounting bracket, securing it with any provided screws or fasteners. Ensure a tight seal to maintain the IP43 rating.
- Install Bulb: Unscrew the glass cover or access panel. Carefully screw an E27 bulb (max 75W) into the lamp holder. Do not overtighten. Replace the glass cover/panel securely.
- Test: Restore power to the circuit. Turn on the light switch to test the lamp's functionality.

Figure 2: The Konstsmide Milano Outdoor Wall Lamp installed on an exterior brick wall.
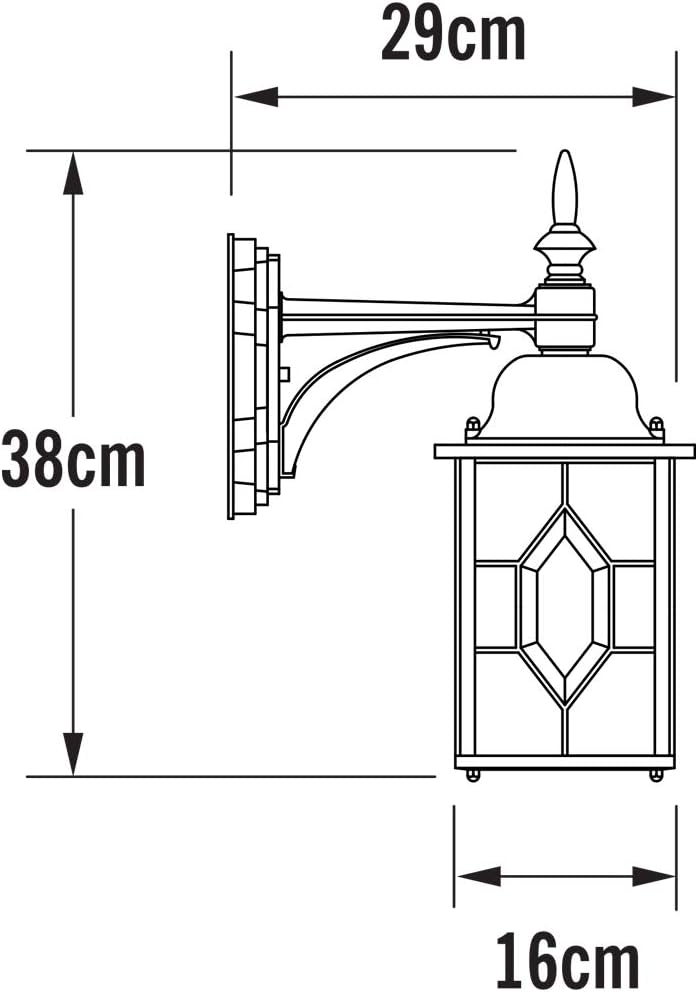
Figure 3: Dimensional drawing of the Konstsmide 7248-759 Milano Outdoor Wall Lamp (Height: 38cm, Width: 16cm, Depth: 29cm).
5. Operation
Once installed and powered, the Konstsmide 7248-759 Milano Outdoor Wall Lamp operates via a standard wall switch connected to its circuit. Simply toggle the switch to turn the light on or off.
For optimal energy efficiency, consider using an E27 energy-saving or LED bulb.
6. Maintenance
- Cleaning: To clean the lamp, ensure the power is off and the lamp is cool. Wipe the lacquered aluminum and glass surfaces with a soft, damp cloth. Do not use abrasive cleaners or solvents, as these can damage the finish.
- Bulb Replacement: Always switch off the power supply before replacing the bulb. Allow the old bulb to cool completely. Unscrew the glass cover or access panel, carefully remove the old E27 bulb, and screw in a new E27 bulb (max 75W). Securely replace the glass cover/panel.
- Inspection: Periodically inspect the lamp for any signs of damage, loose connections, or wear. If any issues are found, consult a qualified electrician.
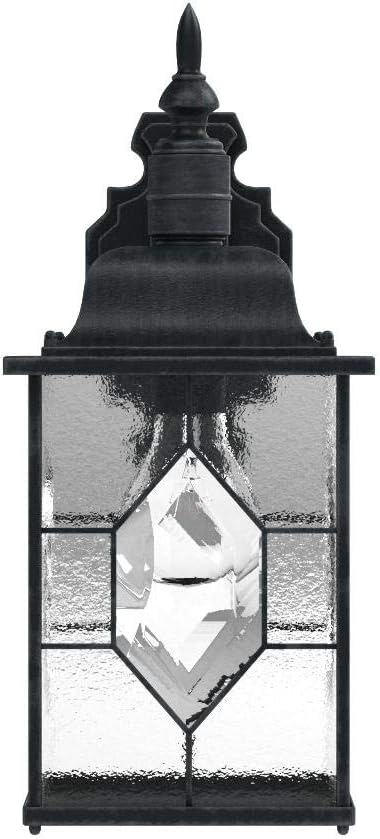
Figure 4: Front view of the Konstsmide Milano Outdoor Wall Lamp, showing the lead effect glass panels.
7. Troubleshooting
| Problem | Possible Cause | Solution |
|---|---|---|
| Lamp does not light up | No power supply Faulty bulb Loose wiring connection | Check circuit breaker/fuse. Replace bulb. Consult a qualified electrician to check wiring. |
| Light flickers | Loose bulb Incorrect bulb type Faulty wiring | Tighten bulb. Ensure correct E27 bulb (max 75W) is used. Consult a qualified electrician. |
| Water inside fixture | Improper installation/seal Damaged seal | Ensure all covers and seals are correctly fitted and tightened during installation. Check for damage to seals and replace if necessary. |
8. Specifications
- Model Number: 7248-759
- Dimensions (L x W x H): 29 x 16 x 38 cm
- Weight: 1.2 kg
- Material: Lacquered Aluminum, Acrylic Glass (Lead Effect)
- Color: Matte Black – Silver (Antique Finish)
- Power Source: Mains Voltage 230-240 V
- Bulb Type: E27 (1 x max 75 W, not included)
- IP Rating: IP43
- Energy Efficiency Rating: A++ – E (depending on bulb used)
- Room Type: Garden, Outdoor
- Manufacturer: Konstsmide
9. Warranty and Support
Konstsmide products are manufactured to high-quality standards. This product is covered by the manufacturer's warranty, details of which can typically be found on the Konstsmide official website or by contacting their customer service.
For technical support, warranty claims, or further assistance, please contact Konstsmide customer service directly or refer to their official website for contact information.
Ask a question about this manual
Ask about setup, troubleshooting, compatibility, parts, safety, or missing instructions. Manuals+ will review the question and use this page’s manual context to help answer it.