1. Introduction and Overview
This manual provides detailed instructions for the safe and effective use of your walimex pro Daylight 1260 Kit. This professional studio lighting kit is designed to provide continuous, soft illumination for photography and videography, featuring a powerful light head and an 80 cm diffuser for optimal light spread.

Image 1.1: The complete walimex pro Daylight 1260 Kit, including the light head, stand, and octagonal softbox.
2. Safety Instructions
Please read and understand all safety warnings and instructions before using this product. Failure to follow these instructions may result in electric shock, fire, or serious injury.
- Always ensure the power supply matches the voltage requirements of the unit.
- Do not operate the unit with wet hands or in damp conditions.
- Keep the unit away from water and other liquids.
- Ensure proper ventilation around the light head to prevent overheating.
- Do not touch the bulbs immediately after use, as they may be hot.
- Unplug the unit from the power outlet before cleaning or performing any maintenance.
- Keep out of reach of children.
3. Package Contents
Verify that all components are present and in good condition upon unpacking:
- walimex pro Daylight 1260 Light Head (multi-socket)
- Energy-saving spiral daylight bulbs (quantity as per kit variant)
- Light Stand
- 80 cm Octagonal Softbox / Diffuser
- Power Cable
- Carrying Bag for Light Stand

Image 3.1: The light stand partially stored in its dedicated carrying bag, highlighting portability.

Image 3.2: The included power cable, featuring a standard European plug for connecting the light head to a power source.
4. Setup Instructions
Follow these steps to assemble your walimex pro Daylight 1260 Kit:
- Assemble the Light Stand: Extend the legs of the light stand (Image 4.1) to form a stable base. Adjust the height to your desired level and secure all locking mechanisms.
- Attach the Light Head: Mount the walimex pro Daylight 1260 light head (Image 4.2) onto the top spigot of the light stand. Tighten the mounting screw securely.
- Install Bulbs: Carefully screw the energy-saving spiral daylight bulbs (Image 4.3) into each socket of the light head. Ensure they are finger-tight but do not overtighten.
- Attach the Softbox: Assemble the 80 cm octagonal softbox (Image 4.4) according to its specific instructions, then attach it to the front of the light head (Image 4.5). Ensure it is securely fastened to prevent accidental detachment.
- Connect Power: Plug the power cable into the light head and then into a suitable electrical outlet.

Image 4.1: The robust light stand fully extended and ready for mounting the light head.

Image 4.2: The light head, showing its multiple bulb sockets designed for high-output illumination.

Image 4.3: A close-up of one of the energy-saving spiral daylight bulbs included in the kit.
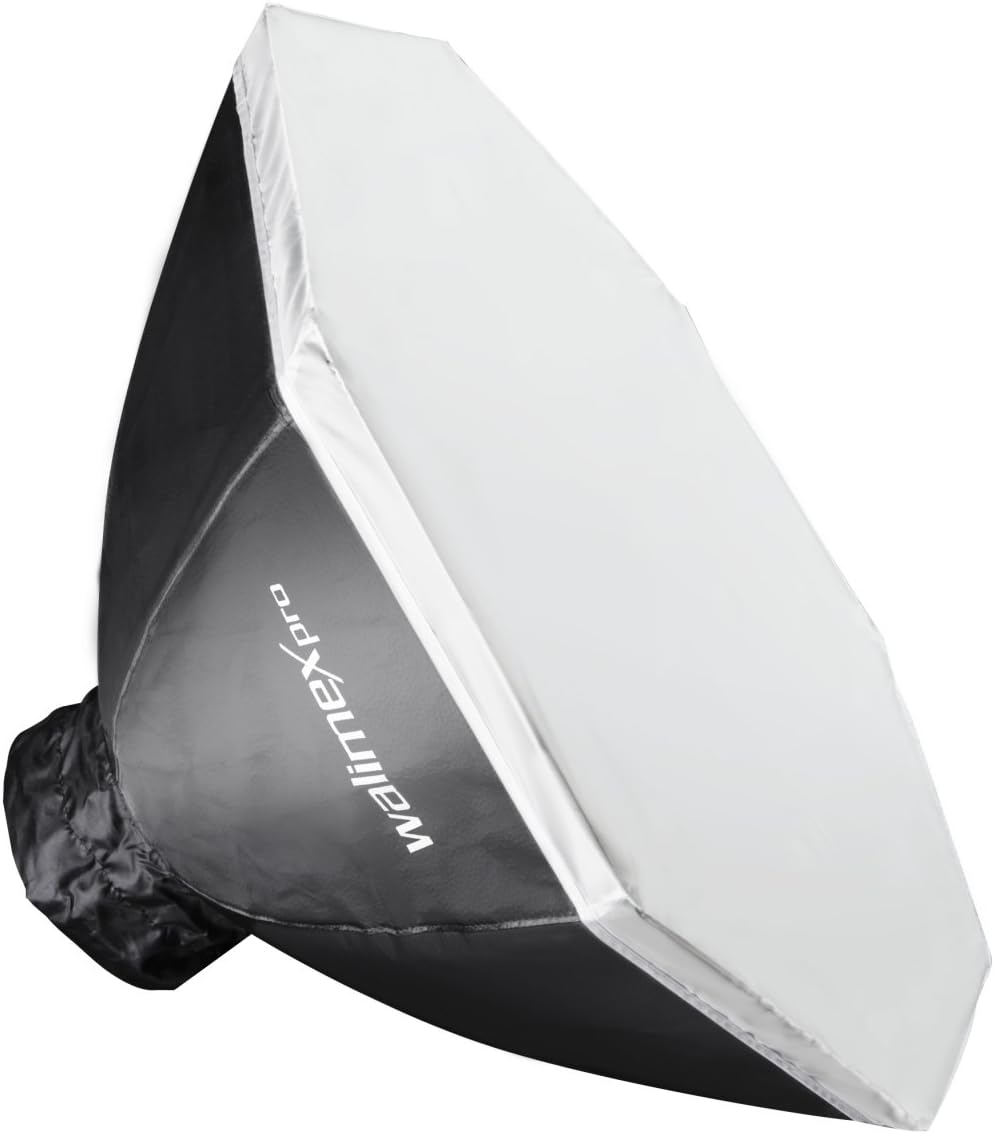
Image 4.4: The octagonal softbox, shown in its folded state, ready for assembly.
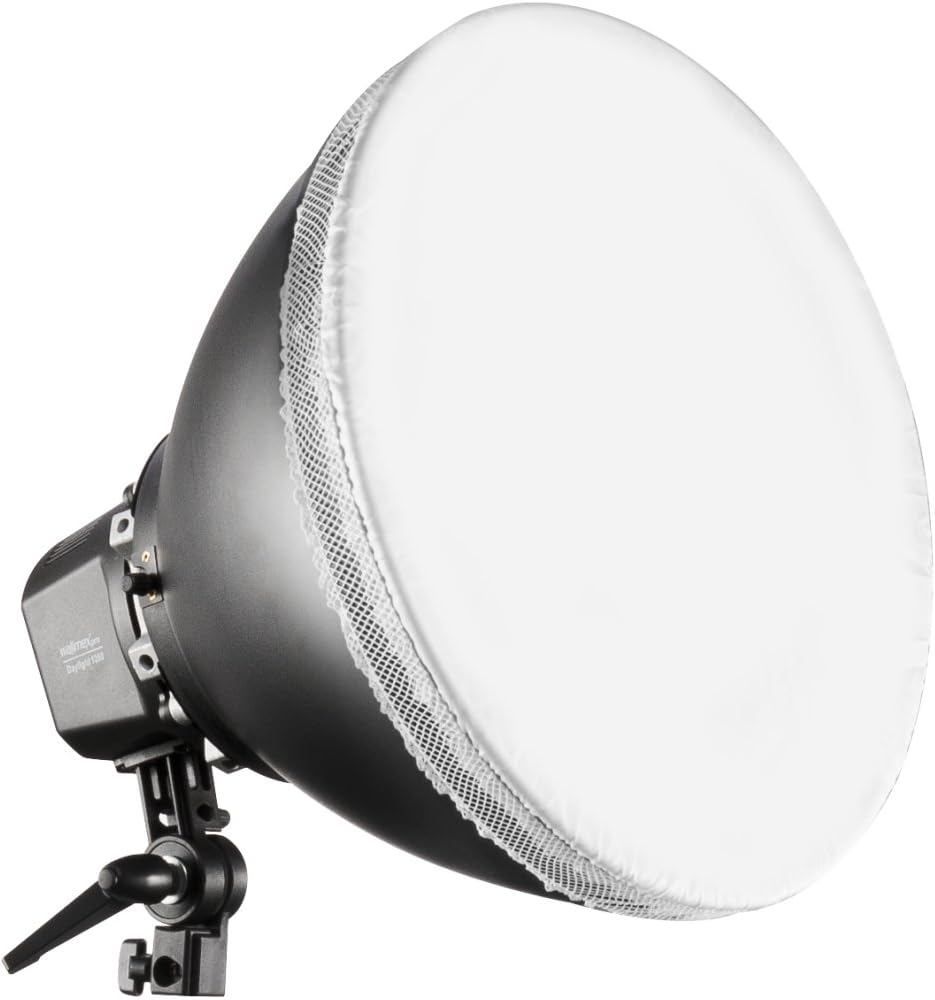
Image 4.5: The light head with the diffuser attached, ready to provide soft, even lighting.
5. Operating Instructions
Once assembled, operating the walimex pro Daylight 1260 Kit is straightforward:
- Power On/Off: Use the integrated power switch on the light head to turn the unit on or off. Some models may feature individual switches for bulb banks, allowing for variable light output.
- Adjust Light Position: Loosen the locking knob on the light head's tilt mechanism to adjust the angle of the light. Tighten the knob once the desired angle is achieved. Adjust the height of the light stand as needed.
- Utilize the Diffuser: The 80 cm octagonal softbox acts as a diffuser, softening the light output and creating more even illumination, reducing harsh shadows. Ensure it is properly attached for optimal results.
6. Maintenance
Regular maintenance ensures the longevity and optimal performance of your lighting kit:
- Cleaning: Disconnect the power before cleaning. Use a soft, dry cloth to wipe down the light head and stand. For the softbox, a slightly damp cloth can be used, but ensure it is completely dry before storage or next use. Do not use abrasive cleaners or solvents.
- Bulb Replacement: If a bulb burns out, ensure the unit is unplugged and the bulb has cooled completely. Carefully unscrew the old bulb and replace it with a new energy-saving spiral daylight bulb of the same specification.
- Storage: When not in use, disassemble the kit and store it in a dry, dust-free environment. The light stand can be stored in its carrying bag.
7. Troubleshooting
If you encounter issues with your walimex pro Daylight 1260 Kit, refer to the following common problems and solutions:
| Problem | Possible Cause | Solution |
|---|---|---|
| Light does not turn on | No power supply; Loose cable connection; Faulty bulb; Unit switch off | Check power outlet; Ensure all cables are securely connected; Replace faulty bulbs; Turn on the unit switch |
| Uneven light output | Damaged or missing diffuser; Incorrect bulb installation | Ensure softbox is correctly assembled and attached; Verify all bulbs are working and properly screwed in |
| Light flickers | Loose bulb; Unstable power supply | Tighten bulbs; Check power source for stability |
8. Specifications
Key technical specifications for the walimex pro Daylight 1260 Kit:
- Brand: Walimex Pro
- Model: 15408
- Color: Black, White
- Product Dimensions (L x W x H): 100 x 52 x 54 cm
- Item Weight: 3.4 Kilograms
- Diffuser Size: 80 cm (Octagonal Softbox)
- Bulb Type: Energy-saving spiral daylight bulbs
- ASIN: B001V69KHG
9. Warranty Information
This walimex pro product is covered by the manufacturer's standard warranty. Please refer to the warranty card included with your purchase or visit the official Walimex Pro website for detailed terms and conditions regarding warranty coverage, duration, and claims process. Keep your proof of purchase for warranty validation.
10. Support
For further assistance, technical support, or spare parts, please contact Walimex Pro customer service. You can typically find contact information on the official Walimex Pro website or through your retailer.
Online Resources: www.walimexpro.com