1. Introduction
This manual provides detailed instructions for the installation, operation, and maintenance of your Pfister 972022J All Metal Drain Assembly. Please read these instructions carefully before beginning installation and retain this manual for future reference.

Image 1.1: Pfister 972022J All Metal Drain Assembly, Brushed Nickel finish.
2. Product Features
The Pfister 972022J All Metal Drain Assembly is designed for durability and reliable performance. Key features include:
- All Metal Construction: Ensures long-lasting durability and resistance to wear.
- Includes Drain, Ball Rod, and Strap: Complete assembly for standard sink installations.
- Genuine Pfister Part: Guarantees compatibility and quality.
- Brushed Nickel Finish: Provides a modern aesthetic and corrosion resistance.
3. Setup and Installation
Before installation, ensure you have all necessary tools and components. Professional installation is recommended if you are unfamiliar with plumbing procedures.
3.1 Components Included
- Drain Body
- Drain Stopper
- Ball Rod
- Lift Rod Strap
- Gaskets and Nuts

Image 3.1: Exploded view of the Pfister 972022J Drain Assembly components.
3.2 Required Tools (Not Included)
- Plumber's Putty or Silicone Sealant
- Adjustable Wrench or Basin Wrench
- Pliers
- Teflon Tape (optional, for threaded connections)
3.3 Installation Steps
- Prepare the Sink Opening: Ensure the sink drain opening is clean and free of old sealant or debris.
- Apply Sealant: Apply a thin bead of plumber's putty or silicone sealant around the underside of the drain flange (the top part that sits in the sink).
- Insert Drain Body: Insert the drain body through the sink opening from above. Press firmly to create a seal.
- Secure from Below: From underneath the sink, slide the rubber gasket, then the friction washer, and finally thread the locknut onto the drain body. Hand-tighten first, then use an adjustable wrench to tighten securely. Do not overtighten.
- Install Ball Rod: Insert the ball rod into the opening on the side of the drain body. Ensure the ball is properly seated.
- Attach Lift Rod Strap: Connect the lift rod strap to the ball rod using the provided clip. The lift rod (from your faucet, not included with this drain assembly) will attach to this strap.
- Insert Stopper: Place the drain stopper into the drain opening. Adjust the ball rod and strap to ensure the stopper operates smoothly, opening and closing completely.
- Connect P-Trap: Connect your P-trap assembly to the bottom of the drain body, ensuring all connections are tight and sealed to prevent leaks.
- Test for Leaks: Fill the sink with water and check all connections for leaks. Tighten any leaking connections as needed.
4. Operating Instructions
The Pfister 972022J drain assembly features a pop-up stopper mechanism, typically controlled by a lift rod located on your faucet (faucet not included).
- To Close the Drain: Push down on the lift rod on your faucet. This will lower the drain stopper, sealing the sink.
- To Open the Drain: Pull up on the lift rod on your faucet. This will raise the drain stopper, allowing water to drain.
Note: If the stopper does not operate smoothly or seal properly, check the adjustment of the ball rod and strap connection under the sink.
5. Maintenance
Regular cleaning and maintenance will ensure the longevity and appearance of your drain assembly.
- Cleaning the Finish: Clean the brushed nickel finish with a soft, damp cloth. Avoid abrasive cleaners, harsh chemicals, or scouring pads, as these can damage the finish.
- Cleaning the Stopper: Periodically remove the drain stopper and clean any hair or debris that may have accumulated in the drain opening. This helps maintain proper drainage.
- Checking for Leaks: Regularly inspect under the sink for any signs of leaks around the drain connections. Tighten nuts as necessary.
6. Troubleshooting
| Problem | Possible Cause | Solution |
|---|---|---|
| Water leaks from under the sink. | Loose connections, improperly seated gaskets, or insufficient sealant. | Check and tighten all nuts. Ensure gaskets are correctly positioned. Reapply plumber's putty or silicone if necessary. |
| Drain stopper does not seal completely. | Ball rod or strap misaligned, debris under stopper, or worn stopper gasket. | Adjust the ball rod and strap connection. Clean any debris from the drain opening and stopper. Replace stopper gasket if worn. |
| Drainage is slow. | Accumulation of hair or debris in the drain. | Remove the drain stopper and clean out any obstructions from the drain opening. |
7. Specifications
- Model Number: 972022J
- Brand: Pfister
- Material: All Metal
- Finish Type: Brushed Nickel
- Product Dimensions: 2.09"W x 7.94"H
- Item Weight: 13.4 ounces
- UPC: 038877479919
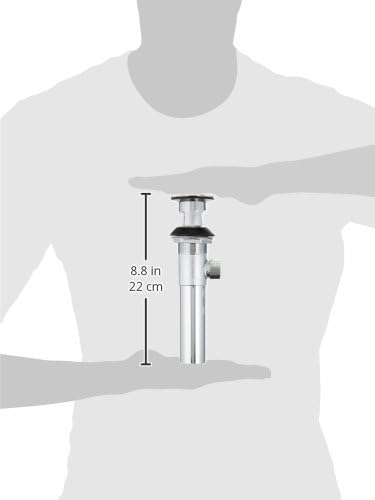
Image 7.1: Dimensions of the Pfister 972022J All Metal Drain Assembly.
8. Warranty and Support
Pfister stands behind the quality of its products. The Pfister 972022J All Metal Drain Assembly is covered by the Pforever Warranty.
- Pforever Warranty: Covers both the finish and function of the product for life.

Image 8.1: Pfister Pforever Warranty details.
For further assistance, technical support, or warranty claims, please visit the official Pfister website or contact their customer service.
Please note: The "Why Pfister Brand Video" below provides general information about the brand's commitment to quality and design, which may be helpful.
Video 8.1: Why Pfister Brand Video. This video highlights Pfister's commitment to high-quality, innovative, and easy-to-install plumbing fixtures, backed by a lifetime warranty.