1. Introduction
This manual provides essential information for the safe and effective use of your Brüder Mannesmann 92570 Mini Drill Bit Set. This versatile 80-piece hobby tool kit is designed for various tasks including drilling, milling, separating, and polishing. Please read these instructions thoroughly before operating the tool and retain them for future reference.
2. Safety Instructions
Always observe basic safety precautions to reduce the risk of injury or damage. Failure to follow these instructions may result in electric shock, fire, and/or serious injury.
- Work Area Safety: Keep your work area clean and well-lit. Cluttered or dark areas invite accidents. Do not operate power tools in explosive atmospheres, such as in the presence of flammable liquids, gases, or dust.
- Electrical Safety: Power tool plugs must match the outlet. Never modify the plug in any way. Avoid body contact with earthed or grounded surfaces. Do not expose power tools to rain or wet conditions.
- Personal Safety: Always wear eye protection. Use hearing protection when operating for extended periods. Dress properly; avoid loose clothing or jewelry that can get caught in moving parts.
- Tool Use and Care: Do not force the power tool. Use the correct power tool for your application. Disconnect the plug from the power source before making any adjustments, changing accessories, or storing power tools.
- Maintenance: Maintain power tools and accessories. Check for misalignment or binding of moving parts, breakage of parts, and any other condition that may affect the power tool’s operation.
3. Package Contents
The Brüder Mannesmann 92570 Mini Drill Bit Set includes the following components:
- Mini Drill (130W)
- Flexible Shaft attachment
- Table Clamp / Stand
- Assortment of 80 accessories (various drill bits, grinding stones, sanding bands, cutting discs, polishing wheels, collets, wrenches)
- Storage Case

Figure 3.1: Overview of the Brüder Mannesmann 92570 Mini Drill Bit Set, showing the main drill unit, flexible shaft, table clamp, and a selection of the 80 included accessories.

Figure 3.2: The mini drill and its accessories neatly organized within the provided storage case, ready for transport or storage.
4. Product Overview
The Brüder Mannesmann 92570 is a corded electric mini drill designed for precision tasks. It features a 130W motor and variable speed control, allowing for optimal performance across different materials and applications.
Key Features:
- Power: 130 Watts
- Voltage: 230 Volts
- Speed: Variable, 8,000 to 30,000 RPM
- Flexible Shaft: For detailed work in hard-to-reach areas.
- Table Clamp/Stand: For stationary operation and improved control.
5. Setup
5.1 Attaching Accessories to the Main Drill
- Ensure the tool is unplugged from the power source.
- Press and hold the spindle lock button on the drill.
- Unscrew the collet nut.
- Insert the desired accessory shank into the appropriate collet.
- Tighten the collet nut securely using the provided wrench.
5.2 Using the Flexible Shaft
The flexible shaft allows for greater maneuverability and precision in intricate tasks.
- Unplug the main drill.
- Remove any accessory from the main drill's collet.
- Unscrew the collet nut and remove the collet from the main drill.
- Screw the flexible shaft coupling onto the main drill's spindle.
- Insert the flexible shaft's inner drive cable into the main drill's spindle opening.
- Secure the flexible shaft's handpiece collet nut and insert the desired accessory.

Figure 5.1: The mini drill mounted on its table clamp stand, with the flexible shaft attached for extended reach and detailed work.
5.3 Mounting the Tool on the Stand
The included table clamp and stand allow for stable, hands-free operation, particularly useful when using the flexible shaft.
- Secure the table clamp to a sturdy workbench or table.
- Assemble the vertical stand rod into the clamp.
- Hang the mini drill from the top hook of the stand.
6. Operating Instructions
Before starting, ensure your work area is clear and you are wearing appropriate personal protective equipment.
6.1 Powering On and Speed Adjustment
- Plug the tool into a 230V power outlet.
- Turn the power switch to the 'ON' position.
- Adjust the rotational speed using the variable speed dial. Start at a lower speed and gradually increase as needed for the material and task.
6.2 Common Applications
The mini drill is suitable for a variety of precision tasks:
- Drilling: Use appropriate drill bits for wood, plastic, or soft metals. Apply light, consistent pressure.
- Grinding: Attach grinding stones for shaping, sharpening, or deburring.
- Engraving: Use engraving bits for detailed work on various surfaces.
- Cutting: Use cutting discs for small cuts in metal, plastic, or wood. Ensure the workpiece is secured.
- Sanding: Attach sanding bands or discs for smoothing surfaces.
- Polishing: Use polishing wheels with appropriate compounds for a high-gloss finish.

Figure 6.1: The mini drill being used to create a precise hole in a wooden plank.

Figure 6.2: A close-up of the mini drill performing a drilling operation on a metal surface.

Figure 6.3: The mini drill with a grinding stone attachment, smoothing the edge of a metal piece.

Figure 6.4: An engraving bit attached to the mini drill, used for intricate detailing on a metal lighter.

Figure 6.5: A cutting disc on the mini drill being used to cut a metal bolt secured to a wooden surface.
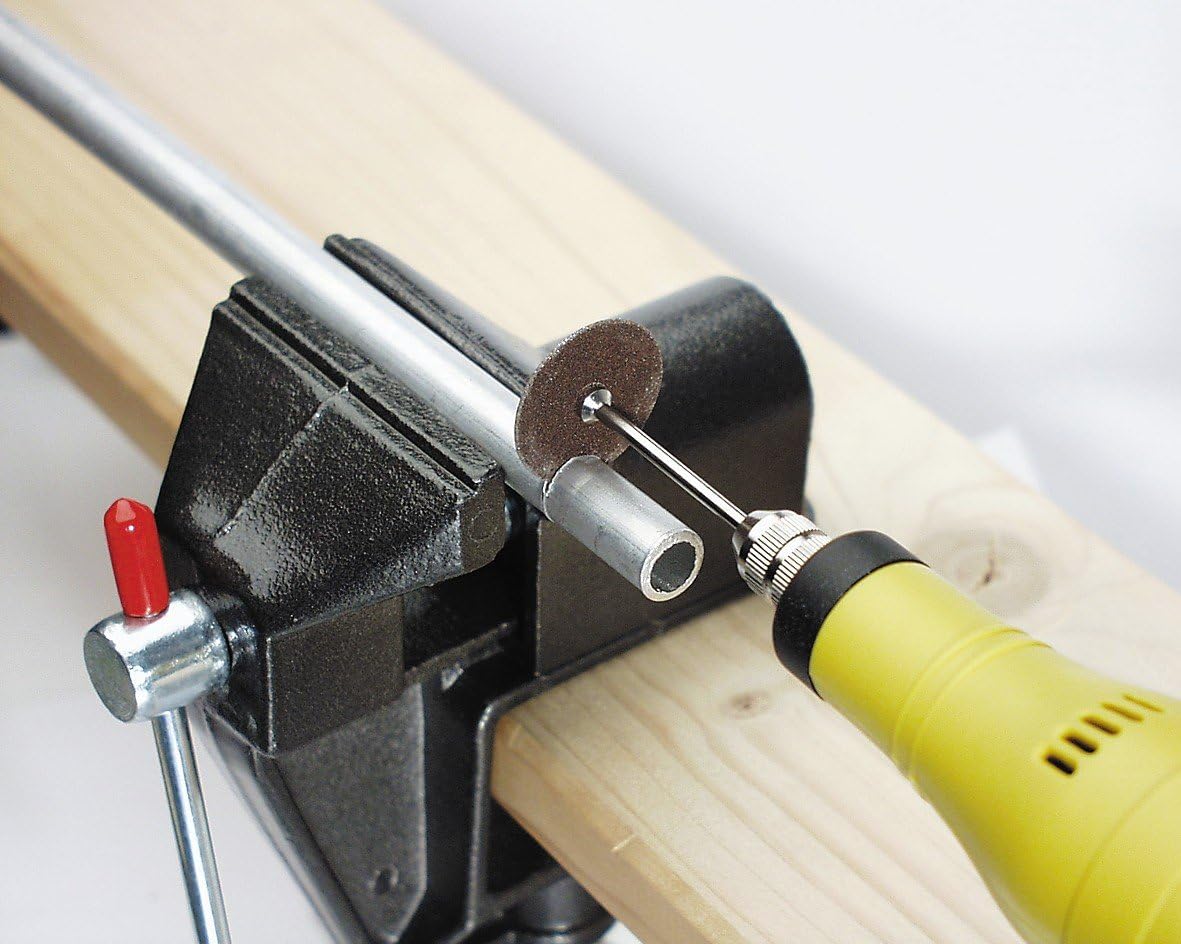
Figure 6.6: The mini drill with a cutting disc, performing a cut on a metal tube held in a vise.

Figure 6.7: A sanding band attachment on the mini drill, used for smoothing a wooden surface.
7. Maintenance
Regular maintenance ensures the longevity and optimal performance of your tool.
7.1 Cleaning
- Always unplug the tool before cleaning.
- Wipe the tool housing with a clean, damp cloth. Do not use harsh chemicals or abrasive cleaners.
- Clear any dust or debris from the ventilation openings to prevent overheating.
- Clean collets and accessory shanks after each use to ensure proper fit and prevent seizing.
7.2 Storage
- Store the tool and all accessories in the provided storage case.
- Keep the tool in a dry, secure location, out of reach of children.
- Avoid storing in direct sunlight or extreme temperatures.
8. Troubleshooting
If you encounter issues with your mini drill, refer to the following common problems and solutions:
| Problem | Possible Cause | Solution |
|---|---|---|
| Tool does not start | No power supply; Faulty switch | Check power connection and outlet; Contact customer support if switch is faulty. |
| Excessive vibration | Accessory not properly seated or balanced; Damaged flexible shaft | Ensure accessory is correctly installed and tightened; Replace damaged accessories or flexible shaft. |
| Tool overheats | Blocked ventilation; Overloading the tool | Clean ventilation openings; Reduce pressure and allow tool to cool. |
| Reduced performance | Worn accessories; Incorrect speed setting | Replace worn accessories; Adjust speed to suit the material and task. |
9. Specifications
| Feature | Detail |
|---|---|
| Model Number | M92571 |
| Power Input | 130 Watts |
| Voltage | 230 Volts |
| Rotational Speed | 8,000 - 30,000 RPM (variable) |
| Power Source | Corded Electric |
| Item Weight | 3.5 Pounds (approx. 1.59 kg) |
| Product Dimensions (L x W x H) | 12.6 x 9.06 x 3.54 inches (approx. 32 x 23 x 9 cm) |
| Recommended Uses | Grinding, Cutting, Sanding, Polishing |
| GTIN | 04003315709299 |
10. Warranty and Support
For warranty information and customer support, please refer to the documentation included with your purchase or contact Brüder Mannesmann directly. Spare part availability duration is typically 1 year from the date of purchase.