1. Introduction
This manual provides detailed instructions for the installation, operation, maintenance, and troubleshooting of your ASUS P6T6 WS Revolution ATX Motherboard. Designed for high-performance computing, this motherboard supports Intel Core i7 processors and features advanced technologies such as DDR3 memory, CrossFireX, and 3-Way SLI. Please read this manual thoroughly before proceeding with installation to ensure proper setup and optimal performance.
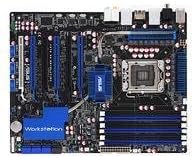
An overhead view of the ASUS P6T6 WS Revolution ATX Motherboard, showcasing its black PCB, blue heatsinks, and various slots including CPU socket, RAM slots, and multiple PCIe slots.
2. Setup and Installation
2.1 Pre-Installation Checklist
- Ensure all components (CPU, RAM, GPU, PSU, storage) are compatible with the P6T6 WS Revolution motherboard.
- Prepare a clean, static-free workspace. Use an anti-static wrist strap.
- Unpack the motherboard carefully, holding it by its edges.
2.2 Physical Installation
- Install the CPU: Open the CPU socket lever, align the CPU with the triangle marker on the socket, gently place the CPU, and close the lever.
- Install the CPU Cooler: Follow the cooler manufacturer's instructions to install the heatsink and fan assembly.
- Install Memory Modules: Insert DDR3 RAM modules into the DIMM slots. For dual-channel operation, refer to the motherboard's silkscreen for correct slot pairing. Press firmly until the clips lock.
- Mount Motherboard in Case: Align the motherboard with the standoffs in your PC case. Secure it with screws.
- Install Expansion Cards: Insert graphics cards (for CrossFireX or 3-Way SLI) and other PCIe/PCI cards into their respective slots.
- Connect Power Cables: Connect the 24-pin ATX power connector and the 8-pin CPU power connector from your power supply to the motherboard. Connect power to graphics cards if required.
- Connect Storage Devices: Connect SATA data cables from your storage drives (HDDs/SSDs) to the SATA ports on the motherboard. Connect power cables to the drives.
- Connect Front Panel Cables: Connect the power button, reset button, HDD LED, power LED, and USB/audio headers from your case to the corresponding pins on the motherboard.
2.3 Initial Boot-Up and BIOS Configuration
After connecting all components, power on your system. Press the DEL key during POST (Power-On Self-Test) to enter the BIOS/UEFI setup utility. Configure boot order, enable/disable features, and set system time. Save changes and exit to boot into your operating system installation media.
3. Operating Your System
3.1 Driver Installation
After installing your operating system (e.g., Windows 10), install the necessary drivers for the motherboard chipset, audio, LAN, and any other integrated components. These drivers are crucial for optimal performance and stability. Drivers can be found on the ASUS support website for your specific model.
3.2 Multi-GPU Configuration (CrossFireX & 3-Way SLI)
The P6T6 WS Revolution supports multiple graphics cards for enhanced gaming and workstation performance. Ensure your power supply can handle the combined power draw. Install the graphics cards into the appropriate PCIe x16 slots and connect the SLI/CrossFireX bridge(s) as per your graphics card manufacturer's instructions. Install the latest graphics drivers and enable the multi-GPU feature through the graphics card control panel.
3.3 Memory Configuration
This motherboard supports DDR3 memory in a dual-channel configuration. For best performance, install memory modules in matched pairs into the designated dual-channel slots. Refer to the motherboard layout for specific slot recommendations.
4. Maintenance
4.1 Cleaning Procedures
- Regularly clean dust from inside your PC case, especially around fans and heatsinks, using compressed air.
- Ensure the system is powered off and unplugged before cleaning.
- Do not use liquid cleaners directly on components.
4.2 BIOS and Driver Updates
Periodically check the ASUS support website for updated BIOS versions and drivers. BIOS updates can improve compatibility, stability, and performance. Driver updates ensure your hardware functions optimally with the latest operating systems and software.
5. Troubleshooting
5.1 Common Issues and Solutions
- No Power: Check all power connections (24-pin ATX, 8-pin CPU, GPU power). Ensure power supply is switched on.
- No Display: Verify monitor connection, ensure graphics card is seated correctly and has power. Try reseating RAM modules.
- System Instability/Crashes: Check CPU and GPU temperatures. Run memory diagnostic tools. Ensure all drivers are up-to-date.
- POST Errors: Listen for beep codes or check diagnostic LEDs (if present) on the motherboard. Consult the ASUS website for specific error code meanings.
5.2 Basic Diagnostic Steps
- Clear CMOS: Power off the system, unplug it, and remove the CMOS battery for a few minutes, or use the Clear CMOS jumper if available.
- Minimal Boot: Disconnect all non-essential components (extra drives, expansion cards) and try to boot with only CPU, one RAM stick, and graphics card (if no integrated graphics).
- Check Connections: Re-seat all power cables, data cables, and expansion cards.
6. Specifications
| Feature | Detail |
|---|---|
| Model | P6T6 WS Revolution |
| CPU Socket | Intel Socket 775 (Note: Product description states Core i7, but specifications list Socket 775. Please verify with product packaging.) |
| Supported Processors | Intel Core 2 Quad, Core 2 Extreme, Core 2 Duo, Pentium dual-core, Celeron dual-core, Celeron Processors |
| Chipset | Intel X58 (Note: Product description states X58, but specifications list 'Intel' as Chipset Type. Please verify with product packaging.) |
| Memory | 2x DIMM 4GB; DDR2 1066/800/667MHz Non-ECC, Dual-Channel, Unbuffered Memory (Note: Product description states DDR3, but specifications list DDR2. Please verify with product packaging.) |
| PCI Slots | 1x PCI Express x16, 1x PCI Express x1, 2x PCI |
| Front Side Bus | 1600(O.C)/1333/1066/800MHz |
| Dimensions | 13.5 x 10.5 x 3 inches |
| Item Weight | 4.58 pounds |
7. Warranty and Support
For warranty information, technical support, and the latest drivers and BIOS updates, please visit the official ASUS support website. It is recommended to register your product to receive timely updates and support.
Important Note: The product information provided indicates a legal disclaimer of "No Refunds". Please be aware of this policy when purchasing or seeking returns for this product.
You can find more information and support resources at the ASUS Store on Amazon.


