1. Introduction
Thank you for choosing the TCP 20714 LED Exit Light Retrofit Kit. This kit is designed to upgrade existing exit signs to energy-efficient LED technology, offering significant energy savings, reduced maintenance costs, and enhanced safety. These LED bulbs are engineered for a long operational life, typically exceeding 10 years, ensuring reliable performance for your exit signage.
2. Safety Information
WARNING: Risk of electric shock. Installation should only be performed by a qualified electrician or trained personnel. Disconnect power before installation, inspection, or removal.
- Ensure the power supply to the exit sign fixture is turned off at the circuit breaker before beginning any installation or maintenance.
- Do not handle the bulbs or adapters with wet hands.
- This product is designed for indoor use in dry locations only.
- Do not attempt to modify or disassemble the LED bulbs or adapters.
- Verify that the existing fixture's voltage matches the product's specifications (120V AC, 60 Hz).
3. Package Contents
The TCP 20714 LED Exit Light Retrofit Kit includes the following components:
- Two (2) LED Bulbs with Candelabra Bases
- Two (2) Bayonet Adapters
- Two (2) Intermediate Adapters
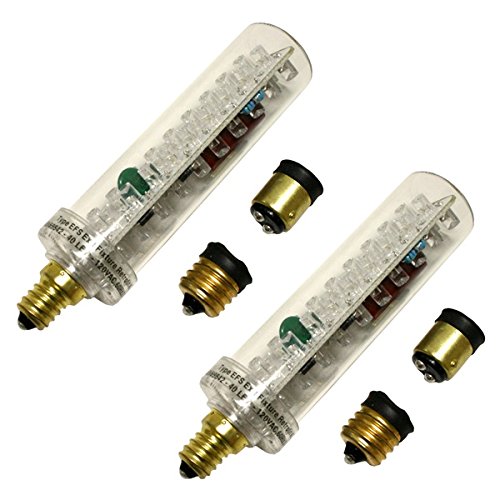
Image 3.1: Contents of the TCP 20714 LED Exit Light Retrofit Kit, showing two LED bulbs and various base adapters.
4. Product Features
The TCP 20714 LED Exit Light Retrofit Kit offers several key features:
- Energy Efficiency: Designed to retrofit into existing exit signs for maximum energy efficiency, consuming only 1.5 watts per LED lamp device.
- Long Lifespan: Expected lamp life of 10+ years at full lumen output, significantly reducing replacement frequency.
- UL 924 Compliant: Bulbs are manufactured to UL 924 specifications for emergency lighting and power equipment.
- Swivel Base: Each bulb features a patented swivel base, allowing for optimal positioning to achieve maximum light output within the exit sign.
- Versatile Adapters: Includes candelabra bases, bayonet adapters, and intermediate adapters to fit various existing exit sign sockets.

Image 4.1: A single TCP LED retrofit bulb, highlighting the LED array and candelabra base.
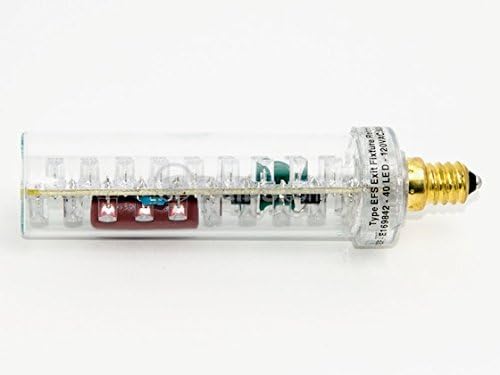
Image 4.2: Side view of the LED bulb, showing its compact design and internal circuitry.
5. Specifications
| Attribute | Value |
|---|---|
| Model Number | 20714 |
| Power Requirements | 120 Volts AC, 60 Hz |
| Amperage | 0.24 Amps |
| Power Consumption (per bulb) | 2.7 Watts |
| Light Output | 10 Foot-Candles |
| Dimensions | 4.70" long X 1.25" Diameter |
| Expected Lamp Life | 10+ years |
| Included Components | LED Bulbs, Candelabra Bases, Bayonet Adapters, Intermediate Adapters |
| Certifications | UL 924 Compliant |
6. Installation Instructions
Follow these steps to install the TCP 20714 LED Exit Light Retrofit Kit:
- Disconnect Power: Before starting, ensure the power supply to the exit sign fixture is completely turned off at the circuit breaker. Verify with a voltage tester if necessary.
- Access Fixture: Open the exit sign housing to access the existing light bulbs.
- Remove Old Bulbs: Carefully remove the old incandescent or fluorescent bulbs from their sockets.
- Select Adapter: Identify the type of socket in your exit sign. Choose the appropriate adapter (candelabra, bayonet, or intermediate) that matches your existing socket. The LED bulb comes with a candelabra base attached. If your fixture requires a bayonet or intermediate base, screw the correct adapter onto the candelabra base of the LED bulb.
- Install LED Bulb: Screw the LED bulb (with the correct adapter, if needed) into the existing socket. Ensure it is securely seated.
- Adjust Position: Utilize the patented swivel base to orient the LED bulb for maximum light output and even illumination of the exit sign face.
- Close Fixture: Carefully close the exit sign housing.
- Restore Power: Turn the power supply back on at the circuit breaker. The LED exit sign should now illuminate.
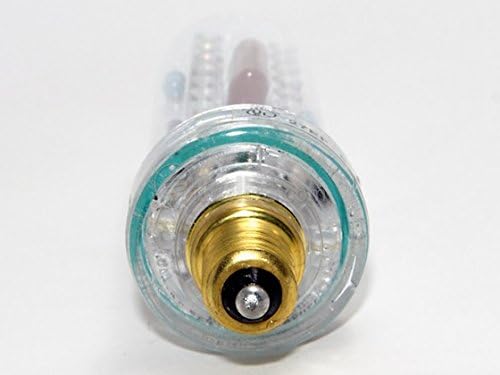
Image 6.1: Detail of the candelabra base, which can be used directly or with included adapters.
7. Operation
Once installed and power is restored, the TCP 20714 LED Exit Light Retrofit Kit operates automatically with your existing exit sign's power supply. The LED bulbs will illuminate when power is supplied to the fixture. No additional user interaction is required for daily operation.
8. Maintenance
The TCP 20714 LED Exit Light Retrofit Kit is designed for minimal maintenance due to its long lifespan and durable LED technology. Regular maintenance typically involves:
- Periodic Cleaning: Occasionally, wipe the exterior of the exit sign and the LED bulbs (when power is off) with a soft, dry cloth to remove dust and ensure maximum light output.
- Visual Inspection: Periodically inspect the bulbs and connections for any visible damage or loose components.
- No Bulb Replacement: Due to the 10+ year expected lamp life, routine bulb replacement is not anticipated.
9. Troubleshooting
If your LED exit light is not functioning correctly, consider the following troubleshooting steps:
- No Illumination:
- Check if the power supply to the exit sign is on at the circuit breaker.
- Ensure the LED bulb is securely screwed into the socket and the adapter (if used) is properly attached.
- Verify that the existing fixture's wiring is intact and correctly connected.
- Dim or Flickering Light:
- Confirm the bulb is fully seated in the socket.
- Ensure the fixture's voltage matches the product specifications (120V AC).
- If multiple bulbs are installed, check if only one is affected.
- Physical Damage: If the bulb or adapter appears physically damaged, discontinue use and replace the affected component.
If these steps do not resolve the issue, contact customer support for further assistance.
10. Warranty and Support
TCP products are manufactured to high-quality standards. For information regarding warranty coverage, technical support, or replacement parts, please refer to the official TCP website or contact their customer service department. Keep your purchase receipt for warranty claims.
Contact Information: Please visit the official TCP website for the most current contact details.