1. Introduction
Thank you for choosing the Progress Lighting P8072-28 Recessed Trim. This incandescent open splay recessed trim features a white powdercoat finish and is designed for use with insulated ceilings. It has a 7-3/4 inch outside diameter and is intended for use with compatible Progress 6-inch recessed lighting housings (P87, P187, P83, P88, P82). Please read these instructions carefully before installation and use to ensure proper function and safety.

Figure 1.1: Front view of the P8072-28 Recessed Trim with an incandescent bulb installed.
2. Safety Information
WARNING: Risk of electric shock. Disconnect power at the fuse box or circuit breaker before installation or servicing. All electrical connections must be in accordance with local codes, ordinances, or the National Electric Code (NEC). Consult a qualified electrician if you are unfamiliar with proper electrical wiring connections.
- Do not install this trim with non-compatible recessed housings. Compatibility is specified for Progress 6-inch recessed housings (P87, P187, P83, P88, P82).
- Refer to the housing's specifications for maximum wattage. This trim is rated for up to 250 watts at 120 volts.
- Ensure all connections are secure and properly insulated.
- Do not modify the product in any way.
3. Components List
Verify that all components are present before beginning installation:
- P8072-28 Recessed Trim (1 unit)
- Product and Installation Sheet (this document)
Note: Recessed housing and incandescent bulb are sold separately.
4. Setup and Installation
This trim is designed for easy installation into compatible 6-inch recessed housings. The trim mounts to the can with a 2-inch by 7-inch leaf spring mechanism, which pulls the trim tightly to the ceiling.
- Turn off Power: Before starting, ensure the power to the circuit is turned off at the circuit breaker or fuse box.
- Prepare Housing: Ensure the recessed housing (e.g., P87, P187) is properly installed in the ceiling according to its own instruction manual.
- Attach Socket: The lamp socket from the recessed housing attaches directly to the trim. This eliminates the need for an adjustable socket mount within the housing. Secure the socket to the designated attachment point on the trim.
- Install Bulb: Screw the appropriate incandescent bulb (up to 250W) into the socket.
- Insert Trim: Carefully push the trim assembly, with the bulb and socket attached, into the recessed housing opening. The leaf springs on the trim will compress and then expand to firmly hold the trim against the ceiling. Apply firm, even pressure until the trim is flush with the ceiling surface.
- Restore Power: Once the trim is securely in place, restore power at the circuit breaker or fuse box and test the light.

Figure 4.1: Top-down view of the P8072-28 Recessed Trim, illustrating the open splay design.
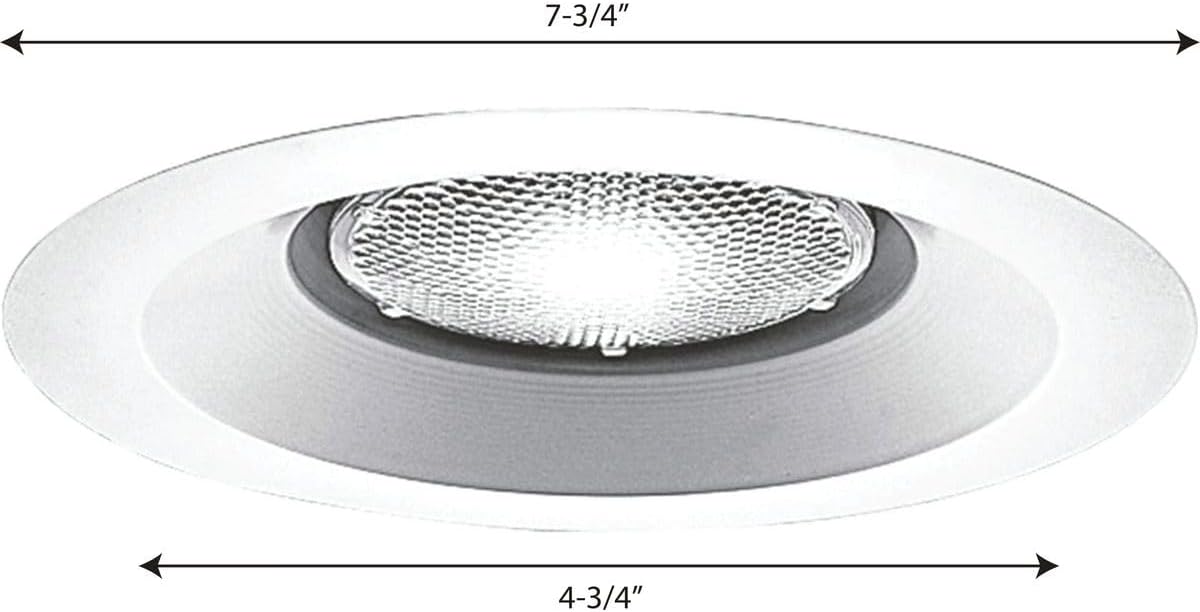
Figure 4.2: Dimensions of the P8072-28 Recessed Trim, showing a 7-3/4 inch outside diameter.
5. Operating Instructions
The P8072-28 Recessed Trim operates in conjunction with your installed recessed housing and a compatible incandescent bulb. Operation is controlled via a standard wall switch connected to the lighting circuit.
- Ensure the correct wattage bulb (up to 250W) is installed.
- Use the wall switch to turn the light fixture on or off.
6. Maintenance
The P8072-28 Recessed Trim requires minimal maintenance.
- Cleaning: To clean the trim, ensure power is off. Wipe with a soft, dry or slightly damp cloth. Do not use abrasive cleaners or solvents, as they may damage the finish.
- Bulb Replacement: Turn off power at the circuit breaker. Carefully pull the trim down from the ceiling to access the bulb. Unscrew the old bulb and screw in a new one of the correct type and wattage. Reinsert the trim firmly into the housing.
7. Troubleshooting
| Problem | Possible Cause | Solution |
|---|---|---|
| Light does not turn on. | No power to the fixture. Bulb is loose or burnt out. Incorrect wiring. | Check circuit breaker/fuse. Tighten or replace bulb. Consult a qualified electrician to check wiring. |
| Trim does not sit flush with ceiling. | Improper installation of leaf springs. Housing not properly installed. | Ensure leaf springs are fully engaged. Verify housing installation according to its manual. |
| Light flickers. | Loose bulb. Incompatible dimmer switch. Wiring issue. | Tighten bulb. Ensure dimmer is compatible with incandescent lights. Consult a qualified electrician. |
8. Specifications
| Feature | Detail |
|---|---|
| Model Number | P8072-28 |
| Brand | Progress Lighting |
| Type | Recessed Trim (Open Splay) |
| Color | White |
| Material | Aluminum |
| Outside Diameter | 7-3/4 inches (19.69 cm) |
| Product Dimensions (L x W x H) | 7.75" x 7.75" x 4.75" (19.69 cm x 19.69 cm x 12.07 cm) |
| Item Weight | 5.9 ounces (167 grams) |
| Voltage | 120 Volts |
| Max Wattage | 250 Watts (Incandescent) |
| Power Source | Corded Electric |
| Indoor/Outdoor Usage | Indoor |
| Compatible Housings | Progress 6-inch recessed housings (P87, P187, P83, P88, P82) |
| UPC | 785247807222 |
9. Warranty Information
This Progress Lighting P8072-28 Recessed Trim comes with a 1-year limited warranty from the date of purchase. This warranty covers defects in materials and workmanship under normal use. It does not cover damage resulting from improper installation, accident, misuse, abuse, or unauthorized modification. For warranty claims, please retain your proof of purchase and contact Progress Lighting customer support.
10. Support and Contact
For technical assistance, troubleshooting not covered in this manual, or warranty inquiries, please contact Progress Lighting customer support. Visit the official Progress Lighting website for the most current contact information.
Progress Lighting Official Website: Visit the Progress Lighting Store on Amazon