1. Introduction
This manual provides detailed instructions for the proper setup, operation, and maintenance of your AKAI DVM-9500 5-Disk Code-Free DVD Player. The DVM-9500 is designed to offer versatile DVD playback, featuring a 5-disk smart carousel, code-free functionality for all regions (1-6), and compatibility with both PAL and NTSC DVD movies. It also supports Audio CD, MP3 discs, and CD-R/RW formats. Key features include Digital Progressive Scan for enhanced video quality, a 10-bit Video D/A Converter, a 96 kHz/24-bit Audio D/A Converter, and built-in Dolby Digital and DTS Decoders.
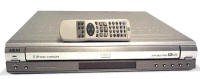
Figure 1: Front view of the AKAI DVM-9500 5-Disk Code-Free DVD Player. This image shows the disc tray, control buttons, and display panel.
2. Setup
2.1 Unpacking and Placement
- Carefully remove the DVD player and all accessories from the packaging.
- Place the unit on a stable, level surface with adequate ventilation. Avoid placing it near heat sources or in direct sunlight.
- Ensure there is enough space around the unit for proper air circulation.
2.2 Connecting to a Television
The DVM-9500 offers various video output options to connect to your television.
- Composite Video: Connect a composite video cable (yellow RCA connector) from the DVD player's VIDEO OUT jack to the corresponding VIDEO IN jack on your TV.
- S-Video: For improved picture quality, connect an S-Video cable from the DVD player's S-VIDEO OUT jack to the S-VIDEO IN jack on your TV.
- Component Video (Progressive Scan): For the best picture quality, especially with progressive scan compatible TVs, connect component video cables (red, green, blue RCA connectors) from the DVD player's COMPONENT VIDEO OUT jacks (Y, Pb, Pr) to the corresponding COMPONENT VIDEO IN jacks on your TV.
2.3 Connecting to an Audio System
Connect the DVD player to your audio receiver or amplifier for sound output.
- Analog Audio: Connect stereo RCA audio cables (red for right, white for left) from the DVD player's AUDIO OUT jacks to the AUDIO IN jacks on your amplifier or TV.
- Digital Audio (Coaxial/Optical): For multi-channel surround sound, connect a digital coaxial cable from the DVD player's COAXIAL OUT jack or an optical cable from the OPTICAL OUT jack to the corresponding digital audio input on your A/V receiver.
2.4 Power Connection
After all audio and video connections are made, plug the AC power cord into the DVD player and then into a standard electrical outlet.
3. Operating Instructions
3.1 Basic Playback
- Power On: Press the POWER button on the front panel or the remote control to turn on the unit.
- Loading Discs: Press the OPEN/CLOSE button to open the 5-disk carousel tray. Place up to five discs onto the trays, ensuring they are seated correctly with the label side facing up. Press OPEN/CLOSE again to close the tray.
- Selecting a Disc: Use the DISC SKIP button on the front panel or remote to select the desired disc slot.
- Playing a Disc: Once a disc is selected, it will typically begin playing automatically. If not, press the PLAY button.
- Basic Controls:
- PLAY (►): Starts or resumes playback.
- PAUSE (−): Pauses playback. Press again to resume.
- STOP (■): Stops playback. Press twice to return to the beginning of the disc.
- SKIP (►►| / |◄◄): Skips to the next or previous chapter/track.
- FAST FORWARD/REWIND (►► / ◄◄): Scans forward or backward through the disc.
3.2 Advanced Features
- Region-Free Playback: The DVM-9500 is designed to play DVDs from any region (1-6) without requiring manual region code changes. Simply insert any region DVD, and the player will automatically adjust.
- PAL/NTSC Conversion: This unit features a built-in 4Mb video converter, allowing it to play PAL or NTSC DVDs on any compatible television system worldwide.
- Digital Progressive Scan: When connected via component video to a progressive scan compatible TV, this feature provides a sharper, more stable picture. Enable this option in the player's setup menu if available.
- Virtual Surround Sound: The player includes 4-level virtual surround sound. Access this feature through the audio settings in the setup menu to enhance your listening experience.
- Zoom Function: During playback, use the ZOOM button on the remote control to magnify a portion of the screen. Repeated presses may cycle through different zoom levels.
- Multi-Camera Angle: For DVDs that support multiple camera angles, press the ANGLE button on the remote control to switch between available views.
3.3 Remote Control
The included full-function remote control provides access to all player features from a distance. Ensure fresh batteries are installed and that there is no obstruction between the remote and the player's infrared sensor.
4. Maintenance
4.1 Cleaning the Unit
- Disconnect the power cord before cleaning.
- Wipe the exterior of the unit with a soft, dry cloth. For stubborn stains, use a slightly damp cloth and then dry thoroughly.
- Do not use abrasive cleaners, waxes, or solvents as they can damage the finish.
4.2 Disc Care
- Always handle discs by their edges to avoid fingerprints on the playing surface.
- Store discs in their cases when not in use to protect them from dust and scratches.
- If a disc is dirty, wipe it gently from the center outwards with a soft, lint-free cloth. Do not use abrasive materials or chemical cleaners.
5. Troubleshooting
Before contacting customer support, please refer to the following troubleshooting guide for common issues.
| Problem | Possible Cause | Solution |
|---|---|---|
| No power | Power cord not connected; Power outlet faulty | Ensure power cord is securely plugged in; Try a different outlet |
| No picture | Video cables not connected correctly; Incorrect TV input selected | Check video cable connections; Select the correct input source on your TV (e.g., AV1, Component, S-Video) |
| No sound | Audio cables not connected; Incorrect audio input selected on receiver/TV; Volume too low | Check audio cable connections; Select the correct audio input; Increase volume on TV/receiver |
| Disc does not play | Disc is dirty or scratched; Disc inserted incorrectly; Disc format not supported | Clean the disc; Insert disc with label side up; Ensure disc is DVD, CD, MP3, or CD-R/RW format |
| Remote control not working | Batteries are dead or inserted incorrectly; Obstruction between remote and player | Replace batteries; Ensure correct battery polarity; Remove any obstructions |
6. Specifications
- Model: AKAI DVM-9500
- Disc Capacity: 5-Disk Smart Carousel
- Disc Compatibility: DVD (All Regions 1-6), Audio CD, MP3 Discs, CD-R, CD-R/W
- Video System: PAL/NTSC compatible with built-in 4Mb video converter
- Video D/A Converter: 10-bit
- Audio D/A Converter: 96 kHz/24-bit
- Frequency Response: 20 Hz ~ 20 kHz
- Audio Decoders: Dolby Digital Decoder, DTS Decoder
- Video Features: Digital Progressive Scan, Zoom Function, Multi-Camera Angle
- Audio Features: 4 Level Virtual Surround Sound
- Control: Full function remote control
- Compatible Devices: Television
7. Warranty and Support
For information regarding the product warranty, please refer to the warranty card included with your purchase or the original sales documentation. For technical support or service inquiries, please contact your retailer or the authorized Akai service center in your region. Keep your proof of purchase for warranty claims.