Introduction
Welcome to the user manual for your Disney Hannah Montana/Princess 7" LCD Pix Frame. This digital picture frame is designed to showcase your cherished memories with ease and style. It features a 7-inch color LCD screen, internal memory, and an SD card slot for expanded storage. The frame comes with interchangeable mylar faceplates, allowing you to customize its appearance to match your preference. Enjoy pre-loaded Disney images and various slideshow transitions for a dynamic display of your photos.
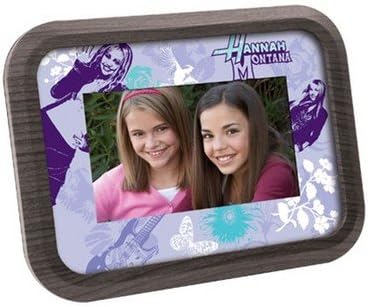
Figure 1: Disney Hannah Montana/Princess 7" LCD Pix Frame with interchangeable faceplate.
What's Included
Please check the package contents to ensure all items are present:
- Digital Picture Frame
- 2 Interchangeable Mylar Faceplates
- AC Adapter
- USB Cable
- User Guide (this manual)
Setup
1. Power Connection
Connect the supplied AC adapter to the DC IN port on the back of the digital picture frame. Plug the other end of the AC adapter into a standard electrical outlet. The frame will power on automatically or can be turned on using the power button.
2. Inserting an SD Card (Optional)
The frame has 128MB of internal memory. For additional storage, you can insert an SD card (up to 2GB) into the SD card slot located on the side or back of the frame. Ensure the SD card is inserted correctly with the metal contacts facing down (or as indicated by the slot diagram).
3. Connecting to a Computer (Optional)
To transfer photos from your computer, connect the digital picture frame to your computer using the provided USB cable. The frame will appear as a removable disk drive on your computer. Ensure your computer meets the following requirements:
- Windows 2000, XP, or Vista
- 300MHz or faster processor
- 64MB RAM
- 300MB free hard disk space
- USB port enabled
4. Changing Faceplates
Your frame comes with two interchangeable mylar faceplates. To change a faceplate, gently lift the edges of the current faceplate from the frame and replace it with the desired design. Ensure it sits flush within the frame's bezel.
Operating Instructions
1. Powering On/Off
Press the MODE button (which functions as the power button) to turn the frame on or off. When powered on, the frame will automatically begin displaying images from its internal memory or inserted SD card.
2. Navigating Photos
Use the navigation buttons (typically NEXT and PREVIOUS or arrow keys) to manually skip through images. The PAUSE button can temporarily stop the slideshow on the current image.
3. Image Rotation
If an image is displayed incorrectly (e.g., sideways), use the ROTATE button to adjust its orientation. This function rotates the image 90 degrees with each press.
4. Slideshow Transitions and Pre-loaded Graphics
The frame features 10 different slideshow transitions that automatically apply between images. It also comes with 10 pre-loaded custom Disney graphics that will be displayed as part of the slideshow.
5. Transferring Photos
To add your own photos:
- Connect the frame to your computer using the USB cable.
- Once recognized, open the frame's drive on your computer.
- Drag and drop your desired image files (JPEG format recommended) into the frame's internal memory or the inserted SD card.
- Safely eject the frame from your computer before disconnecting the USB cable.
Note: For optimal performance, it is recommended to resize larger images to a resolution closer to the frame's native resolution (e.g., 480x234 pixels) before transferring, especially when using an SD card. This can prevent display issues or lock-ups.
Maintenance
Cleaning the Frame
To clean the screen and frame, gently wipe with a soft, dry, lint-free cloth. For stubborn smudges, slightly dampen the cloth with water. Do not use abrasive cleaners, waxes, or solvents as they may damage the finish or screen. Ensure the frame is powered off and unplugged before cleaning.
Troubleshooting
Frame does not power on.
- Ensure the AC adapter is securely connected to both the frame and a working electrical outlet.
- Verify the electrical outlet is functional by plugging in another device.
- Press the MODE button firmly to ensure it registers.
Images are blurry or low resolution.
- The frame's display resolution is 480x234 pixels. Images with significantly higher resolution may appear less sharp or pixelated when scaled down.
- Ensure the original image files are of good quality.
Frame locks up or displays gibberish.
- This can occur with very large image files, especially when using an SD card. Try resizing your images to a smaller resolution (e.g., closer to 480x234) before transferring them to the frame or SD card.
- Remove and reinsert the SD card.
- Power cycle the frame by unplugging and re-plugging the AC adapter.
Cannot transfer files from computer.
- Ensure the USB cable is securely connected to both the frame and the computer.
- Verify your computer meets the minimum system requirements (Windows 2000, XP, or Vista; 300MHz+ processor; 64MB RAM; 300MB free hard disk space; enabled USB port).
- Try a different USB port on your computer.
- Restart both the frame and your computer.
Specifications
| Feature | Detail |
|---|---|
| Product Dimensions | 10.75" L x 1.5" W x 7.25" H (Frame Size) / 1 x 1 x 1 inches (Product Box Dimensions) |
| Item Weight | 5oz (Frame Weight) / 2.45 pounds (Shipping Weight) |
| ASIN | B0010CIVFI |
| Date First Available | November 30, 2007 |
| Manufacturer | Digital Blue |
| Brand | Disney |
| Compatible Devices | Personal Computer |
| Screen Size | 7 Inches |
| Connectivity Technology | USB |
| Power Source | Corded Electric |
| Internal Memory | 128MB |
| External Memory | SD Card Slot (up to 2GB) |
Warranty and Support
Warranty Information
Specific warranty details for your Disney Hannah Montana/Princess 7" LCD Pix Frame are typically provided at the time of purchase or within separate documentation included in the product packaging. Please refer to any warranty cards or leaflets that came with your device for terms, conditions, and duration of coverage. In general, manufacturer warranties cover defects in materials and workmanship under normal use.
Customer Support
For technical assistance, troubleshooting beyond this manual, or warranty claims, please contact the manufacturer, Digital Blue, or the retailer from whom you purchased the product. Keep your purchase receipt as proof of purchase for any warranty-related inquiries.
You may also visit the official Disney store on Amazon for general product information: Disney Store on Amazon.


