1. Introduction
This manual provides essential information for the safe and effective operation, maintenance, and troubleshooting of your NEIKO 10529A 3/8-inch Right Angle Corded Drill. Please read this manual thoroughly before using the tool to ensure proper handling and to prevent injury or damage.

Image 1.1: The NEIKO 10529A 3/8-inch Right Angle Corded Drill, a compact power tool designed for drilling in confined spaces.
2. Safety Information
Always observe basic safety precautions to reduce the risk of fire, electric shock, and personal injury when operating power tools. Keep this manual for future reference.
General Power Tool Safety Warnings:
- Work Area Safety: Keep the work area clean and well-lit. Cluttered or dark areas invite accidents. Do not operate power tools in explosive atmospheres, such as in the presence of flammable liquids, gases, or dust. Power tools create sparks which may ignite the dust or fumes. Keep children and bystanders away while operating a power tool. Distractions can cause you to lose control.
- Electrical Safety: Power tool plugs must match the outlet. Never modify the plug in any way. Do not use any adapter plugs with earthed (grounded) power tools. Unmodified plugs and matching outlets will reduce risk of electric shock. Avoid body contact with earthed or grounded surfaces, such as pipes, radiators, ranges, and refrigerators. There is an increased risk of electric shock if your body is earthed or grounded. Do not expose power tools to rain or wet conditions. Water entering a power tool will increase the risk of electric shock. Do not abuse the cord. Never use the cord for carrying, pulling, or unplugging the power tool. Keep cord away from heat, oil, sharp edges, or moving parts. Damaged or entangled cords increase the risk of electric shock.
- Personal Safety: Stay alert, watch what you are doing, and use common sense when operating a power tool. Do not use a power tool while you are tired or under the influence of drugs, alcohol, or medication. A moment of inattention while operating power tools may result in serious personal injury. Use personal protective equipment. Always wear eye protection. Protective equipment such as dust masks, non-skid safety shoes, hard hats, or hearing protection used for appropriate conditions will reduce personal injuries. Prevent unintentional starting. Ensure the switch is in the off-position before connecting to power source, picking up, or carrying the tool.
- Tool Use and Care: Do not force the power tool. Use the correct power tool for your application. The correct power tool will do the job better and safer at the rate for which it was designed. Do not use the power tool if the switch does not turn it on and off. Any power tool that cannot be controlled with the switch is dangerous and must be repaired. Disconnect the plug from the power source before making any adjustments, changing accessories, or storing power tools. Such preventive safety measures reduce the risk of starting the power tool accidentally. Store idle power tools out of the reach of children and do not allow persons unfamiliar with the power tool or these instructions to operate the power tool. Power tools are dangerous in the hands of untrained users.
3. Product Overview and Features
The NEIKO 10529A is a corded right-angle drill designed for precision drilling in confined spaces. Its unique 55-degree angled head allows access where standard drills cannot reach.
Key Features:
- 55-Degree Angled Head: Enables access to tight and restricted work areas.
- 3/8-inch Keyed Chuck: Provides secure bit retention for various drilling applications. Includes a chuck key for easy bit changes.
- Variable Speed Control (0-1400 RPM): Allows for precise drilling and control over different materials.
- Forward/Reverse Switch: Facilitates easy directional changes for drilling and screw driving tasks.
- Ergonomic Pistol Grip: Designed for comfortable handling and reduced user fatigue during extended use.
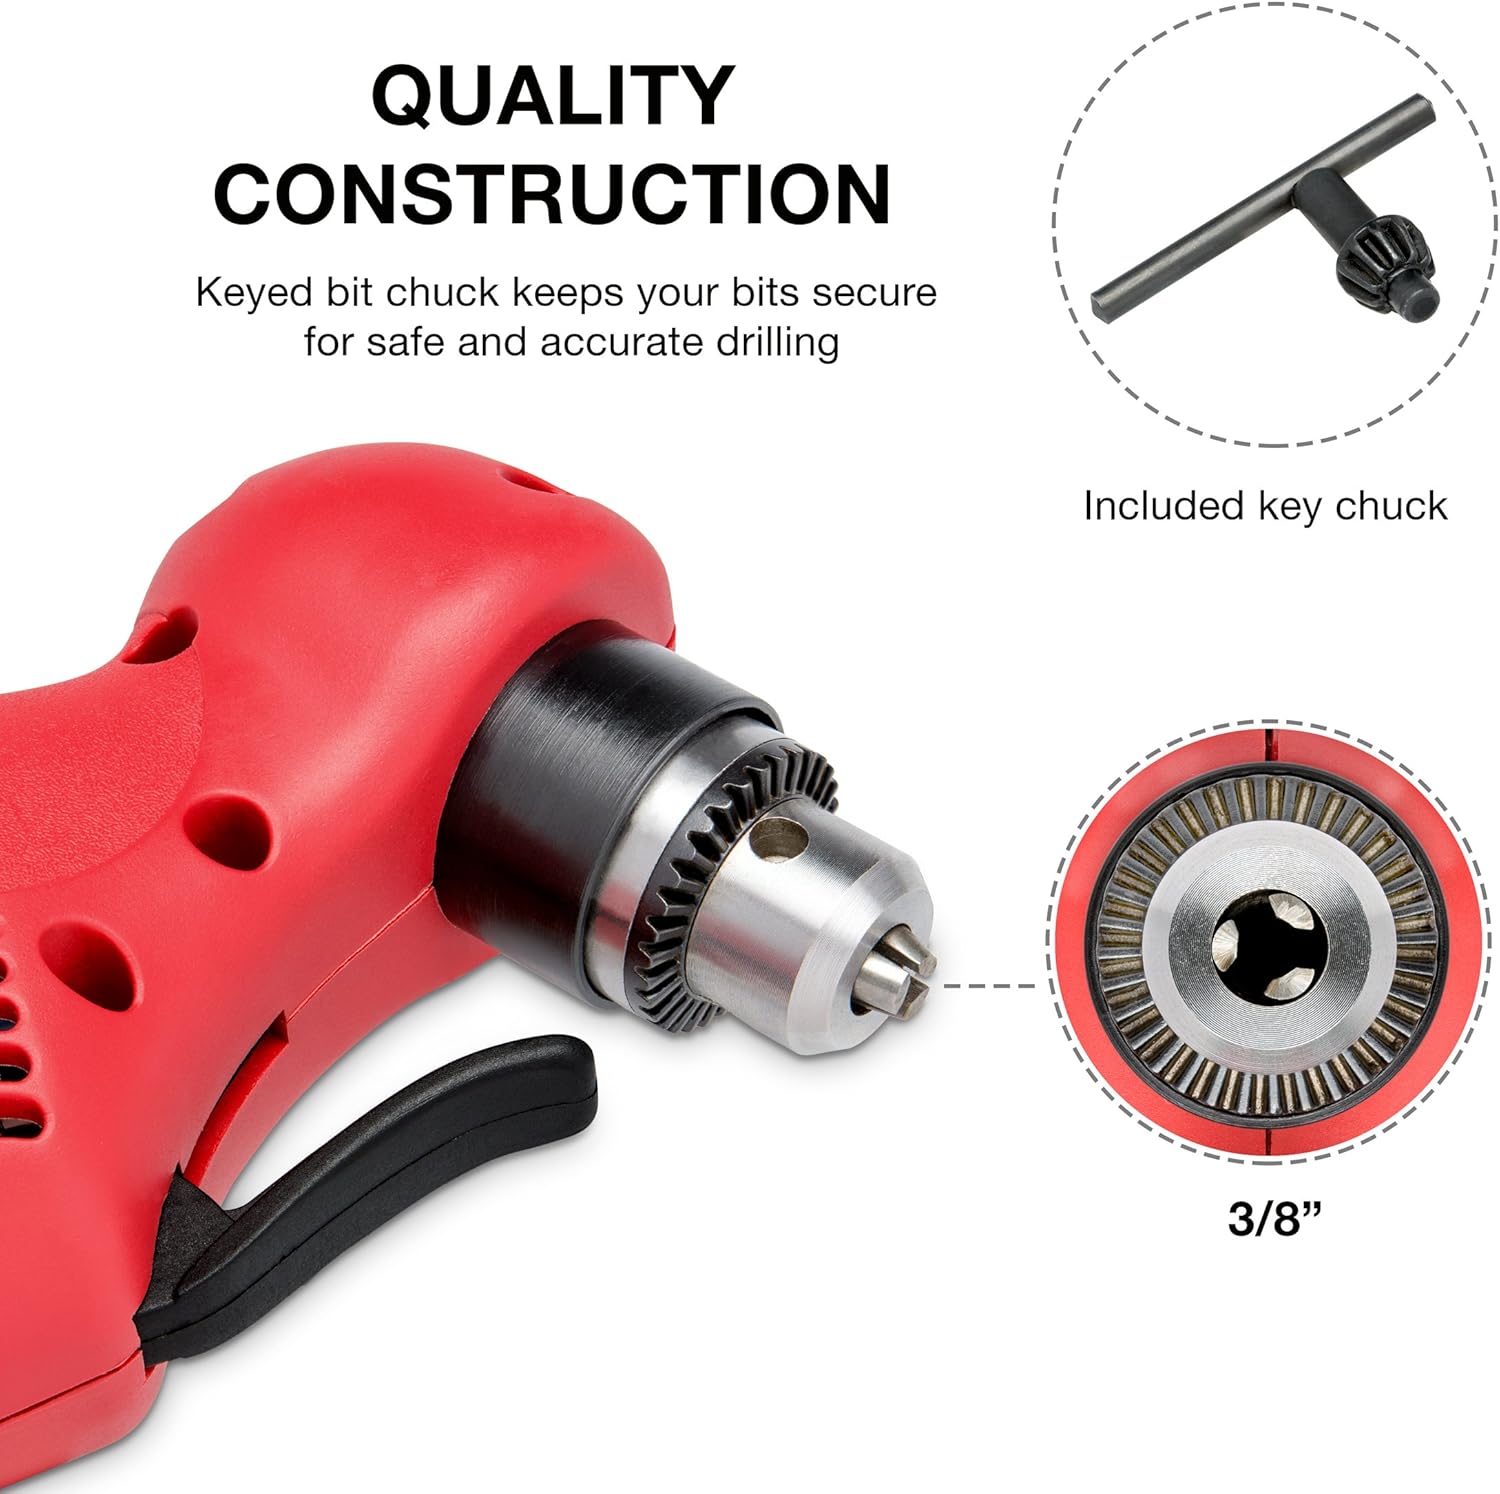
Image 3.1: Detail of the 3/8-inch keyed chuck, ensuring secure bit placement, along with the included chuck key.

Image 3.2: The 55-degree angled head provides extended reach for drilling in tight spaces. The forward/reverse switch is also visible.

Image 3.3: The ergonomic pistol grip and paddle trigger are designed for precise control and comfortable operation.
4. Setup
4.1. Installing Drill Bits
- Ensure the drill is unplugged from the power source before installing or removing bits.
- Insert the chuck key into one of the holes on the chuck.
- Rotate the chuck key counter-clockwise to open the chuck jaws.
- Insert the desired drill bit into the chuck, ensuring it is centered and fully seated.
- Rotate the chuck key clockwise to tighten the chuck jaws securely around the drill bit. Hand-tighten firmly, then give an extra quarter turn with the chuck key to ensure the bit is locked in place.
- Remove the chuck key from the chuck before operating the drill.
4.2. Power Connection
Connect the drill's power cord to a standard 120V ~ 60Hz electrical outlet. Ensure the outlet is properly grounded. Verify that the power switch is in the 'OFF' position before plugging in the tool.
5. Operating Instructions
5.1. Starting and Stopping the Drill
- To start the drill, press the paddle trigger. The drill's speed is variable, meaning the harder you press the trigger, the faster the drill bit will rotate (up to 1400 RPM).
- To stop the drill, release the paddle trigger.
5.2. Forward/Reverse Operation
The forward/reverse switch is located near the trigger. Push the switch to the left for forward rotation (for drilling) and to the right for reverse rotation (for removing bits or screws). Always ensure the drill has come to a complete stop before changing the direction of rotation.
5.3. Drilling Techniques
- Material Compatibility: This drill is suitable for use on wood, composition materials, plastics, masonry, and metal. Select the appropriate drill bit for the material.
- Starting a Hole: For precise drilling, mark the drilling location. For smoother starts and to prevent bit wandering, use a center punch on metal or a pilot hole for larger bits.
- Applying Pressure: Apply steady, even pressure to the drill. Excessive pressure will not make the drill cut faster but can overheat the motor, damage the bit, or reduce control.
- Cooling: For metal drilling, use cutting oil to cool the bit and improve cutting efficiency. Periodically withdraw the bit from the hole to clear chips and allow cooling.
- Close Quarter Use: The 55-degree angled head is specifically designed for tight spaces. Position the drill head to maximize access and maintain a stable grip.
6. Maintenance
Regular maintenance ensures the longevity and optimal performance of your drill.
6.1. Cleaning
- Always unplug the drill before cleaning.
- Use a clean, damp cloth to wipe down the exterior of the drill. Do not use harsh chemicals or abrasive cleaners.
- Clear dust and debris from the ventilation slots to prevent overheating. Use compressed air if necessary.
- Clean the chuck jaws regularly to ensure proper grip on drill bits.
6.2. Inspection
- Periodically inspect the power cord for any signs of damage, cuts, or fraying. If damaged, have it replaced by a qualified technician.
- Check the chuck for wear or damage. Replace if necessary.
- Ensure all external screws are tight.
6.3. Storage
Store the drill in a clean, dry place, out of reach of children and away from direct sunlight or extreme temperatures.
7. Troubleshooting
This section addresses common issues you might encounter with your drill.
| Problem | Possible Cause | Solution |
|---|---|---|
| Drill does not start | No power supply Faulty power cord/plug Switch in OFF position | Check power outlet and circuit breaker Inspect cord/plug for damage; replace if necessary Ensure switch is pressed to ON |
| Bit slips in chuck | Chuck not tightened sufficiently Chuck jaws worn or damaged Bit shank is dirty or damaged | Tighten chuck firmly with chuck key Inspect and replace chuck if worn Clean or replace bit |
| Drill overheats | Blocked ventilation slots Excessive continuous use Dull drill bit | Clean ventilation slots Allow drill to cool down Replace or sharpen drill bit |
| Excessive vibration or noise | Bent drill bit Internal mechanical issue | Replace drill bit Discontinue use and contact customer support |
8. Specifications
| Feature | Specification |
|---|---|
| Brand | NEIKO |
| Model Number | 10529A |
| Power Source | Corded Electric |
| Voltage | 120V ~ 60Hz |
| Amperage | 3.8 Amps |
| Maximum Rotational Speed | 0-1400 RPM (Variable Speed) |
| Chuck Size | 3/8 inch (10 mm) Keyed |
| Angle Head | 55-Degree |
| Product Dimensions | 12"L x 2.9"W x 4.9"H |
| Item Weight | 3.25 Pounds |
| Included Components | Chuck Key |
| Certifications | ETL Approved |
9. Warranty and Support
For warranty information or technical support, please refer to the documentation included with your purchase or contact NEIKO customer service directly. Keep your purchase receipt as proof of purchase for any warranty claims.
For further assistance, you may visit the official NEIKO website or contact their support channels.