
1. Introduction
This manual provides instructions for the Sewell IDC 5 Male (Motherboard Connector, Single Row) to USB 2.0 A Male Adapter Cable. This cable facilitates the connection of devices designed for a 5-pin motherboard header to a standard USB 2.0 Type A port.
2. Product Overview
The Sewell IDC 5 Male to USB 2.0 A Male Adapter Cable is a 12-inch cable designed to bridge compatibility between internal motherboard header connections and external USB 2.0 Type A ports. It features a 5-pin (1x5) IDC motherboard connector on one end and a USB 2.0 Male Type A connector on the other.
Key Features:
- (1) USB 2.0 Male Type A Connector
- (1) 5-Pin (1x5) IDC Motherboard Connector
- Shielded Copper Wire for reliable data transfer
- Gauge: 28/24 AWG
- Length: 12 inches (approximately 30.5 cm)
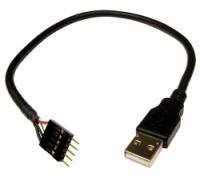
Image 1: Sewell IDC 5 Male to USB 2.0 A Male Adapter Cable. This image displays the adapter cable with its IDC 5-pin motherboard connector on one end and the standard USB 2.0 Type A male connector on the other.
3. Specifications
| Feature | Detail |
|---|---|
| Brand | Sewell |
| Model Name | SW-8562 |
| UPC | 685289085629 |
| Connector Type | USB 2.0 (Type A) |
| Cable Type | USB |
| Connector Gender | Male-to-Male |
| Number of Pins | 5 |
| Length | 12 inches (30.5 cm) |
| Data Transfer Rate | 480 Megabits Per Second (USB 2.0) |
| Gauge | 28/24 AWG |
| Maximum Voltage | 5 Volts (DC) |
| Special Feature | Shielded |
| Compatible Devices | Standard Female USB Port Devices |
| Recommended Uses | Adapting devices with a motherboard header connector to a standard USB port |
| Color | Black |
| Specification Met | UL |
4. Setup Instructions
- Identify Connectors: Locate the 5-pin IDC header on your motherboard or internal device. Identify a standard USB 2.0 Type A female port on your computer or an internal USB hub.
- Connect IDC Header: Carefully align the IDC 5 Male connector of the adapter cable with the 5-pin IDC header. Ensure the pins are correctly aligned to avoid bending or damaging them. The cable is designed for a straight pin-to-pin connection.
- Connect USB-A: Plug the USB 2.0 A Male connector into the available standard USB 2.0 Type A female port.
- Verify Connection: Once both ends are connected, ensure they are seated firmly. The connected device should now be recognized by your system.
Important Note: Pay close attention to the orientation of the IDC 5-pin connector. Incorrect orientation or reversed wiring can prevent the device from functioning or potentially cause damage. Some devices may have a key block on the header; ensure the adapter's connector aligns correctly. If unsure, consult your motherboard or device manual for pinout diagrams.
5. Operating Instructions
This adapter cable is a passive component. Once correctly connected, it facilitates the data and power transfer between the IDC 5-pin motherboard header and the USB 2.0 Type A port. No additional software or drivers are required for the cable itself. The functionality of the connected device will depend on its own requirements and drivers.
6. Maintenance
- Keep the cable clean and free from dust and debris.
- Avoid sharp bends or kinks in the cable to prevent internal wire damage.
- Store in a cool, dry place when not in use.
- Do not expose to extreme temperatures or moisture.
7. Troubleshooting
- Device Not Recognized:
- Ensure both the IDC 5-pin connector and the USB-A connector are fully and correctly seated.
- Verify the orientation of the IDC 5-pin connector. Incorrect pin alignment (e.g., reversed power/ground) is a common issue. Refer to your device's manual for the correct pinout.
- Test the connected device directly with a known working USB port if possible, to rule out device malfunction.
- Try connecting the adapter to a different USB 2.0 Type A port.
- Intermittent Connection:
- Check for any physical damage to the cable or connectors.
- Ensure connections are secure and not loose.
- Slow Data Transfer:
- This cable supports USB 2.0 speeds (up to 480 Mbps). If your device requires USB 3.0 or higher, this cable will not provide those speeds.
- Ensure the connected device and the USB port it's connected to are functioning optimally.
8. Warranty and Support
For warranty information and technical support, please refer to the official Sewell website or contact their customer service directly. Product return policies may vary based on the retailer and purchase date.