1. Introduction
The Oxford Oximiser OF950, also known as the Oximiser 600, is an advanced battery optimizer designed to maintain and recover 12V lead-acid batteries with capacities up to 30Ah. This device is suitable for a wide range of vehicles, including motorcycles, cars, ATVs, golf carts, and marine applications. Regular use of the Oximiser OF950 helps to extend battery life and can effectively recover deeply discharged batteries, ensuring optimal performance and reliability.
Key Features:
- Optimizes and maintains 12V lead-acid batteries up to 30Ah.
- Capable of recovering deeply discharged batteries.
- Integrated short-circuit protection for enhanced safety.
- Includes a wall mounting bracket for convenient storage.
- Supplied with both crocodile clips and ring terminal leads for versatile connection options.
2. Safety Information
It is crucial to read and understand all safety instructions before operating the Oxford Oximiser OF950. Failure to comply with these guidelines may result in electric shock, fire, property damage, or serious personal injury. Keep this manual for future reference.
- Use this charger exclusively for 12V lead-acid batteries with capacities up to 30Ah. Do not attempt to charge other battery types or voltages.
- Do not expose the charger to rain, snow, or excessive moisture. Operate in a dry environment.
- Ensure adequate ventilation around the charger and battery during operation to prevent heat buildup.
- Avoid creating sparks or open flames near the battery, especially during charging, as batteries can emit explosive gases.
- Always disconnect the charger from the mains power supply before connecting or disconnecting the battery terminals.
- Keep the device and its accessories out of reach of children and pets.
- Never attempt to charge non-rechargeable batteries.
- If the power cord is damaged, it must be replaced by the manufacturer, its service agent, or similarly qualified persons to avoid a hazard. Do not use the charger with a damaged cord.
- Wear appropriate eye protection and gloves when working with batteries.
3. Package Contents
Please inspect the package contents upon receipt to ensure all components are present and undamaged:
- Oxford Oximiser OF950 Battery Charger Unit (Black)
- Wall Mounting Bracket
- Set of Crocodile Clips (Battery Clamps)
- Set of Ring Terminal Leads (for permanent battery connection)
- User Manual (this document)
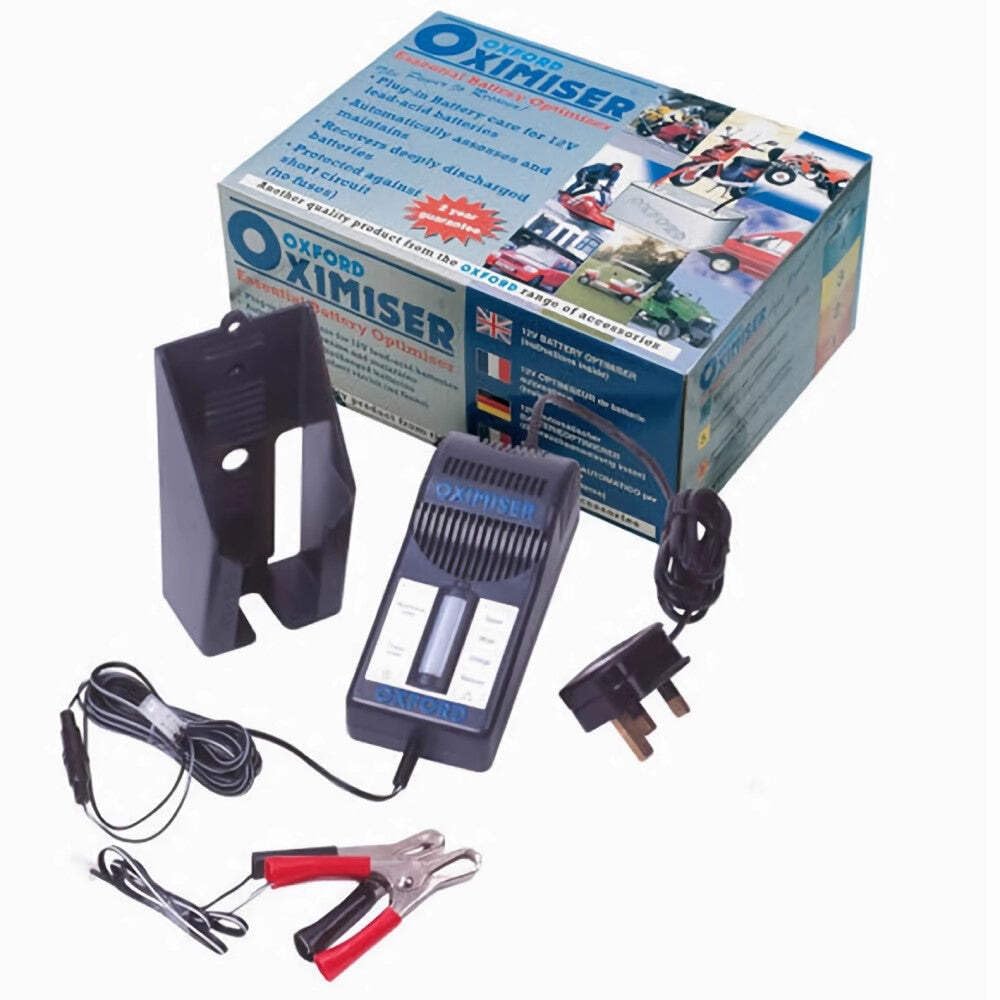
Figure 3.1: Oxford Oximiser OF950 Battery Charger and its accessories.
4. Setup
4.1. Mounting the Charger
The Oximiser OF950 can be conveniently mounted on a wall or other suitable vertical surface using the provided bracket.
- Select a secure location that is dry, well-ventilated, and within reach of a mains power outlet and the battery to be charged.
- Position the wall bracket and mark the drilling points. Secure the bracket to the surface using appropriate screws and wall plugs (not included), ensuring it is firmly attached.
- Slide the Oximiser unit onto the mounted bracket until it securely clicks into place.
4.2. Connecting to the Battery
The Oximiser OF950 offers two methods for connecting to your battery: temporary connection using crocodile clips or permanent connection using ring terminal leads.
- Ensure the Oximiser is disconnected from the mains power supply before making any battery connections.
- Connect the RED (+) connector (either crocodile clip or ring terminal) to the positive (+) terminal of the battery.
- Connect the BLACK (-) connector (either crocodile clip or ring terminal) to the negative (-) terminal of the battery.
- Verify that both connections are secure and free from corrosion. For permanent connections, ensure the ring terminal lead is routed safely and secured to prevent accidental damage or short circuits.
5. Operating Instructions
5.1. Charging Process
- Once the Oximiser is securely connected to the battery, plug the charger into a standard mains power outlet.
- The Oximiser OF950 will automatically initiate its multi-stage charging and optimizing cycle.
- Monitor the indicator lights on the unit to observe the current charging status. These lights typically indicate power on, charging in progress, fully charged/maintenance mode, or a fault condition. Refer to the labels on your specific unit for detailed light interpretations.
- The charger is designed to automatically transition to a long-term maintenance mode once the battery reaches full charge, preventing overcharging and ensuring the battery remains in optimal condition.
5.2. Recovering Deeply Discharged Batteries
The Oximiser OF950 is equipped with a recovery function for deeply discharged 12V batteries. If a battery is severely depleted, the charger may take a longer period to initiate the main charging phase or may display a specific recovery indicator. Simply follow the standard connection procedure; the unit will automatically attempt to recover the battery before proceeding with the normal charging cycle.
6. Maintenance
Proper maintenance ensures the longevity and reliable operation of your Oxford Oximiser OF950.
- Keep the Oximiser unit clean and dry. Wipe the exterior with a soft, slightly damp cloth if necessary. Do not use abrasive cleaners or solvents.
- Regularly inspect all cables, connectors, and the main unit for any signs of damage, fraying, cracks, or corrosion. Replace any damaged components immediately to prevent hazards.
- When not in use, store the Oximiser in a cool, dry place, away from direct sunlight and extreme temperatures.
- Ensure battery terminals are clean and free of corrosion for optimal electrical contact. Clean terminals with a wire brush if necessary.
7. Troubleshooting
Refer to the table below for common issues and their potential solutions.
| Problem | Possible Cause | Solution |
|---|---|---|
| Charger not turning on. | No mains power; faulty power outlet; damaged power cord. | Check the power outlet with another device; ensure the power cord is undamaged and securely plugged into both the charger and the mains. |
| Charger connected but not charging the battery. | Incorrect battery connection (reverse polarity); battery too deeply discharged; faulty battery; incorrect battery type. | Verify positive (+) and negative (-) connections are correct; allow more time for the charger's recovery mode; test the battery with a different device; ensure the battery is a 12V lead-acid type. |
| Charger indicator shows a fault or error. | Short circuit in connections; reverse polarity; internal charger fault. | Disconnect the charger, check all connections for short circuits or reverse polarity, then reconnect carefully. If the fault persists, contact customer support. |
| Battery not holding charge after using Oximiser. | The battery is old, damaged, or has reached the end of its service life and can no longer hold a charge effectively. | While the Oximiser can optimize and recover, it cannot repair a physically damaged or chemically degraded battery. Battery replacement may be necessary. |
8. Specifications
- Model: OF950 (Oximiser 600)
- Brand: Oxford
- Output Voltage: 12 Volts
- Max Battery Capacity: Up to 30 Ah
- Charging Current: Approximately 0.6A (typical for Oximiser 600 series)
- Item Weight: 880 g
- Package Dimensions: 23 x 17 x 10.6 cm
- Color: Black
- Manufacturer: Oxford Products Ltd.
- ASIN: B000R5B386
- Number of Connection Ports: 2 (referring to the two types of leads provided)
9. Warranty and Support
For detailed warranty information, technical assistance, or customer support, please contact Oxford Products Ltd. directly. It is recommended to retain your proof of purchase for any warranty claims.
Official Website: www.oxfordproducts.com
For the most current contact details and support resources, please visit the manufacturer's official website.


