
1. Product Overview
The Cvf Supply 16-Piece Hole Saw Kit is designed for cutting precise holes in wood and thin sheet metal. This kit provides a range of hole saw sizes for various applications, along with essential accessories for assembly and use.
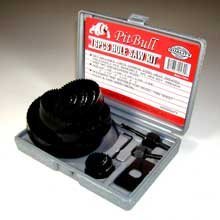
Image 1.1: The Cvf Supply 16-Piece Hole Saw Kit, neatly organized in its blow-molded storage case. The image displays the various carbon steel hole saws, mandrels, and other components.
2. Package Contents
Verify that all components listed below are present in your kit:
- 12 x Carbon Steel Heat Treated Hole Saws:
- 3/4" (19mm)
- 7/8" (22mm)
- 1 1/8" (28mm)
- 1 1/4" (32mm)
- 1 1/2" (38mm)
- 1 3/4" (44mm)
- 2" (51mm)
- 2 1/2" (64mm)
- 3" (76mm)
- 3 1/2" (89mm)
- 4" (102mm)
- 5" (127mm)
- 2 x Mandrels (Arbors)
- 1 x Allen Wrench
- 1 x Door Lock Installation Plate
- 1 x Blow Mold Storage Case
3. Safety Information
Always follow basic safety precautions when using power tools and accessories to reduce the risk of personal injury. Read and understand all instructions before use.
- Wear Personal Protective Equipment (PPE): Always wear safety glasses or goggles to protect your eyes from flying debris. Consider wearing gloves and hearing protection.
- Secure Workpiece: Ensure the material you are cutting is firmly clamped or secured to prevent movement during operation.
- Use Correct Speed: Operate your drill at appropriate speeds for the material being cut. Lower speeds are generally recommended for larger hole saws and harder materials.
- Avoid Overheating: Allow the hole saw to cool periodically, especially when cutting metal, to prevent overheating and prolong tool life.
- Clear Work Area: Keep your work area clean and well-lit. Remove any obstructions or loose items.
- Inspect Tools: Before each use, inspect the hole saw and mandrel for any damage, cracks, or dullness. Do not use damaged tools.
- Disconnect Power: Always disconnect the drill from the power source before changing hole saws or making any adjustments.
- Material Compatibility: This kit is suitable for wood and thin sheet metal. Do not use on masonry, concrete, or thick metals.
4. Setup and Assembly
Follow these steps to properly assemble the hole saw with a mandrel:
- Select Hole Saw: Choose the appropriate size hole saw for your application from the kit.
- Select Mandrel: Identify the correct mandrel for the selected hole saw. The mandrels have threaded shafts that screw into the hole saw.
- Attach Pilot Bit: Ensure the pilot drill bit is securely fastened in the mandrel. Use the provided Allen wrench to tighten the set screw if necessary. The pilot bit guides the hole saw and prevents wandering.
- Screw Hole Saw onto Mandrel: Thread the hole saw onto the mandrel until it is hand-tight. Some mandrels may have pins that engage with holes in the hole saw base for added stability; ensure these are aligned and engaged.
- Secure in Drill Chuck: Insert the shank of the assembled mandrel into the chuck of your power drill. Tighten the chuck securely to prevent slippage during operation.
The door lock installation plate is a guide for specific door lock installations. Refer to your door lock's instructions for its proper use in conjunction with the hole saws.
5. Operating Instructions
Once the hole saw is assembled and secured in your drill, follow these steps for effective and safe operation:
- Mark the Center: Clearly mark the center point of the desired hole on your workpiece.
- Position the Pilot Bit: Place the tip of the pilot drill bit directly on your marked center point.
- Start Slowly: Begin drilling at a slow speed, applying light pressure. This allows the pilot bit to establish the hole and the hole saw teeth to engage the material without binding.
- Increase Speed (Gradually): Once the hole saw teeth have engaged the material, gradually increase the drill speed. Maintain steady, moderate pressure. Avoid excessive force, which can cause overheating or damage to the saw.
- Maintain Control: Hold the drill firmly with both hands if possible, especially with larger hole saws, to maintain control and prevent kickback.
- Clear Debris: Periodically withdraw the hole saw from the cut to clear sawdust or metal shavings, especially when cutting deeper holes. This helps prevent clogging and overheating.
- Complete the Cut: Continue drilling until the hole saw passes completely through the material. Reduce pressure as you near the end of the cut to prevent splintering (in wood) or sudden breakthrough.
- Remove Core: After completing the cut, disconnect the drill from power. Carefully remove the material core from inside the hole saw. A screwdriver or punch may be needed to push out stubborn cores.
Note on Materials: For thin sheet metal, use a slower speed and consider applying a cutting lubricant to reduce friction and heat, which can extend the life of the hole saw.
6. Maintenance
Proper maintenance ensures the longevity and performance of your hole saw kit.
- Cleaning: After each use, clean the hole saws and mandrels. Remove all sawdust, metal shavings, and debris. A brush or compressed air can be effective.
- Lubrication (for metal cutting): If used for metal, ensure any cutting lubricant residue is cleaned off.
- Inspection: Regularly inspect the teeth of the hole saws for dullness or damage. While carbon steel hole saws are not typically sharpened, severely dull or damaged saws should be replaced.
- Storage: Store all components in the provided blow mold storage case. This protects the tools from damage and keeps them organized, preventing loss. Store in a dry environment to prevent rust.
7. Troubleshooting
Refer to this section for common issues and their potential solutions.
| Problem | Possible Cause | Solution |
|---|---|---|
| Hole saw not cutting or cutting slowly. | Dull teeth, incorrect speed, insufficient pressure, material too hard. | Increase pressure slightly, adjust drill speed, ensure material is compatible. If teeth are dull, replace the hole saw. |
| Hole saw binding or getting stuck. | Excessive pressure, incorrect speed, material buildup, kickback. | Reduce pressure, clear debris from the cut, ensure proper drill speed. Secure workpiece firmly. |
| Pilot bit wandering or not starting cleanly. | Pilot bit loose, dull, or not centered. | Ensure pilot bit is securely tightened in the mandrel. Start drilling at a very slow speed. |
| Hole saw wobbling during operation. | Hole saw not securely attached to mandrel, mandrel loose in drill chuck. | Ensure hole saw is fully threaded onto the mandrel. Tighten drill chuck securely around the mandrel shank. |
8. Specifications
- Model: B000P1N05G
- Brand: Cvf Supply
- Material: Carbon Steel
- Number of Pieces: 16 (12 hole saws, 2 mandrels, 1 Allen wrench, 1 door lock installation plate)
- Hole Saw Sizes: 3/4", 7/8", 1 1/8", 1 1/4", 1 1/2", 1 3/4", 2", 2 1/2", 3", 3 1/2", 4", 5"
- Item Weight: Approximately 4 pounds (1.81 kg)
- Package Dimensions: Approximately 15.7 x 8.8 x 1.6 inches (39.9 x 22.4 x 4.1 cm)
- UPC: 689958320196
- Recommended Use: Wood and thin sheet metal
9. Warranty and Support
Specific warranty information for the Cvf Supply 16-Piece Hole Saw Kit is not provided in this manual. For details regarding warranty coverage, returns, or technical support, please refer to the product packaging or contact the retailer or manufacturer directly. Keep your purchase receipt as proof of purchase.