1. Introduction
The Mityvac MV5535 Digital Diesel Compression Test Kit is designed for accurately measuring the compression pressure in diesel engines. This kit features a digital gauge that memorizes the peak compression value for each cylinder, supporting up to 12 cylinders. It is powered by a 9-Volt battery and provides precise readings essential for diagnosing engine performance issues.
2. Safety Information
Always observe standard safety precautions when working on or around vehicle engines. Failure to follow these safety guidelines may result in personal injury or damage to the vehicle or tool.
- Wear appropriate personal protective equipment, including eye protection and gloves.
- Ensure the engine is cool before beginning any testing procedure to avoid burns from hot engine components.
- Disconnect the vehicle's battery ground cable before removing any electrical components or fuel lines, unless otherwise specified by the vehicle manufacturer.
- Be aware of moving engine parts when cranking the engine. Keep hands, tools, and clothing clear.
- Diesel fuel is flammable. Handle with care and ensure adequate ventilation.
- Refer to the vehicle manufacturer's service manual for specific procedures and safety warnings related to your vehicle model.
3. Package Contents
The Mityvac MV5535 Digital Diesel Compression Test Kit includes the following components:
- Digital Compression Gauge
- Flexible Hose Assembly
- Various Diesel Engine Adapters
- Quick-Connect Fittings
- Carrying Case
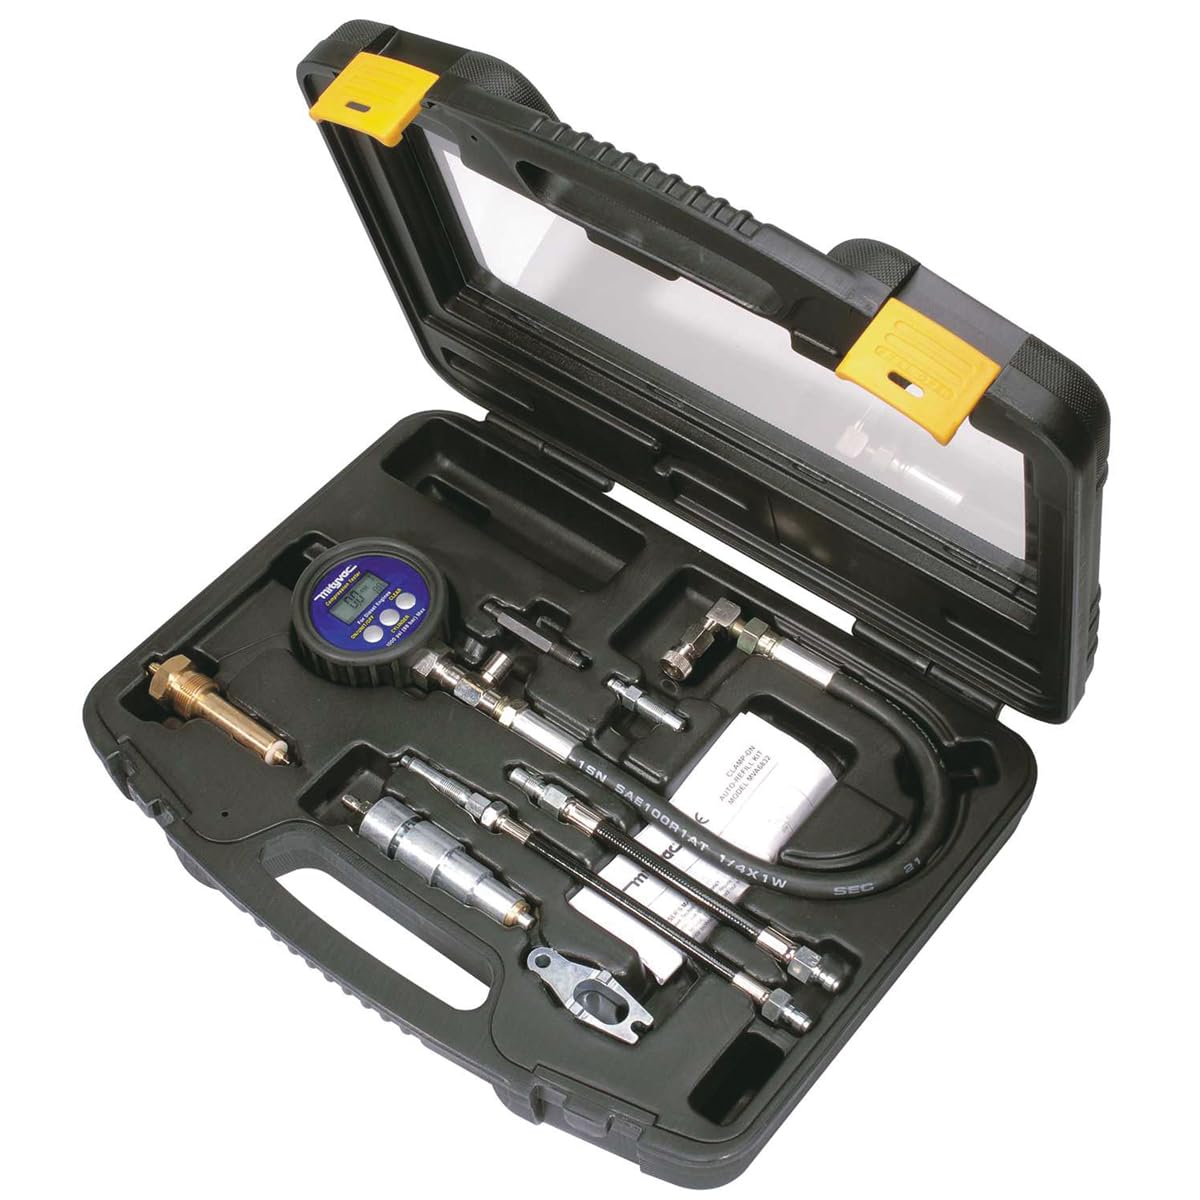
Image 3.1: All components of the Mityvac MV5535 Digital Diesel Compression Test Kit, including the digital gauge, hose, various adapters, and the protective carrying case.
4. Setup
4.1 Battery Installation
- Locate the battery compartment on the back of the digital compression gauge.
- Open the compartment cover.
- Insert a fresh 9-Volt battery, ensuring correct polarity.
- Close the battery compartment cover securely.
4.2 Assembling the Gauge and Hose
- Thread the flexible hose assembly onto the digital compression gauge until hand-tight.
- Ensure all connections are secure to prevent pressure leaks during testing.

Image 4.1: A detailed view of the Mityvac digital compression gauge, showing the display, ON/UNIT/OFF, and CLEAR buttons.
5. Operating Instructions
5.1 Engine Preparation
Proper engine preparation is critical for accurate compression test results.
- Ensure the engine is at operating temperature, then turn it off and allow it to cool slightly to a safe handling temperature.
- Disable the fuel injection system to prevent fuel from entering the cylinders during cranking. Consult your vehicle's service manual for the specific procedure (e.g., disconnecting the fuel pump relay or injector harness).
- Remove all glow plugs or fuel injectors from the cylinders. This allows the engine to crank freely and provides access for the compression tester adapters. Keep track of the order of removal for reinstallation.
- Ensure the vehicle's battery is fully charged to allow for consistent engine cranking speed during the test.
5.2 Compression Testing Procedure
- Select the appropriate adapter for the cylinder being tested. Thread the adapter into the glow plug or injector port until hand-tight.
- Connect the quick-connect fitting of the flexible hose assembly to the installed adapter.
- Press the ON/UNIT/OFF button on the digital gauge to power it on. The display will show '0.0' and the cylinder number.
- Crank the engine for several revolutions (typically 4-7 seconds) until the peak compression reading stabilizes on the gauge display. The gauge will automatically hold the peak value.
- Record the compression reading for the current cylinder.
- Press the CLEAR button to reset the gauge for the next cylinder.
- Disconnect the hose assembly from the adapter and move to the next cylinder. Repeat steps 1-6 for all remaining cylinders.
- After testing all cylinders, press and hold the ON/UNIT/OFF button to turn off the gauge.
- Remove all adapters and reinstall glow plugs or injectors according to the vehicle manufacturer's specifications. Reconnect the fuel system and battery.
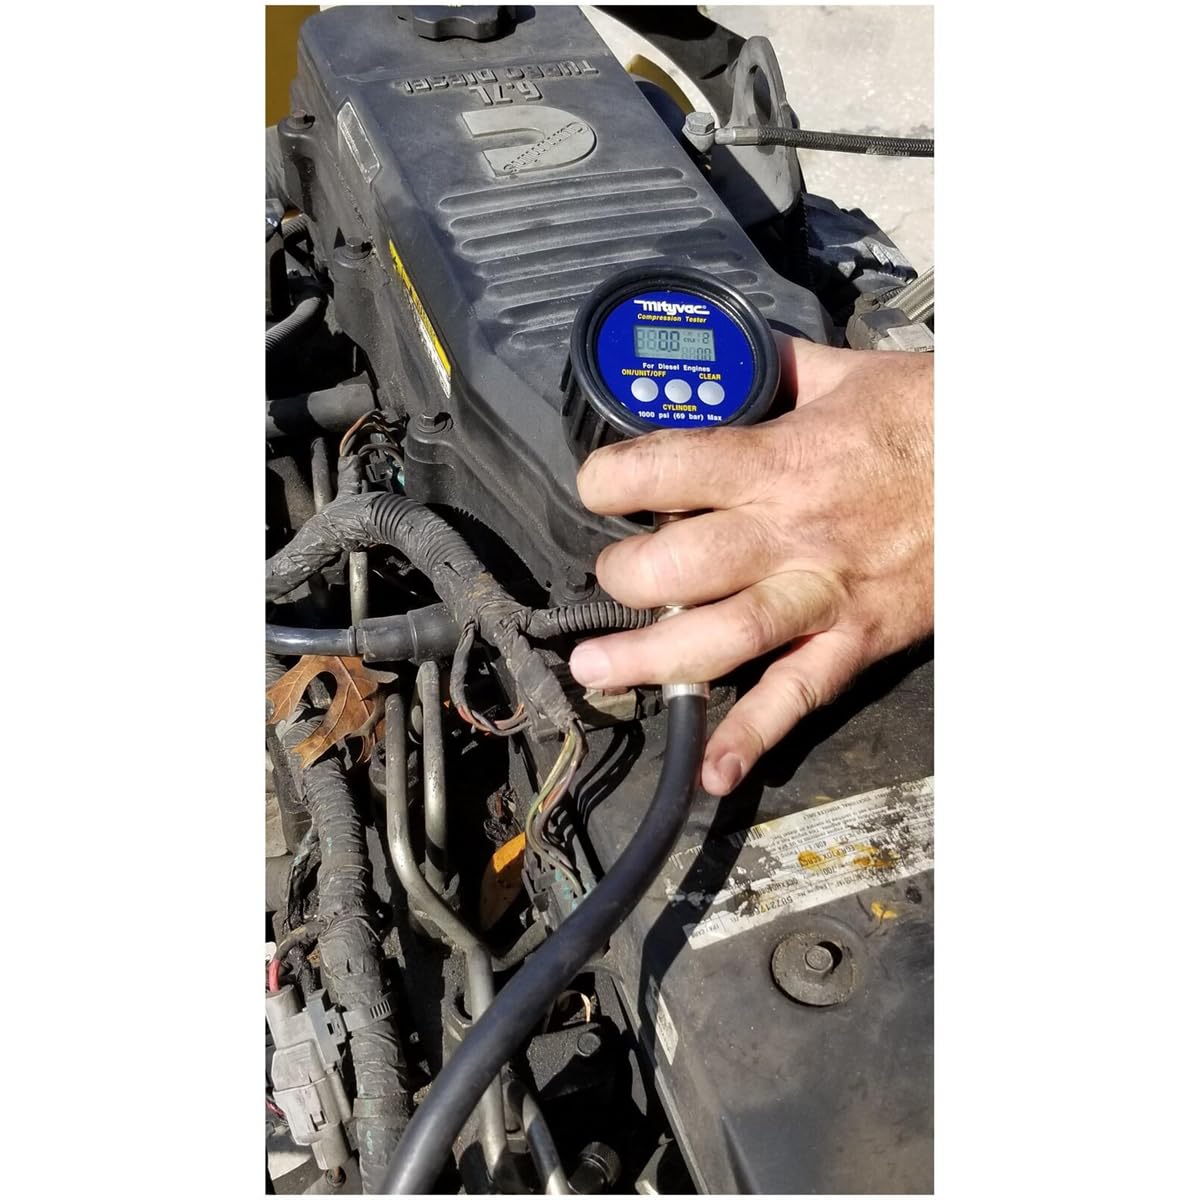
Image 5.1: The Mityvac digital compression gauge connected to a diesel engine, showing the testing process.

Image 5.2: The digital display of the gauge showing a compression reading during operation.
5.3 Interpreting Results
Compare the recorded compression values to the specifications provided in your vehicle's service manual. Significant variations (typically more than 10-15%) between cylinders or readings below the manufacturer's minimum specification may indicate internal engine issues such as worn piston rings, valve problems, or head gasket leaks.
6. Maintenance
6.1 Cleaning
After each use, wipe down the digital gauge, hose, and adapters with a clean, dry cloth to remove any oil, fuel, or debris. Do not use harsh solvents or abrasive cleaners.
6.2 Storage
Store the kit in its original carrying case in a clean, dry environment away from extreme temperatures and direct sunlight. Ensure all components are clean and dry before storage.
6.3 Battery Replacement
Replace the 9-Volt battery when the low battery indicator appears on the display or if the gauge fails to power on. Refer to section 4.1 for battery installation instructions.
7. Troubleshooting
- Gauge does not power on: Check the 9-Volt battery. Ensure it is correctly installed and has sufficient charge. Replace if necessary.
- Inaccurate or inconsistent readings:
- Verify all connections (adapter to cylinder, hose to adapter, hose to gauge) are secure and free of leaks.
- Ensure the engine is cranking consistently and at the correct speed. A weak vehicle battery can affect cranking speed and test results.
- Confirm that all glow plugs or injectors have been removed from the cylinders being tested.
- Ensure the fuel system is properly disabled.
- No reading displayed: Check all connections for proper sealing. Ensure the gauge is powered on and the battery is functional.
8. Specifications
| Feature | Specification |
|---|---|
| Model Number | MV5535 |
| Maximum Pressure | 1000 psi (69 bar) |
| Power Source | 9-Volt Battery |
| Material | Metal components |
| Item Weight | 4.4 Pounds |
| Cylinder Capacity | Up to 12 cylinders |
9. Warranty and Support
For warranty information, technical assistance, or replacement parts, please contact Mityvac customer support directly. It is recommended to purchase Mityvac products from authorized distributors to ensure full warranty coverage and support.
You can visit the official Mityvac website or refer to the contact information provided with your product packaging for the most current support details.