1. Overview
The Shop Fox W1671 3/4 HP Heavy-Duty Mortising Machine is designed for precision woodworking, specifically for creating mortise and tenon joints. This robust benchtop machine is engineered to provide accurate and fast operation, eliminating common issues like unwanted wood movement and sticking chisels. Its unique design features, such as a swiveling base and a powerful motor, make it suitable for a wide range of furniture and woodworking projects requiring strong, clean joints.
Key Features:
- Powerful Motor: 3/4 HP, totally enclosed, fan-cooled motor with an aluminum finned housing for cool and long-lasting operation.
- High Spindle Speed: 3450 RPM for efficient cutting and reduced heat buildup.
- Sturdy Construction: Heavy cast iron base and headstock for stability and vibration reduction.
- Large Work Table: 6-inch by 16-inch table provides ample support for workpieces.
- Secure Workpiece Handling: Heavy-duty fence and cast iron hold-down system prevent wood movement.
- Versatile Hold-Down: Includes three different lengths of support posts to accommodate wood up to 8.5 inches thick.
- Micro-Adjustable Fence: Y-axis micro-adjustable stop for precise mortise width and location adjustments.
- Dual Column Support: Dual hardened and ground headstock column supports with a rack and pinion elevation system for smooth, accurate travel.
- Easy Chisel Access: Two-door chuck access for quick and convenient chisel changes.
- Chisel Compatibility: Accepts chisels with 5/8-inch or 3/4-inch shanks, with supplied bushing adapters. A 1/2-inch chisel is included.
- Adjustable Handle: Extra-long steel handle with six indexed positions for optimal leverage and control over 9 inches of head travel.
- Unique Swiveling Base: Allows for off-the-bench operations and increased capacity for larger workpieces.
- Adjustable Depth Stop: All-steel quick-adjust depth stop for repeatable mortise depths.

Figure 1: Shop Fox W1671 Mortising Machine with key features labeled, including the adjustable depth stop rod, adjustable length handle, double support columns, hydraulic cylinder for softer releases, unique swiveling base, extra large 11" x 14" base, extra long cast iron fence, 3/4 HP motor, and doors on both sides providing easy access to the drill chuck.
2. Safety Information
WARNING: Always wear safety glasses or a face shield when operating or adjusting this equipment. Failure to do so may result in serious personal injury.
Before operating the mortising machine, ensure you have read and understood all safety instructions provided in the product manual. Keep hands clear of the cutting area during operation. Ensure the workpiece is securely clamped before beginning any mortising operation. Disconnect power before performing any maintenance or adjustments.
3. Setup
3.1 Unpacking and Assembly
The machine may arrive in more than one box. Carefully unpack all components and verify against the packing list. Assemble the base and headstock unit according to the detailed instructions in the included printed manual. Ensure all fasteners are tightened securely.
3.2 Installing Chisels and Bits
- Open the two-door chuck access on the headstock.
- Insert the desired hollow mortising chisel into the machine. The machine accepts chisels with 5/8-inch or 3/4-inch shanks. Use the supplied bushing adapters if necessary.
- Insert the matched special mortising drill bit into the 1/2-inch drill chuck. Ensure the bit is securely tightened.
- Close the chuck access doors.
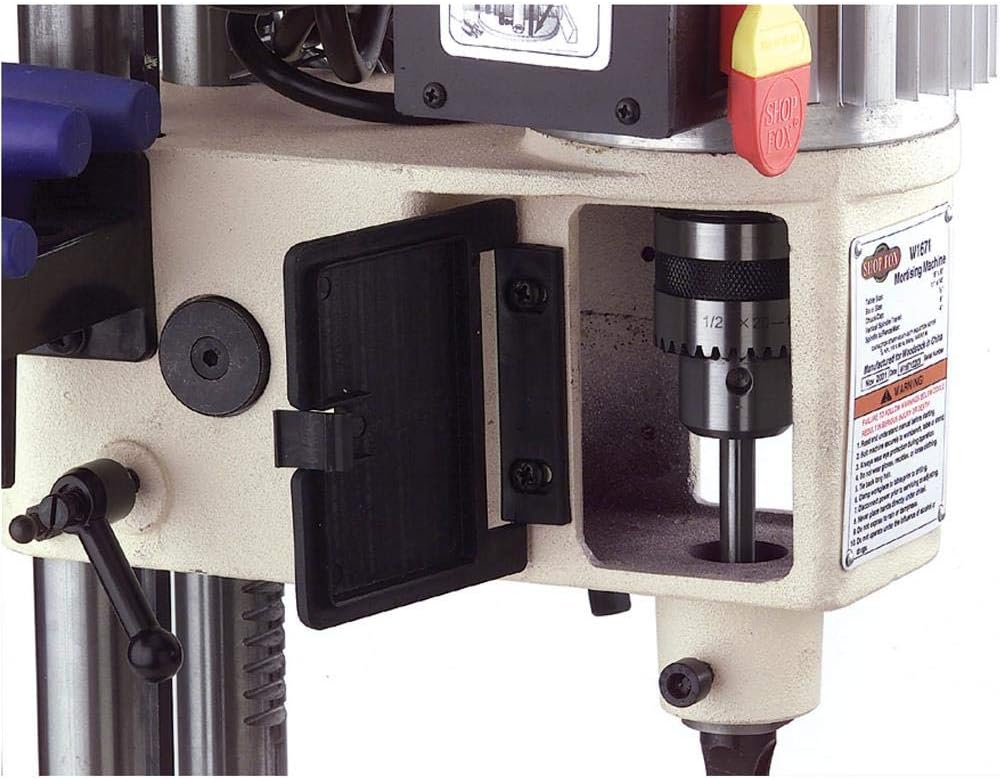
Figure 2: Easy access to the 1/2-inch drill chuck for installing and changing chisels and bits.
3.3 Adjusting the Fence and Hold-Down
Position the heavy-duty fence to support your workpiece. Use the Y-axis micro-adjustable stop for fine-tuning the mortise width and location. Secure the cast iron hold-down to firmly grip the workpiece, preventing any movement during operation. Select the appropriate length of support posts for the hold-down based on the thickness of your material (up to 8.5 inches).

Figure 3: Detail of the swiveling base and micro-adjustable fence for precise workpiece positioning.
3.4 Setting the Depth Stop
Adjust the all-steel quick-adjust depth stop to the desired mortise depth. Lock the depth stop in place to ensure consistent and repeatable mortises across multiple cuts.
3.5 Utilizing the Swiveling Base
For mortising larger stock or for off-the-bench operations, the unique swiveling base can be adjusted. This feature expands the machine's capacity and opens new possibilities for custom mortises.
4. Operating the Mortising Machine
4.1 Basic Mortising Process
- Ensure the workpiece is securely clamped to the table using the fence and hold-down.
- Align the chisel and bit with the desired starting point for the mortise.
- Using the adjustable handle, steadily lower the headstock unit. The drill bit leads the cut, removing material, while the hollow chisel squares off the corners.
- Apply consistent pressure. The gas spring provides additional support for a steady mortising action and smooth chisel releases.
- Once the desired depth is reached (controlled by the depth stop), raise the headstock unit.
- For longer mortises, reposition the workpiece and repeat the process, overlapping cuts slightly to create a continuous mortise.

Figure 4: Proper operation of the mortising machine, demonstrating how to apply pressure using the handle.
4.2 Working with Different Wood Types
The 3/4 HP motor and 3450 RPM spindle speed allow the machine to power through both hard and soft woods with ease. For harder woods, a slightly slower feed rate may be beneficial to prevent excessive heat buildup and ensure clean cuts. Always ensure your chisels are sharp for optimal performance across all wood types.
4.3 Video Demonstration
Video 1: A detailed demonstration of the Shop Fox W1671 Mortising Machine, showcasing its features, how the hollow chisel works, and the process of creating mortises. This video provides visual guidance on setup and operation.
5. Maintenance
5.1 Cleaning
Regularly clean the machine to remove wood chips, dust, and debris. Use a brush or compressed air to clear the work area, columns, and motor housing. Ensure the fan-cooled motor's fins are free from obstruction to maintain optimal cooling.
5.2 Chisel Sharpening
Maintain sharp chisels for efficient and clean mortising. Dull chisels can lead to burning, increased effort, and poor cut quality. Sharpen chisels as needed or replace them if they become excessively worn or damaged. Additional chisels are available in various sizes (1/4-inch to 3/4-inch).
5.3 General Inspection
Periodically inspect all moving parts, fasteners, and electrical connections. Ensure the dual hardened and ground headstock column supports are clean and lubricated for smooth operation. Check for any signs of wear or damage and address them promptly to ensure continued accuracy and safety.
6. Troubleshooting
6.1 Wood Burning During Mortising
- Dull Chisel: Ensure the mortising chisel and bit are sharp.
- Feed Rate: Reduce the feed rate, especially when working with harder woods.
- Chip Clearance: Ensure chips are being effectively cleared from the mortise.
6.2 Chisel Getting Stuck
- Workpiece Secureness: Verify the workpiece is firmly held by the hold-down and fence.
- Feed Pressure: Apply steady, even pressure. Avoid excessive force.
- Chisel Condition: A dull or damaged chisel can bind.
6.3 Inaccurate or Uneven Mortises
- Workpiece Movement: Re-check the hold-down and fence for secure clamping.
- Column Play: Ensure the headstock columns are clean and free from debris that could cause side-to-side play.
- Depth Stop: Confirm the depth stop is correctly set and locked.
7. Specifications
| Feature | Specification |
|---|---|
| Model Number | W1671 |
| Manufacturer | Shop Fox |
| Horsepower | 0.75 HP |
| Voltage | 110 Volts |
| Power Source | Corded-Electric |
| Item Weight | 90 pounds |
| Product Dimensions | 19.3 x 17.1 x 25.7 inches |
| Table Size | 6" x 16" |
| Max. Stock Thickness | 8-3/4" (with swiveling base) |
| Head Travel | 9 inches |
| Chuck Size | 1/2" |
| Chisel Shank Sizes Accepted | 5/8", 3/4" (adapters included) |
| Included Components | 1/2" Mortising Chisel, Mortising Machine |
8. Warranty and Support
For warranty information, technical support, or to order replacement parts, please refer to the official Shop Fox documentation included with your product or visit the manufacturer's website. Keep your purchase receipt for warranty claims.


