1. Introduction
This manual provides essential information for the setup, operation, and maintenance of your Numark TTUSB Turntable. Please read these instructions carefully before using the product to ensure proper function and longevity.
2. Package Contents
Verify that all items listed below are included in your package:
- Numark TTUSB Turntable
- USB Cable
- RCA Audio Cables
- Power Adapter
- EZ Vinyl / Tape Converter Software (CD or download instructions)
- Quickstart Guide
3. Setup
3.1 Turntable Assembly
Some minor assembly is required before first use. Carefully follow the instructions provided in the Quickstart Guide for attaching the platter, belt, and tonearm counterweight. Ensure the belt is correctly positioned around the motor pulley and the platter. Proper calibration of the tonearm counterweight is crucial for optimal sound quality and to prevent damage to your records and stylus.
3.2 Connecting to Audio System
The TTUSB turntable offers both RCA line outputs for connection to a traditional stereo system and a USB output for computer connectivity.
- RCA Output: Connect the included RCA audio cables from the TTUSB's RCA outputs to an available audio input on your stereo receiver or amplifier. Ensure the input selected on your receiver matches the connection (e.g., 'Aux', 'Line In').
- USB Output: Connect the included USB cable from the TTUSB's USB port to an available USB port on your computer (PC or Mac). This connection allows for digital audio transfer for recording.
- 1/8" Stereo Line Input: An additional 1/8" stereo line input is available for connecting external audio sources, such as a cassette player, allowing you to digitize other media.
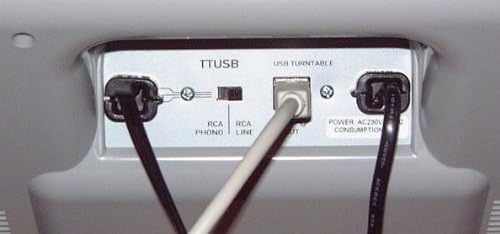
Image: Rear panel connections of the Numark TTUSB, illustrating the RCA outputs, USB port, and power input.
3.3 Software Installation
For converting vinyl to digital audio, install the EZ Vinyl / Tape Converter software or Audacity (available for free online). Follow the on-screen instructions for installation. Ensure your computer recognizes the TTUSB as an audio input device after connecting via USB.
4. Operating Instructions
4.1 Playing Records
- Place a record on the platter.
- Select the appropriate speed (33 1/3 RPM or 45 RPM) using the speed selector switch.
- Press one of the large START/STOP buttons to begin platter rotation.
- Manually lift the tonearm and position the stylus over the desired track on the record. Gently lower the tonearm onto the record.
- To stop playback, manually lift the tonearm from the record and return it to its rest. Press the START/STOP button to halt platter rotation.
Note: The TTUSB features manual tonearm operation; there is no automatic arm dropdown or return function.
4.2 Adjusting Playback
- Pitch Control: Use the adjustable pitch control slider (±10%) to fine-tune the playback speed. This is useful for matching pitch with other instruments or correcting slight variations in record pressing.
- Anti-Skate Control: Adjust the anti-skate control to ensure even pressure on both groove walls, which improves stereo balancing and reduces stylus wear. Refer to the Quickstart Guide for initial calibration.
4.3 Recording to Computer
To convert your vinyl collection to digital files:
- Ensure the TTUSB is connected to your computer via USB and recognized as an audio input device.
- Open your chosen recording software (e.g., EZ Vinyl / Tape Converter, Audacity).
- Select the TTUSB as the input source within the software settings.
- Start recording in the software, then begin playing your record on the turntable.
- Monitor the audio levels within the software to prevent clipping or distortion.
- After recording, use the software's editing features to split tracks, remove noise, and export to your desired audio format (e.g., MP3, WAV).

Image: Audacity software displaying audio input levels during a recording session.
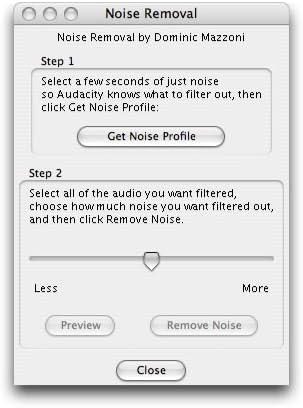
Image: Audacity's Noise Removal dialog, illustrating steps to reduce unwanted background noise from recorded audio.
5. Maintenance
5.1 Cleaning
- Turntable Body: Wipe the turntable's surface with a soft, dry cloth. Avoid using harsh chemicals or abrasive cleaners.
- Records: Keep your records clean to ensure optimal sound quality and prolong stylus life. Use a dedicated record cleaning brush before each play.
- Stylus: Periodically clean the stylus using a soft brush designed for stylus cleaning, brushing gently from back to front.
5.2 Stylus and Cartridge Replacement
The stylus is a consumable part and will wear out over time, affecting sound quality. Replace the stylus when you notice a degradation in sound or after approximately 500-1000 hours of playback. The TTUSB uses a standard cartridge that can be replaced with compatible models if an upgrade or replacement is desired.
Note: The Numark TTUSB does not include a dust cover. It is recommended to cover the turntable when not in use to protect it from dust and debris.
6. Troubleshooting
- No Sound Output:
- Ensure all audio cables (RCA or USB) are securely connected.
- Verify the correct input source is selected on your stereo system or computer.
- Check the tonearm counterweight calibration; improper setting can lead to poor sound or no sound. - Distorted or Poor Sound Quality:
- Re-calibrate the tonearm counterweight and anti-skate settings.
- Clean the stylus and record.
- Ensure the record is flat and free of debris.
- If using USB, check recording levels in your software to avoid clipping.
- Consider replacing the stylus or upgrading the cartridge if wear is suspected. - USB Connection Issues:
- Try a different USB port on your computer.
- Ensure all necessary drivers are installed (usually automatic with modern OS, but check software documentation).
- Restart your computer and the recording software. - Platter Not Spinning:
- Check power connection.
- Ensure the drive belt is correctly installed and not slipped off the motor pulley or platter.
7. Specifications
| Feature | Specification |
|---|---|
| Brand | Numark |
| Model Name | TTUSB |
| Maximum Rotational Speed | 45 RPM (also supports 33 1/3 RPM) |
| Connectivity Technology | Wired (USB, RCA) |
| Special Features | Adjustable pitch control ±10%, USB computer connectivity, 1/8" stereo line input, RCA line outputs, Adjustable Anti-Skate control |
| Material | Aluminum |
| Item Weight | 3.5 Kilograms |
| Power Source | Corded Electric |
| Signal-to-Noise Ratio | 60 dB |
| Compatible Devices | Personal Computer, Headphone, MP3 Player |
8. Warranty Information
The Numark TTUSB Turntable comes with a 1-year parts and labor warranty from the date of purchase. This warranty covers manufacturing defects and workmanship under normal use. Please retain your proof of purchase for warranty claims. For full terms and conditions, refer to the warranty card included with your product or visit the official Numark website.
9. Support
For technical support, troubleshooting assistance, or further product information, please visit the official Numark website or contact their customer service department. Online resources often include FAQs, driver downloads, and additional guides.


