Introduction
This manual provides instructions for the safe and effective use of the NEIKO 01925A Screw-Extractor and Left-Hand Drill-Bit Set. This 10-piece kit is designed for removing broken screws, studs, and bolts from various materials, including wood and metal. Please read these instructions carefully before use and retain them for future reference.
Safety Information
WARNING: This product may expose you to chemicals known to the State of California to cause cancer and birth defects or other reproductive harm. For more information, go to www.P65Warnings.ca.gov.
Always wear appropriate personal protective equipment, including safety glasses and gloves, when using this tool set. Ensure your work area is well-lit and clear of obstructions. Do not force tools; use the correct size and technique for the fastener being removed.
What's in the Box
The NEIKO 01925A Screw-Extractor and Left-Hand Drill-Bit Set includes the following components, stored in a durable metal index carrying case:
- Left-Hand Drill Bits (HSS M2 Steel): 5/64", 7/64", 5/32", 1/4", 19/64"
- Matching Alloy Extractors (Spiral Flute): #1, #2, #3, #4, #5
- Metal Carrying Case

Image: The complete 10-piece NEIKO 01925A Screw-Extractor and Left-Hand Drill-Bit Set, neatly organized within its red metal carrying case.
Setup
Before beginning any extraction task, ensure you have the following:
- Appropriate personal protective equipment (safety glasses, gloves).
- A reversible drill.
- A center punch (optional, but recommended for precise drilling).
- Penetrating lubricant (optional, for seized fasteners).
- A clean and stable work surface.
Operating Instructions: Removing Stripped or Broken Fasteners
Follow these steps carefully to remove stripped or broken screws, studs, or bolts:
Step 1: Prepare the Fastener
If the broken fastener has an uneven surface, use a center punch to create a small indentation in the exact center. This helps guide the drill bit and prevents it from wandering.

Image: A close-up view showing a drill bit precisely centered on a broken fastener, creating a pilot hole.
Step 2: Select the Correct Drill Bit
Choose a left-handed drill bit that has a smaller diameter than the broken fastener. Using a bit that is too large may damage the surrounding material or prevent the extractor from gripping effectively. The drill bits are made from cobalt fortified high-speed steel for durability.

Image: The NEIKO screw extractor set, displaying the various sizes of left-hand drill bits and spiral extractors, clearly labeled for selection.
Step 3: Drill the Pilot Hole
Attach the selected left-handed drill bit to your reversible drill. Set the drill to reverse (counter-clockwise) rotation. Carefully drill down into the center of the broken fastener, maintaining a straight alignment. Drill approximately 1/8 to 1/4 inch deep. The left-hand rotation of the drill bit may, in some cases, loosen and remove the fastener without needing the extractor.
Step 4: Insert the Screw Extractor
Remove the drill bit and select the appropriate spiral flute extractor. The extractor should be slightly larger than the pilot hole you just drilled. Gently tap the tip of the screw extractor into the drilled hole with a hammer to ensure a secure fit. The spiral flutes are designed to dig into the screw, increasing grip as torque is applied.
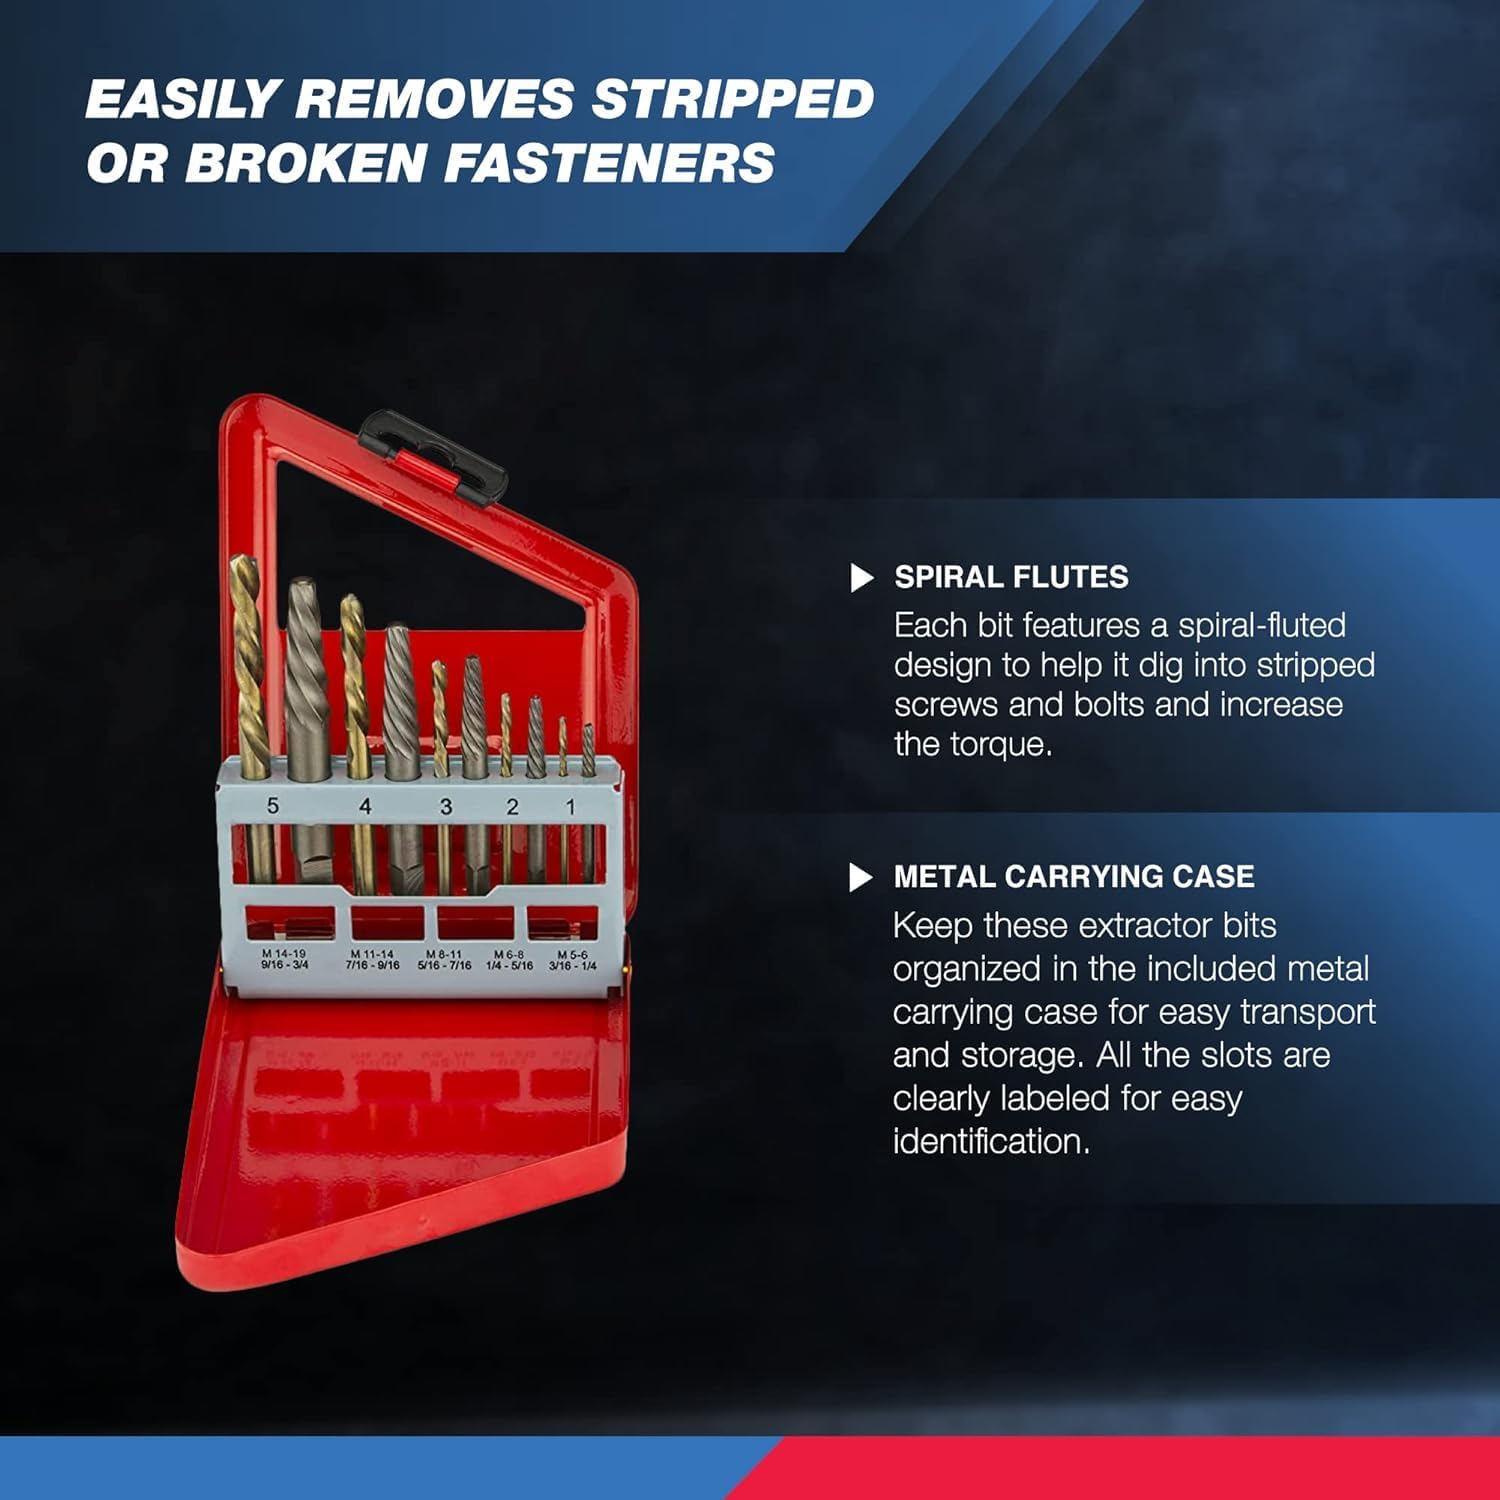
Image: A close-up view of a spiral flute extractor being inserted into the pilot hole of a broken fastener, ready for extraction.
Step 5: Extract the Fastener
Using a tap wrench or an adjustable wrench, turn the extractor counter-clockwise. Apply steady, firm pressure. As you turn, the spiral flutes will grip or bite into the hole. Continue turning counter-clockwise and apply a slight pulling force to completely remove the stripped or broken screw.
Product Features
- Bolt Extractors: Designed to effectively remove broken screws, studs, bolts, and other fittings.
- Left-Handed Drill Bits: Made from cobalt fortified HSS M2 steel for enhanced durability and extended service life. Their reverse action helps prevent further tightening of the fastener.
- Spiral Flutes: The extractors feature spiral flutes that dig into the fastener, increasing grip and torque for efficient removal.
- Metal Carrying Case: Provides organized storage and easy transport for all components, with clearly labeled sizes.
Specifications
| Feature | Detail |
|---|---|
| Model Number | 01925A |
| Material | Cobalt HSS M2 Steel (Drill Bits), Alloy (Extractors) |
| Number of Pieces | 10 (5 drill bits, 5 extractors) |
| Drill Bit Sizes | 5/64", 7/64", 5/32", 1/4", 19/64" |
| Extractor Sizes | #1, #2, #3, #4, #5 |
| Shank Type | Threaded |
| Finish Type | Steel |
| Tool Flute Type | Spiral |
| Item Dimensions | 5.67 x 4.49 x 0.79 inches |
Troubleshooting
If you encounter difficulties while using the screw extractor set, consider the following:
- Bit Breakage: Ensure you are using the correct size drill bit for the fastener. Apply steady, even pressure and avoid excessive force. Drill slowly and use cutting fluid if working with hard metals.
- Extractor Not Gripping: Verify that the pilot hole is centered and of the appropriate size for the extractor. The extractor should be slightly larger than the hole. Tap the extractor firmly into the hole to ensure a good bite before turning.
- Fastener Still Seized: Apply penetrating lubricant to the fastener and allow it to soak for an extended period. Heat can also be applied carefully to the surrounding material (not the fastener itself) to help expand it, but exercise extreme caution.
Maintenance
To ensure the longevity and performance of your NEIKO Screw-Extractor and Left-Hand Drill-Bit Set:
- Clean bits and extractors after each use to remove debris and metal shavings.
- Store the set in its original metal carrying case to protect the tools from damage and corrosion.
- Periodically apply a light coat of oil to the bits and extractors to prevent rust, especially if stored in humid environments.
Warranty and Support
For warranty information or technical support regarding your NEIKO 01925A Screw-Extractor and Left-Hand Drill-Bit Set, please refer to the manufacturer's official website or contact their customer service department. Keep your purchase receipt as proof of purchase.