
1. Introduction
This manual provides detailed instructions for the installation, configuration, and operation of your SMC SMCWBR14-G2 Barricade g Wireless Cable/DSL Broadband Router. This device enables multiple computers to share a single broadband internet connection wirelessly or via wired Ethernet, and provides network security features.
The SMCWBR14-G2 operates on the 2.4 GHz frequency band, supporting IEEE 802.11b/g wireless standards with a maximum transmission speed of 54 Mbps. It includes a built-in 4-port switch for wired connections.
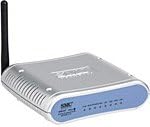
Figure 1: SMC SMCWBR14-G2 Wireless Broadband Router. This image shows the compact, silver-colored router with a blue front panel, featuring indicator lights and a single external antenna on the left side.
2. Setup Guide
2.1 Package Contents
Before proceeding, ensure all items are present:
- SMC SMCWBR14-G2 Wireless Broadband Router
- Power Adapter
- Ethernet Cable
- Quick Installation Guide (if included)
2.2 Physical Connection
- Power Connection: Connect the provided power adapter to the router's power input and then to a wall outlet. The router will power on automatically.
- WAN Connection: Connect one end of an Ethernet cable to the WAN port (often labeled "Internet" or "WAN") on the router. Connect the other end to your Cable or DSL modem.
- LAN Connection (Optional): For wired devices, connect an Ethernet cable from one of the router's LAN ports (labeled 1-4) to your computer's Ethernet port.
- Antenna: Ensure the external antenna is securely attached and oriented for optimal signal reception.
2.3 Initial Configuration (Web Interface)
To configure the router, access its web-based management interface:
- Ensure your computer is connected to the router via an Ethernet cable or wirelessly (if the default wireless network is active).
- Open a web browser (e.g., Chrome, Firefox, Edge).
- In the address bar, type the router's default IP address (commonly 192.168.2.1 or 192.168.1.1) and press Enter. Refer to the label on the bottom of your router for the exact IP address and default login credentials.
- Enter the default username and password when prompted. Common defaults are admin/smcadmin or admin/password.
- Follow the on-screen setup wizard to configure your internet connection type (e.g., DHCP, PPPoE) and wireless settings.
2.4 Wireless Network Configuration
It is crucial to secure your wireless network:
- Change SSID: Modify the default Wireless Network Name (SSID) to a unique name.
- Enable Security: Select WPA2-PSK (recommended) or WPA-PSK encryption. Avoid WEP as it is less secure.
- Set Password: Create a strong, unique password (passphrase) for your wireless network.
- Save Settings: Apply and save all changes. The router may restart.
3. Operation
3.1 Internet Access
Once configured, devices connected to the router (wired or wireless) should automatically obtain an IP address and gain internet access. Verify by opening a web browser and navigating to a website.
3.2 Network Status Indicators
The front panel LEDs provide status information:
- Power LED: Indicates the router is powered on.
- WAN LED: Indicates connection to the internet modem. Blinks during data activity.
- LAN LEDs (1-4): Indicate active wired connections to devices. Blinks during data activity.
- WLAN LED: Indicates wireless functionality is active. Blinks during wireless data activity.
3.3 Access Point Mode
The SMCWBR14-G2 supports Access Point Mode, allowing it to extend an existing wired network with wireless capabilities. This feature can be configured within the router's web interface under the operating mode settings.
4. Maintenance
4.1 Firmware Updates
Periodically check the SMC support website for updated firmware. Firmware updates can improve performance, add features, and address security vulnerabilities. Follow the instructions provided with the firmware download carefully to avoid damaging the device.
Note: Early versions of the router's firmware may require an update to enable full functionality, such as the "release renew" IP feature.
4.2 Optimal Placement
Place the router in a central location, away from obstructions and sources of interference (e.g., cordless phones, microwave ovens). Ensure adequate ventilation around the device to prevent overheating, which can affect performance and longevity.
4.3 Resetting the Router
If the router becomes unresponsive or you need to restore factory default settings, perform a power cycle. Disconnect the power adapter from the router, wait 10-15 seconds, then reconnect it. The router will restart with its current configuration.
Note: This model does not feature a dedicated physical reset button. All resets to factory defaults must be performed via the web interface, or by power cycling for a soft reboot.
5. Troubleshooting
5.1 No Internet Access
- Check Cables: Ensure all Ethernet cables are securely connected to the correct ports (WAN to modem, LAN to computer).
- Modem Status: Verify your Cable/DSL modem is working correctly and has an active internet connection.
- Router LEDs: Check the WAN LED on the router. If it's off or not blinking, there might be an issue with the connection to the modem or your ISP.
- Power Cycle: Power cycle both your modem and router. Disconnect power from both, wait 30 seconds, then reconnect power to the modem first. Once the modem is fully online, reconnect power to the router.
- IP Address Renewal: Access the router's web interface and look for an option to "Release/Renew IP Address" for the WAN connection.
5.2 Wireless Connection Drops Frequently
- Interference: Move the router away from other electronic devices that might cause interference (e.g., microwaves, cordless phones, Bluetooth devices).
- Channel Selection: In the router's wireless settings, try changing the wireless channel. Channels 1, 6, and 11 are often recommended as non-overlapping channels.
- Signal Strength: Ensure devices are within a reasonable range of the router. Obstacles like walls and floors can degrade signal quality.
- Firmware: Ensure the router has the latest firmware installed.
5.3 Cannot Access Router Web Interface
- IP Address: Double-check the router's IP address.
- Wired Connection: Try connecting your computer directly to one of the router's LAN ports with an Ethernet cable.
- IP Settings: Ensure your computer is set to obtain an IP address automatically (DHCP).
- Firewall/Antivirus: Temporarily disable any firewall or antivirus software on your computer to see if it's blocking access.
6. Specifications
| Feature | Detail |
|---|---|
| Product Type | Wireless Router |
| Model | SMCWBR14-G2 |
| Brand | SMC |
| Wireless Standard | IEEE 802.11b/g |
| Frequency Band | 2.4 GHz (2.412 GHz to 2.462 GHz) |
| Transmission Speed | Up to 54 Mbps |
| Channels | 1 to 11 (USA & Canada) |
| Number of Ports | 4 x LAN, 1 x WAN |
| Connectivity Technology | Wireless, Wired |
| Special Features | Access Point Mode |
| Compatible Devices | Personal Computer |
| Operating System | RouterOS (internal firmware) |
| RAM Memory Installed Size | 64 MB |
| Product Dimensions | 27.94 x 19.69 x 7.62 cm |
| Item Weight | 408 g |
| Date First Available | Sept. 25, 2008 |
7. Warranty and Support
7.1 Warranty Information
The SMC SMCWBR14-G2 Wireless Broadband Router comes with a Lifetime Limited Warranty. Please refer to the official SMC warranty documentation for specific terms, conditions, and limitations. Keep your proof of purchase for warranty claims.
7.2 Technical Support
For technical assistance, firmware downloads, or further information, please visit the official SMC support website. Have your product model number (SMCWBR14-G2) and serial number ready when contacting support.
Note: Product support resources may vary based on region and product lifecycle.


